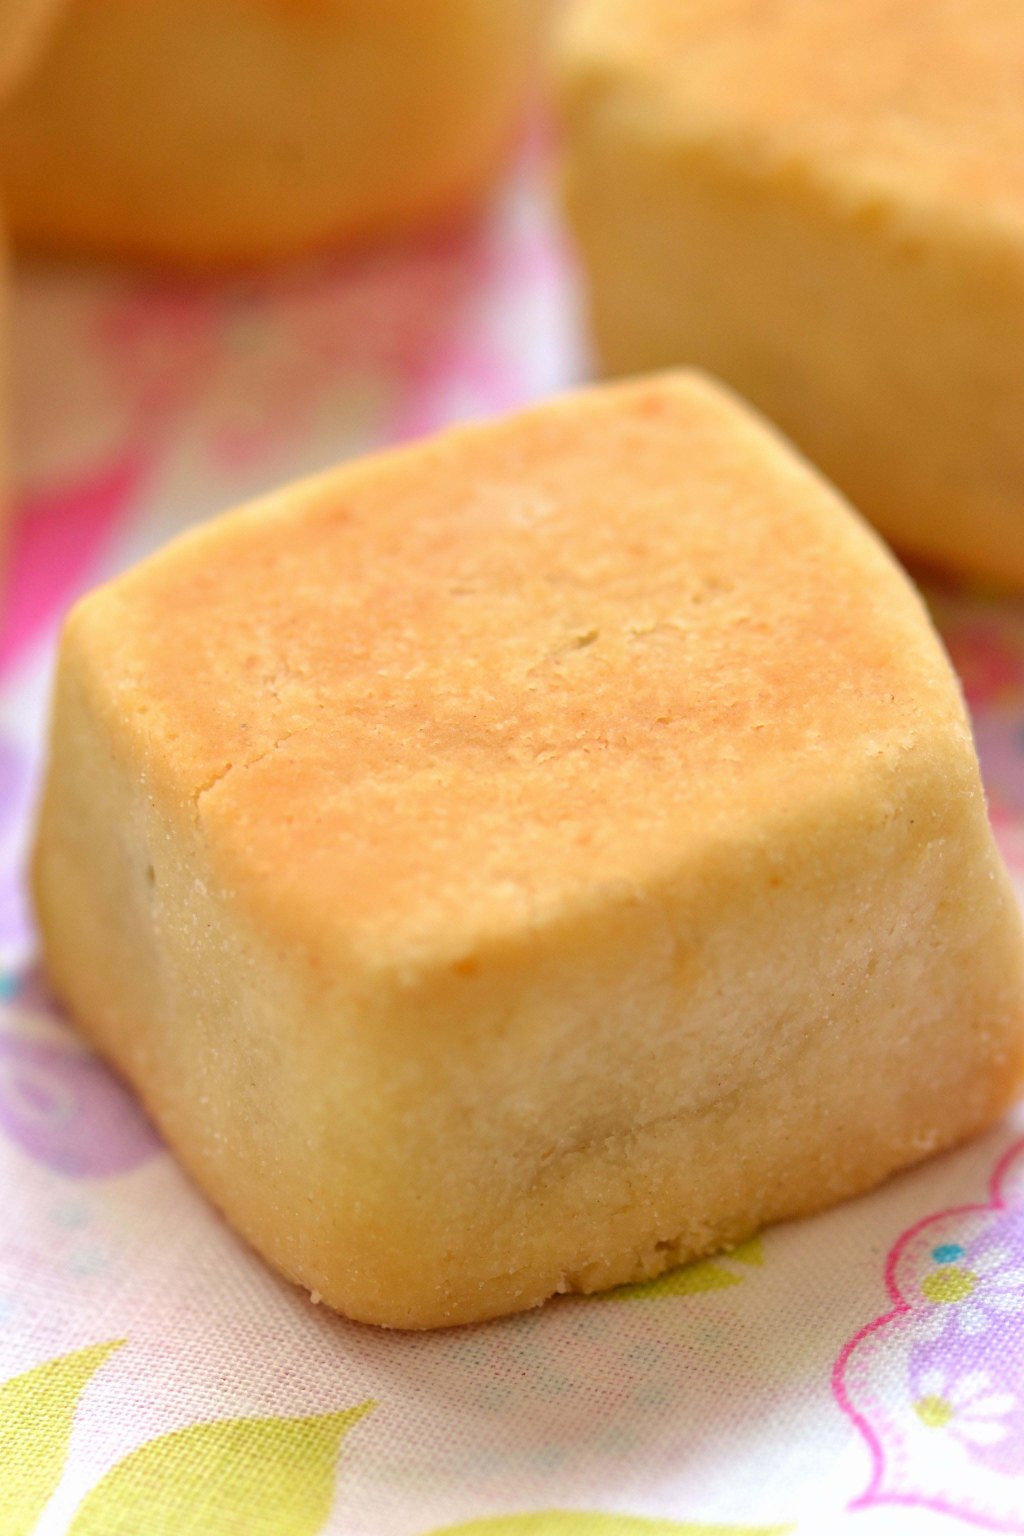
• Being a foodie, I like to be intrigued by trying foods I’ve never had before. The kumquat suddenly intrigued me. For years I had always walked by that little mysterious orange fruit and never paid it any attention. This year though something happened that was unexpected. It was kind of whispering my name from afar. Just me and the little fruit in the produce aisle. Beckoning me to come over and say hi. A slight flirt and tease-as to say, well hello there-why have you not noticed me before? Kind of like the quirky guy in chemistry class who you suddenly notice one day is kind of cute and a lot less quirky and lo and behold he was there all along. You just never noticed before because you were too busy with your bunsen burner. Sorry for the ninth grade flashback. Anywho~ the kumquat. It was daring me to buy it and take it home and make something yummy with it. So I did. It was cute and quirky, but very tasty.

    kumquats clustered 2

    Candied Kumquats 2

                               Candied Kumquats

    Tangerine Cupcakes 5

    Tangerine Cupcakes 3

    Tangerine

    Tangerine Mini Cupcakes with Vanilla Buttercream & Candied Kumquats

    Candied Kumquats

    1 pint kumquats, washed, stems removed

    1/3 Cup water

    1 Cup granulated sugar

    2 Tbsp. corn syrup

    Slice the washed kumquats into thin slices; about 3-4 slices for each kumquat, being careful to discard all seeds. In a heavy saucepan combine the water, sugar and corn syrup. Bring to a boil and add in the sliced kumquats. Reduce to simmer and simmer for about 5 minutes until the slices are translucent. Turn off the heat and remove from the heat and allow the kumquats to cool in the syrup. Store kumquats in the syrup in a glass jar in the refrigerator. They will keep for several weeks. (The citrus syrup is great over crepes or drizzled over a warm biscuit with butter).

    Cupcakes

    (yield: ~ 36 mini cupcakes)

    1  1/2 Cups cake flour

    1  1/4 tsp. baking powder

    1/4 tsp. salt

    1/2  Cup unsalted butter, softened

    1  1/4 Cup granulated sugar

    2 Lg eggs

    zest of one tangerine

    3 Tbsp. fresh squeezed tangerine juice

    1 tsp. vanilla bean paste (or 1 tsp. vanilla will do)

    1/3 Cup milk

    1. Preheat the oven to 350 degrees. Prepare a mini muffin tin(s) with paper liners or use a silicon pan if you can.

    2. Sift (or whisk) together the dry ingredients and set aside.

    3. Cream the butter and sugar until fluffy on medium high speed until fluffy; about 3 minutes. Add the eggs one at a time and beat well after each addition. Stop the mixer from time to time to scrape the bowl as needed. Add in the zest, orange juice and vanilla and beat to combine. Reduce the speed to low and add in the flour mixture in 3 additions, alternating with the milk in two additions; ending with the flour. Mix until just combined.

    4. Fill each cupcake well to 3/4 full and bake for 18-20 minutes. Allow the cakes to cool in the pan for about 7 minutes then remove to a wire rack to continue cooling. Frost with buttercream when cooled and garnish with a slice of candied kumquat.

    Vanilla Buttercream

    2 Lg. egg whites

    1/2 Cup sugar

    2 sticks unsalted butter

    1 tsp. vanilla

    orange gel food coloring paste (optional)

    In the bowl of a stand mixer combine egg whites and sugar. Set over a saucepan of simmering water and whisk until mixture is hot and sugar is dissolved. Remove bowl and place on mixer and beat until stiff meringue forms and bottom of mixer bowl is cool to touch; about 5 minutes. Add softened butter one tablespoon at a time until all is incorporated. Add vanilla,  then beat until smooth. Add the optional orange food gel paste if using, stir to combine.

  • Everyone likes to receive a gift. Sometimes the best gift is when it’s totally unexpected. Maybe you want to thank your neighbor for always bringing your mail in when you’re out-of-town. Perhaps you’ve gotten to know your UPS man so well, you know his first name (you know who you are) and want to thank him for always leaving your packages in that right discreet hidden spot instead of leaving that annoying ticket. There can be a myriad of reasons why you want to show a little sugar love. Here’s an idea-bring a batch of these to your kids next swim meet-whip them out and start making new friends. Enjoy.

    Salted Caramels 2

    Salted Caramel wrapped

    Salted Caramels 3

    Fleur de Sel Caramels

    recipe: Ina Garten

    (yield: 64 pieces)

    1  1/2 Cups sugar

    1/4 Cup water

    1/4 Cup light corn syrup

    5 Tbsp. unsalted butter

    1 Cup heavy cream

    1 tsp. Fleur de sel (kosher salt would also do)+ more for sprinkling

    1/2 tsp. vanilla

    Prepare an 8 inch square pan by lining it with parchment paper (both sides) so that the paper hangs over the sides by two inches, and lightly brushing it with vegetable oil. In a 2 cup glass measuring cup heat the cream until hot. Stir in the butter and salt and set aside. Have a candy thermometer available.

    In a heavy 2 quart saucepan place the sugar, water, and corn syrup and bring to a boil over medium high heat. DO NOT STIR, but swirl the pan occasionally as necessary to maintain even heat distribution. Boil until the syrup mixture is golden brown. Remove from the heat and carefully add the cream mixture (be careful as it will bubble up and spit) stir with a heat proof spatula or wooden spoon and return to the heat and bring back to a boil using a candy thermometer until the mixture reaches hard ball stage. When the mixture reaches hard ball (248° degrees F) add in the vanilla, stir and pour into prepared pan. Allow the pan to cool in the refrigerator until set. Cut into one inch squares and sprinkle with additional salt. Wrap in 4×4 inch squares of wax paper and twist the ends. Store in a cool place.

  • There are grown up cookies and there are kiddy cookies. Guess what this is-this is a grown up cookie. The flavor is not something perhaps your 9 yr. old would like; nor even your 12 yr. old (as I found out), but it is good. This is the beauty of a good macaron. There are some really wild and crazy interesting flavors out there [in a good way] and this is one of them. I love anything with sesame seeds. I cannot go out for dim sum and NOT get a sesame ball. I simply cannot do it. There are times I crave for a sweet sesame rice ball and nothing will do. Days will go by and I will try to push it out of my brain. That damn sesame ball will keep calling my name. I cave every time. The Husband has been known to navigate the streets around Chinatown in (loop de loop like fashion) while I dodge into the congested bakery to claim my sesame ball. He knows when I get that wild look in my eye and proclaim I NEED a sesame ball that there is no turning back. The ticket has been bought- you are strapped into the seat and the ride is starting. Although this is not a sesame rice ball, it is my ode to the sesame seed in macaron form. If you want to go all out sesame-you can add some sesame powder to the vanilla filling as well and make it all sesame.

    Black Sesame Macarons

    DSC_0117

    DSC_0103

    Black Sesame Macarons

    200 gms almond flour, sifted

    200 gms confectioners sugar, sifted

    2  1/2 Tbsp. black sesame powder

    75 gms egg whites

    200 gms granulated sugar

    50 gms water

    75 gms egg whites (room temp)

    pinch of cream of tartar

    1. In a large bowl combine the almond flour, and confectioners sugar and sesame powder. Add the 75 gms of egg whites, and stir to combine to form a paste. Set aside.

    2. In a bowl of a stand mixer fitted with the whisk attachment combine 75 gms of egg whites and the cream of tartar and begin whipping them on medium-high speed.

    At the same time combine the 200 gms of  granulated sugar and water in a small saucepan on high heat; bring to 240° without stirring while whipping the egg whites on your mixer simultaneously. You want the cooking sugar syrup to reach 240 degrees at the same time your whites reach stiff peaks. To time this; keep the stand mixer next to the stove so you can peek at the whites while still watching your cooking syrup. If you notice the whites starting to get too stiff before the sugar is done; slow down the mixer to low-speed.

    3. Once the syrup is at 240 degrees, stop/take off the heat and start pouring the syrup down the side of the mixer bowl slowly with the mixer running on slow-medium at the same time; careful not to let the syrup hit the whisk to prevent hard syrup forming. Once all the syrup is in, crank up the mixer and whip the whites until very glossy and stiff.

    4. Take the whipped meringue and place on top of the almond mixture and start to  fold gently until all of the meringue is incorporated; careful not to deflate the mixture. You are looking for a thick consistency like lava. Fill a piping bag fitted with a 1/2 inch round tip and pipe the cookies on parchment lined sheet trays; leaving at least an inch space between cookies. Take the trays and rap them hard on the counter to release any air bubbles. Let the trays sit out anywhere from 30-60 minutes; as long as it takes until when you touch the top of the cookies they are dry and no longer tacky to the touch.

    5. Bake the cookies double panned (placing one empty tray underneath the piped cookies) one tray at a time in a 325° oven for about 15-18 minutes until the cookies are no longer wet on the bottom and appear dry. Sacrifice one if you have to test. Let the cookies cool on the tray. Sandwich with the filling. Store the cookies in the fridge covered loosely for 8 hours or overnight; this helps the cookies become even more chewy as the moisture from the filling helps the texture of the cookie.

    Vanilla Buttercream

    2 egg whites

    1/2 cup granulated sugar

    2 sticks (1 cup) unsalted butter

    1 tsp. vanilla

    1/4 cup confectioners sugar (note: although not traditional in swiss meringue buttercream- it helps add a firmer structure to the filling)

    Black Sesame Buttercream Filling Option: add 1-2 tsp. of black sesame powder (to taste) to the vanilla buttercream and mix well to combine.

    In the bowl of a stand mixer combine egg whites and sugar. Set over a saucepan of simmering water and whisk until mixture is hot and sugar is dissolved. Remove bowl and place on mixer and beat until stiff meringue forms and bottom of mixer bowl is cool to touch; about 5 minutes. Add softened butter one tablespoon at a time until all is incorporated. Add vanilla and confectioners sugar and beat until smooth. Use a generous 1 tsp. full to fill macarons.

  • You ever have one of those mornings-you wait too long to eat breakfast. Suddenly you realize morning has flown by, but you really don’t want to eat at 10 or 11 because pretty soon it will be lunch and then you won’t be hungry. You want some kind of filler. Nothing too heavy, but something to fill the gap and quiet your growling tummy. You’ve already been chugging down coffee- that’s a given. Coffee you always have time for. You never forget to drink your coffee. Pop a couple of these in your work bag wrapped in tinfoil and keep one in your desk for another time later in the week if you get a growly stomach. Eat one now dipping it in your hot coffee and it is the perfect tide over until lunch.

    Coffee Biscotti 1

    Coffee Biscotti 2

    Coffee Biscotti 3

    Coffee Almond Biscotti

    Yield: 12 biscotti

    1 Cup whole unsalted almonds

    2  Cups + 3 Tbsp. all-purpose flour

    1 Cup sugar

    1/2 tsp. baking soda

    1/2 tsp. baking powder

    1/2 tsp. salt

    1/2 tsp. (generous) of cinnamon

    1/4 tsp. nutmeg

    1/4 Cup strong coffee, cooled

    1 Lg. egg

    2 Tbsp. milk

    1 tsp. vanilla

    6 oz. bittersweet (60 %) chocolate chips, melted and cooled (for dipping)

    Preheat the oven to 350° degree F. Toast the almonds in a shallow pan for about 10 minutes. Remove almonds and let cool, and set aside. Combine the dry ingredients in a large bowl. In a measuring cup combine the espresso, egg, milk, and vanilla. Add the wet ingredients and combine. Add the toasted nuts and combine.

    With floured hands shape into a log about 12 inches long by 2 inches thick. Place the log on a parchment lined baking sheet. Bake at 350° degrees for 30-35 minutes until firm to the touch. Remove from the oven and let cool on a wire rack.

    Decrease the oven to 300° degrees. Once the log has cooled at least 10 minutes, cut into diagonal slices about 3/4 inch thick. Place the slices on their cut sides on a baking sheet and bake for 8- 10 minutes, (10 if you like really crunchy biscotti- 8 minutes if you like yours a little softer) turn the cookies over to finish baking on the other side for another 8-10 minutes. Remove from the oven and let cool on a wire rack. Dip each cookie on its flat side into the melted chocolate and place on parchment until set. Store cookies in an airtight container.

  • Are you feeling lazy like you never want to get out of your PJ’s? Staring out the window wondering what you are going to do today?  Contemplating perhaps if you really want to take a shower and get dressed or continue on in your favorite outfit that includes something of the flannel variety?  The post-Christmas crash will do it every time. All that running around and the lead up can leave one exhausted. When you come down from the Christmas high you pretty much don’t want to do anything. Brushing your teeth is a major event. I get it. As you know, there are many ways to make scones. I like to call this the lazy man version. You mix it, dump it out into one big slab shaped in a circle. No cutting with a biscuit cutter, no rolling. Just mix, dump, shape and bake. The scones come out super moist and you throw that bad boy right into the middle of the counter, slice it into 8 wedges, and make everyone grab their own scone right off of the tray once they cool a bit. Here’s to lazy days….

    Cherry Scone single 2

    Cherry Scones 2

    DSC_9614

    Using wet hands, pat it into a circle about 1 inch thick and score the top lightly with a knife, brush with cream, sprinkle with sugar

    Cherry Scones

    Once it cools enough, slice into 8 wedges and serve right off the tray

    Cherry Scones 3

    Cherry Almond Scones

    2 Cups all-purpose flour
    1/4 Cup sugar
    1 tsp. baking powder
    1 tsp. baking soda
    1/2 tsp. salt

    6 Tbsp. unsalted butter, cubed (kept cold)
    1 heaping cup lowfat yogurt (I like to use vanilla)
    1 large egg
    1/2 tsp. almond extract
    1 tsp. vanilla
    zest of one lemon or orange (whatever you have on hand)
    3/4 Cup dried sour cherries
    1/2 Cup coarsely chopped toasted almonds

    milk, cream or half n half (whatever you have on hand for brushing top of scones)

    sugar (for sprinkling top of scones)

    1. Preheat the oven to 375 degrees F. Line a baking tray with parchment paper.

    2. Combine the dry ingredients in a medium to large bowl. Using a pastry cutter, cut in the cold butter until you have a coarse meal. Create a well in the center.  Combine the yogurt, egg, extracts,  and zest and add to the well of the dry ingredients in the bowl. Using a fork bring in the wet ingredients until just combined. Fold in the cherries and the nuts.

    3. Turn out onto prepared sheet and using wet hands shape into a circle 1 inch thick. Brush with cream or milk and sprinkle with sugar. Score the top lightly with a sharp knife. Bake at 375 degrees F for about 20 minutes unti lightly browned and a toothpick comes out clean when pierced. Let cool slightly and cut into wedges, serve warm.

  • This is a shout out to all my baking challenged friends. For those of you who shudder at the thought of baking something too difficult. And you know who you are. It does not get much easier than shortbread. Shortbread cookies purposely do not have any leavener in them as you do not want them to spread. The dough is “short” which means it is crumbly in texture. Shortbread is quite often a traditional gift to give for the Holidays as the cookies last for a while and somehow they get better with age. Shortbread is a good way to experiment with flavors that you like. You can add just about any kind of flavor enhancer to a shortbread recipe that you like to make it your own. Today I’m going with earl grey tea. I love the slight earthiness and bergamot scent from the tea and because shortbread is sweet it balances well with the flavor. The bittersweet chocolate is a nice touch and you can leave it off if you desire.

    Earl Grey Shortbread 1

    Earl Grey Chocolate Shortbread


    2 Tbsp.  loose Earl Grey tea leaves or 4 regular size tea bags

    3/4 Cup unsalted butter, cut into Tablespoons

    1/2 Cup granulated sugar

    1 tsp. vanilla

    1/4 tsp. salt

    1/2 Cup Cake flour (if you like see my post on how to make cake flour)

    1/2 Cup all-purpose flour

    Chocolate Glaze

    2 oz. bittersweet chocolate, coarsely chopped (hint-Ghiradelli bars come in 4 0z. so you can use 1/2 a bar without measuring)

    1/2 tsp. vegetable oil

    1. Grease the bottom and sides of a 9-inch removable tart pan (use the butter wrappers that the butter was in).

    2. In a medium saucepan, melt the butter over low heat and add the tea; stirring well to combine. Remove from the heat, and leave to steep for 10 minutes. Strain the butter through a fine mesh sieve or a cheese cloth. Squeeze to get all the butter. Reserve about 1-2 tsp. of the tea to add back in (depending on your preference).

    3. Stir together the warm butter, sugar, reserved tea, vanilla and salt. Add the flours and stir until just blended. Scrape the dough into the prepared pan and pat into an even layer. Cover the surface with plastic wrap and chill for at least 2 hours (or 30 mins. in the freezer). May chill up to 2 days before baking.

    4. Position a rack in the center of the oven and preheat to 325 degrees F.

    5. Bake the chilled shortbread for 35-40 minutes, until golden brown. While the shortbread is still hot cut into 16 wedges with a thin sharp knife. Transfer the wedges to a wire rack and cool completely.

    Prepare Chocolate for dipping:

    1. In a microwave on high, melt the chocolate in short intervals checking closely to make sure chocolate does not burn. Stir in the vegetable oil.

    2. Line a baking sheet with parchment or waxed paper and dip each shortbread wedge into the chocolate; being careful to check for any loose crumbs first before dipping. Dip each pointed end of shortbread into the chocolate up about an inch from the point. Set the wedges on the prepared sheet and let stand until set, about 1 hour at room temperature. To speed up the process you can also set the wedges in the fridge to chill for about 15 minutes.

    Serve at room temp. Store in an airtight tin or container.