• Need some passion in your life? I got you…

    Those who know me- know I’m crazy about passion fruit. I always have a packet of passion fruit puree in my freezer. I use Goya brand that I find in my Asian grocery store in the frozen fruit section. I use it to make passion fruit curd, passion fruit cheesecake, and also this passion fruit ganache. Sometimes I’ll see them on sale in Sprouts grocery and will grab a few fresh one when they are discounted.

    Recently I’ve been using invert sugar in my ganache recipes as it helps extend the shelf life of baked goods and in this case the ganache and it aides in giving a nice smooth texture and mouth feel. I make a batch of it and keep it in a glass canning type jar and keep it in my fridge. It will start to crystallize a bit in the jar if you don’t use it all the time, but don’t worry it keeps for quite a while.

    Passion Fruit Ganache

    85 g passion fruit puree

    200 g white chocolate

    pinch of fine salt (I like Himalayan pink salt)

    20 g invert sugar (see below how to make invert sugar) (If you don’t want to make invert sugar- you can use corn syrup or agave syrup in place (same amount).

    In a medium bowl over a bain marie melt the white chocolate. In a small pot, bring the passion fruit puree and inverted sugar, and salt to a simmer. As soon as it starts to simmer, remove from heat. Pour the hot passion fruit mixture over the white chocolate in 3 parts. Use a rubber heat proof spatula instead of a whisk as you want to avoid a lot of air bubbles. Once it is thoroughly mixed, pour it into a deli type tall container and using a hand blender, keep the blender below the level of the ganache and blend to emulsify to make smooth ganache. Pour the ganache into a bowl and cover with plastic wrap directly onto the surface. Let the ganache sit at room temperature to set up- it will take several hours. You can do this the day before and once the ganache is set- place it in the fridge to chill.

    Macaron Shells

    95 g almond flour

    85 g confectioners sugar

    1/4 tsp. cream of tartar

    80 g egg whites

    75 g granulated sugar

    purple gel food coloring (I used a mix of regal purple and electric purple) Optional- before I poor the batter into the piping bag. With the batter still in the bowl after finishing the macaronage, I put a few drops of regal purple into the batter spaced far apart and swirl with a toothpick. Then I gently pour the mac batter into the prepared piping bag. You can kind of see the swirl in my shells.

    Drying macs w/ oven method: (known as the Sugar Bean method). She has videos on you tube if you search for her.

    I preheat my oven to 248° degrees F before I have piped my macs. I place one tray in the oven and immediately turn off the oven, then open the oven and place something like an oven mitt or something to keep it ajar a couple inches. Then I immediately turn back on the oven at 248° F again, and time for 2-3 minutes. After 3 minutes I close the oven door and turn up the oven to 293° F. Once the oven temp comes up to 293° F, I then start timing my bake time for 15 minutes. After the bake time I open the door and check a macaron; if it’s super wiggly still I bake for another minute. If it barely wiggles or not at all, I turn off the oven and open the oven door ajar and time for another 2-3 minutes; “Sugar bean” calls this the “oven shower”. After the 3 minutes, I remove the tray and then let them cool over a wire rack. Now; since the second tray has already been drying at room temperature; I usually only oven dry for 1.5 minutes and repeat the bake as I did for the first tray.

    *A word about oven temperatures: EVERY one’s oven is different and after painstaking doing several batches of macarons I determined that in MY oven 293 F convection setting is best for me. Check your oven temperature against a thermometer placed in the middle of your oven. Some people bake there’s at 285, 290, 310 etc. unfortunately it’s something that you have to play around with and determine what is best for you and your oven.

    Passion Fruit Macarons

    How to make invert sugar:

    2 Cups + 3 Tbsp. Fine granulated sugar

    1 Cup filtered water

    1/8 tsp Citric acid

    In non-reactive sauce pan, place the water, sugar and citric acid to combine. On medium heat- bring mixture to heat just until sugar starts to dissolve. Then lower the heat to low- you don’t want any color to the syrup so you must go on low. If you get any crystallized bits of sugar on the side of the pot- use a wet pastry brush to brush down the sides. On low heat, continue to heat the mixture and simmer until it reaches 236 degrees F. Remove from the heat snd allow it to cool. Once cooled- place in a glass jar and keep in the fridge. It will keep for 6 months.

  • Chocolate & Pecan Chewies (Gluten Free)

    I have a lot of friends or peeps who need to eat gluten free. I’m so glad I’m not one of them, although this cookie is so divine that you will not even miss or guess it’s gluten free. Safeway grocery stores used to make this type of cookie and always had it available in their bakery department. One day I noticed they stopped carrying them for whatever reason. I started researching what went into this infamous cookie and I came across a few recipes. I played around with the recipe a bit and I can say I am very pleased with the result. The one thing you have to be careful about is not to overbake them as once they cook they firm up considerably, so in order to remain chewy do NOT overbake them. As a footnote, please excuse the phone photo I have of these as the lighting in my kitchen is SO bad and sometimes when I bake late in the day the only good source of light is from my phone. That said, don’t let the less than IG worthy photo deter you from admiring their yummy quality.

    Chocolate Chewies

    1 1/4 C toasted pecans, coarsely chopped

    3 1/2 egg whites (105 g)

    1/3 C Hershey’s original cocoa powder

    1/3 C Hershey’s extra dark cocoa powder (you may use 2/3 C regular cocoa powder if you don’t have extra dark)

    3 C Confectioners sugar, sifted

    1/4 tsp kosher salt

    2 tsp. vanilla

    Preheat oven to 350 degrees F. Add all ingredients to the bowl of your stand mixer, then whisk by hand briefly. Blend ingredients on speed 4 for 4 minutes. Let batter rest for about 15 minutes, then spoon out 2 tablespoons of batter onto either a Silpat or parchment paper lined sheet pan. Allow 3 inches room between each cookie as they will spread. Bake in 350 degree oven for about 15-16 minutes on the middle rack of the oven until the tops no longer look wet. Don’t overbake as you want them to remain chewy. I would bake a few first and error on the side of underbaking and test the outcome before baking off a whole tray. Allow to cool on sheet pan until fully cooled.

  • I love this time of year when my lemon tree is just bursting with fresh lemons. I have always loved any kind of lemon dessert. As a kid growing up my Mom would always let us kids choose our kind of birthday cake and I always chose white cake with lemon filling. I still this day will choose a lemon dessert off a menu given a choice over chocolate. what can I say, I am just a lemon lover.

    If you’re a lemon lover like me, you will adore this pie.

    Crust

    2 1/4 Cups finely processed cookie crumbs; see note

    (You can choose graham cracker crumbs, or if you can find a crisp lemon cookie; I used this option for an additional lemon flavor) I found a Kroger store brand lemon crisp cookie that was really tasty. The key is, you want to make sure the cookie crumbs are from a crisp cookie. You could also use lemon flavor Oreo cookies (discard the filling when processing).

    one lemon zested finely.

    6 Tbsp. unsalted butter, melted.

    2-3 Tbsp. granulated sugar (depending on how sweet your cookies are)

    Process the cookie crumbs in a food processor until finely ground. In a bowl stir the crumbs, lemon zest, melted butter and sugar until combined. Press firmly into a 9-inch-deep dish pie plate, up the sides and bottom until even. Do not press onto the rim of the pie plate. Bake in a preheated oven for 6-8 minutes or until the crust appears matte. Allow the crust to cool while you make the filling. Note; you can make the crust the day before and bake if you prefer.

    Filling:

    2/3 Cup granulated sugar, divided

    1 envelope unflavored gelatin powder (7 g) (2 tsp)

    1/2 C water

    4 large eggs, separated yolks and whites

    1 tsp. lemon zest

    1/2 Cup fresh squeezed lemon juice, strained

    1/8 tsp. table salt

    3/4 C heavy whipping cream

    + 1 Cup for optional garnish for top of pie if desired

    optional: for garnish; Sanding sugar, candied lemon peel, or lemon zest

    In a saucepan whisk 1/3 cup of sugar along with the powdered gelatin.

    In a bowl with a fork whisk the 4 egg yolks, lemon zest, lemon juice, and salt to combine.

    Stir the egg yolk mixture into the saucepan, and on medium heat, cook the mixture while stirring constantly until mixture thickens and you get the sign of the first large bubble come to the surface in the middle of the pan. Immediately remove from the heat and pour into a bowl and place the fridge to chill until cooled; about 20 minutes. Every 5 minutes or so, go into the bowl and stir the contents to help it chill.

    Pour the heavy whipping cream into a very cold bowl and whip using the whisk attachment until stiff peaks. Gently fold into the chilled lemon/yolk mixture.

    In a squeaky-clean bowl place the 4 egg whites and using a clean whisk attachment , whip by adding in gradually the 1/3 remaining granulated sugar until stiff peaks. Fold this into the lemon/cream mixture until combined; being careful to fold gently.

    Tip the lemon mousse mixture into the prepared pie shell, and smooth out the top. Set in the fridge and allow to become set while chilling for about 3-4 hours.

    Decorate with stabilized whipped cream as desired, and top with sanding sugar, lemon zest etc. as desired.

    Stabilized sweetened whipped cream

    In a chilled bowl place 1 1/4 Cup of heavy whipping cream, 2 Tablespoons of confectioners sugar, and 1 Tablespoon of dried non-fat milk powder. Whisk to combine, then using either a hand mixer or a stand mixer whip until stiff peaks. Place in a piping bag with a tip of your choice; here I used a open star tip. Pipe a border of the whipped cream as desired. Sprinkle with sanding sugar, or lemon zest, or garnish with fresh thinly sliced lemons if you wish. I personally love the texture of the sanding sugar on the whipped cream.

  • Pumpkin Cannoli with Recipe for Homemade Ricotta Cheese

    Last year I attempted to make a pumpkin cannoli but my filling was too loose even with straining my ricotta cheese it wasn’t as thick as I wanted, so I took to the web looking at recipes for classic cannoli’s to see why. I found several Italian peeps saying the trick was to make your own ricotta cheese which results in a much drier version. I’ve never had an itch to make homemade ricotta until I watched various videos on YouTube. Wow, I was pleasantly surprised to find out how super easy it is; so I took to it, and I made just a small batch. As often in life I got busy/lazy and my ricotta ended up draining in the fridge for 2 days which I was not at all mad about, as it resulted in a nice thick almost cream cheese like consistency.

    Now- I know most bakers will not want to make their own ricotta, so note that you can still make it but make sure to let your purchased ricotta drain until as much of the whey has drained off. I like Polly-O brand ricotta cheese. To drain just line a strainer with cheese cloth and dump in the ricotta and place the strainer over a narrow but deep bowl and place in the fridge to drain.

    I admit I used pre made cannoli shells; I was lucky to find these cute mini shells from a local market where I live. I look forward to playing around in the future with making my own, but I don’t have cannoli tubes and I was more interested in knocking these out and playing around with the filling to get it just right.

    Pumpkin Cannoli Filling (this will fill enough mini cannoli for 12-13) 0r 6 standard size

    3/4 C homemade ricotta cheese (or strained ricotta cheese as per above)

    3 Tbsp. canned pumpkin puree

    3/4 Cup + confectioners sugar, sifted (depending on sweet you want your filling)

    1/2 tsp. pumpkin pie spice

    In a medium bowl place all the ingredients and using a silicone spatula gently mix to combine. Keep the mixture chilled until ready to use.

    Prepping cannoli’s:

    place a small amount of white chocolate chips in a bowl and microwave until melted.

    dip the ends of each end of the cannoli shells into the white chocolate and then dip into cinnamon sugar. Place the shells onto a sheet pain and let them firm up; about an hour. If you like, you can use finely chopped nuts of your choice such as pistachio or pecans instead of cinnamon sugar or do a mixture of cinnamon sugar and nuts, or even sugar and pumpkin pie spice. Make it your own.

    cinnamon sugar: mix 1/4 Cup granulated sugar with 1 scant Tbsp. cinnamon to combine.

    Place the pumpkin cannoli filling into a pastry bag and snip off the tip and fill each end of the cannolis. You can sprinkle some confectioners sugar over the top of the cannolis right before serving if you like.

    Homemade ricotta cheese:

    4 Cups whole milk (do not buy ultrapasteurized)

    3/4 Cup heavy cream

    1 tsp. kosher salt

    2 Tbsp. fresh lemon juice or distilled white vinegar (I used lemon juice)

    In a medium pot place the milk, cream, and salt and over low medium heat heat up the mixture SLOWLY until it reaches 200 degrees F, then immediately remove from the heat and stir in the lemon juice (or vinegar) and let sit for about 10-15 mins untouched. You will notice that the curds will float to the top. Line a strainer with double thickness cheese cloth and place over the same pot or a bowl. Let it sit at room temperature on the counter for about an hour. Then gather the cheese cloth and gently squeeze to remove some of the liquid; don’t worry about trying to remove all of the visible loose liquid; as the fridge time will remove the rest. Place the draining set up in the fridge overnight or as I did; for 2 days to let all the excess liquid /whey drain off. You will use 3/4 cup of the strained ricotta cheese for the filling recipe above; any excess enjoy spread on toast with a drizzle of honey or other various ways. Note; if you want a lot more; simply double the recipe.

  • Pumpkin Cinnamon Rolls


    Are you a pumpkin spice lover or hater? I’m a lover. You haters must have a wee bit of a hard time this year as pumpkinpalooza explodes over everything-showering us with “punkin” delights. Ohhh…me- I love everything spice. Spice is the fruit of life; it’s what makes everything better. Have you ever had a cinnamon roll that just fell flat and didn’t have enough goo or cinnamon between the layers? yeah. I know. It’s a crime. Sooo calorie not worthy. There’s nothing worse than blowing your diet for a non calorie worthy bite. Of anything. This pumpkin roll will not disappoint. This is the roll where you eat salad all week-saving up your calories for just the right moment on a Sunday morning with a cup of Joe for. Promise. I can guarantee you it’s worth every calorie. Truth be told I think I had one roll on the tray that the very inner middle was a wee bit underdone. It was extra gooey and saturated with cinnamon goodness and extra pillowy soft. The Husband exclaimed “Honey, I think it’s a bit underdone” and I retorted; “Yeah, well some people would pay for that inner bite of goo”. He left it on the plate and I’m telling you….I went for that bite and it was pure nirvana. NIRVANA! He was born in Asia; so he didn’t grow up with cinnamon rolls where you know the most coveted bite is that inner piece of cinnamon jackpot bliss. His loss, my gain. Ok, enough of me waxing poetic, and onto the recipe…..

    p.s. I cannot tell you how soft and luscious this dough is to work with and roll out. It doesn’t fight you back when rolling; truth be told I pressed it out almost 80 percent and then just finished by rolling it even. It is that easy to work with. Something to do with that added moistness of the pumpkin makes it a divine dough.


    Pumpkin Dough

    3/4 Cup buttermilk, warmed to ~ 110 degrees F

    6 Tbsp. unsalted butter, melted

    1 large egg

    2/3 Cup pumpkin puree (I swear by Libby’s it’s the only one I use)

    1/4 C granulated sugar

    1 Tbsp. instant (rapid rise yeast)

    1 tsp. salt

    1/2 tsp. cinnamon

    1/4 tsp. fresh ground nutmeg

    1/8 tsp. ground ginger

    1/8 tsp. ground cloves

    4-5 Cups all purpose flour (I use unbleached)

    In the stand mixer bowl add the warmed buttermilk and butter and mix together. With the mixter running add in the pumpkin, egg, spices, yeast,sugar, salt, and 1 cup of flour. Switch to the dough hook and add in the flour and add a cup of the flour at a time until the dough collects on the hook and beat/kneed until the dough becomes tacky but not sticky. When you touch the dough it should not stick to your finger when you pull it away from the dough; it will feel tacky but no residue of dough will stay; that’s when you know the dough is ready.

    Remove dough and shape into a ball and place into a large lightly greased bowl. (The paper from the butter wrapper is perfect to grease the bowl with). Place in a warm spot and over with plastic wrap and let rise until doubled. You can speed up the rise if you place in a lightly warmed oven. I turned on my oven to 150 ° F then immediately turned it off; waited 5 mins then parked the bowl in the turned off oven. My dough rose in one hour this way.

    When the dough is ready turn it out onto a lightly greased counter and press into a rectangular shape. Roll out gently until it is 16 x 12 inches. Spread the softened butter onto the dough leaving about a centimeter of space on all sides and sprinkle over all the cinnamon filling. It will seem like a lot of filling; but make sure to use it all. Press gently with the hands to allow the filling to adhere to the butter. With the long side in front of you roll up the dough as tightly as possible and pinch the dough together to seal. Cut into 12 equal pieces and place in lightly greased 9×13 inch pan or line the pan with parchment paper.

    Cover the pan of rolls and allow to rise one more time in a warm place. (used the oven trick again for this and mine took only 40 mins to rise).

    Preheat the oven to 350° F and bake for 22-25 mins or until lightly golden and cooked through. Mine took exactly 22 mins. Check at the 20 min mark though because you don’t want to over bake them. You want them still pillowy soft.

    Let the rolls rest for about 6 mins, then pour over the glaze while they are still warm.


    Cinnamon Filling

    6 Tbsp. unsalted butter, softened

    3/4 C brown sugar ( I used 2/4 and 1/4 dark)

    2 tsp. cinnamon ( I use Saigon cinnamon) (use what you have)


    Cream Cheese Icing  (my recipe)

    4 oz. Philadelphia Cream Cheese, softened

    2 Tbsp. unsalted butter, softened

    1 tsp. vanilla

    3 Cups confectioners sugar

    2 Tbsp. whole milk as needed to adjust consistency (depending on how runny you like your icing)

    Cream the cream cheese and butter together until combined. Add in the sugar a cup at a time and beat until smooth; (I just do this in a bowl; no need for the mixer). Stir in the vanilla and milk. Adjust the consistency with the milk as needed. Let the rolls rest about 6 mins then pour over the warm rolls.


  • Easter Milk Chocolate Malt Cadbury Macarons


    Do you know how therapeutic it is crushing candy into tiny pieces after a mind bending day at work? Yeah. Therapeutic, I’m here to tell ya. I normally don’t buy Cadbury during other times of the year; although their chocolate is amazing. There’s something about these tiny little eggs that dare you to stop after eating just a few. The hard crunchy outer shell while being smooth, is thick enough that cracking one open with a side back tooth- launches that file used just for methodical eating-corner of your brain. For me, that’s the same file used for eating macadamia nuts; but that’s a story for another time.

    Cadbury egg crushing/bashing with a meat tenderizer caveman style while being encased safely inside a ziplock bag did just the trick for getting over a bad day at work.

    I was unsure if I wanted to fold them inside of chocolate ganache or use them sprinkle fashion showing off their pretty little pastel like dress colors. Obviously, I went with the later. It says-look at me Mommy in my pretty little Easter dress. Yeah, I’m weird. My candy talks to me.

    I chose to flavor the ganache with a malted milk chocolate flavor to envoke the same flavor as a malted milk egg. Spring is here folks!


    Easter Malted Milk Chocolate Cadbury Macarons


    140 g fine almond flour

    125 g confectioners sugar

    108 g egg whites

    1/8 tsp. cream of tartar

    110 g granulated sugar

    gel food coloring of your choice (I used a mixture of teal and navy blue)


    In a food processor place the almond flour and confectioners sugar and run for 30 seconds. Stop and scrape down the sides so the mixture settles into the processor bowl. Repeat this 2 more times, then sift mixture through a strainer (it doesn’t have to be fine) over a large bowl (I use a 5 quart size stainless steel bowl). Preheat the oven to 300° F convection, 325° F for non convection setting.

    In the bowl of a stand mixer place the egg whites and cream of tartar and whisk by hand (using the mixer whisk) until foamy for about 30 seconds. Prepare two baking sheets with either parchment paper or Silpat liners.

    Set the mixer bowl fitted with the whisk attachment assembled to the mixer, and start the meringue by running mixer on power level 4 (Kitchen Aide) and start gradually adding in the granulated sugar- run/whisk for 2 minutes once all the sugar is in. Stop once to scrape the sides of the bowl to push down any sugar that appears on the sides.

    Increase mixer then to power level 6 and run for 3 minutes.

    Increase mixer to power level 8 and run for 3 minutes.

    Stop mixer and with a bamboo skewer or toothpick add in your gel color.

    Increase mixer to power level high (10) and run for 1 minute (Just to show it who’s boss!!) or until meringue is stiff peaks. A sign that meringue is ready is there will be a good amount collected within the whisk and if you turn the bowl upside down the meringue will not slip or move. If the color does not appear to be mixer to your liking at this point I add in any color and mix gently by hand; being careful not to overmix.

    Add one half of the meringue to the almond flour/sugar mix and start folding with a rubber spatula until mixture starts to look cohesive. Add in the remaining half of meringue and continue to gently fold, stopping occasionally to scrape the sides and bottom of the bowl as needed. The batter is perfect when you lift up the spatula and tip the spatula down and ~ 4 ribbons of batter fall smoothly back into the bowl and the edges of the ribbons fade into the rest of the batter in 10 seconds.

    Fill your pastry bag by using a heavy tall cup or mason jar to hold your pastry bag with the top folded over the glass. When preparing your bag after you drop in your round tip (I use an Ateco 804), twist the bag right above the larger end of the tip and push it down into tip. Fold the top 4 inches of the bag over the jar or glass. Pipe quarter size of your batter and let sit for about 15-30 minute until they are no longer tacky feeling with touching with a finger.

    Bake in a preheated oven for ~ 15-16 minutes at 300° F- 325° F (see above). Allow to cool completely on the tray and then remove and sandwich with the malted milk chocolate ganache and roll each macaron edge into the crushed Cadbury egg pieces.


    Malted Milk Chocolate Ganache

    1 Cup milk chocolate chips

    1/3 Cup heavy cream

    3 Tbsp. Carnation malted milk powder

    Crushed Cadbury Easter mini egg candies (for dipping macs into)


    In a small saucepan scald the heavy cream and stir in the malt powder, combining well. Pour over the chocolate chips in a heat proof bowl and let sit for one minute, then stir slowly to combine. Let ganache firm up in the fridge until ready to use. Use a piping bag to pipe dollops of ganache to sandwich each cookie, then roll in crushed Cadbury egg pieces. Chill in the fridge in a covered air tight container to allow the macarons to “mature” for 1-2 days ideally before serving.


  • Pumpkin Spice Whoopie Pies

    I must admit- I’ve never really been into whoopie pies until last year when I made my first batch. I suddenly occurred to me that you know that trick everybody does where they take their cupcake and tear off the bottom and place it on top of the frosting to create a sandwich? well…it’s kind of like creating your own whoopie. Besides, whoopies are a whole lot cuter-especially when you make them mini size they are perfect party fair.

    Come on, you know you want an excuse to call up your neighbor and ask “Do you want to come over for some whoopie?” Ha Ha Ha. Sorry, I had to slip that in there. But kidding aside, it’s fun to have the girls over to catch up on the neighborhood gossip (not kidding- kinda, sorta) while you scoot the boys outside to the deck  while they drink their beer so you can nibble on a few of these cuties drinking your seasonal drink of choice.

    I made two mini sizes. I was playing around with the recipe during my recipe development phase; including even how to scoop them. At first I tried using the ice cream scoop method using a mini scoop, and they just did not come out uniform or smooth enough on top, (esp. since the batter is a bit sticky), so I switched to using the tried and true piping bag method. Not only was the piping bag method the winner but each and every cookie came out uniform in size (but full disclosure I used a template*See note below). I piped two different sizes (1.5 inch and 2 1/4 inch size). I know this is rather small, so you can obviously go bigger since we are talking really small here. I would not go bigger than 3 inch size though since they are a rich in flavor. I actually think the 2 1/4 inch size is perfect to be quite honest which is about 3 bites worth.

    Pumpkin Spice Whoopie Pies

    yield: 2-3 dozen depending on the # of size you make

    3 Cups all purpose flour

    1 Tbsp. + 1 tsp. pumpkin pie spice

    1 tsp. baking powder

    1 tsp. baking soda

    1 tsp. kosher salt

    3 Cups canned pumpkin puree

    1 C vegetable oil

    2 eggs

    2 Cups firmly packed light brown sugar

    1 tsp. vanilla


    In a large bowl place the pumpkin puree, vegetable oil, and egg and whisk to combine. Then add in the brown sugar and vanilla and whisk again to combine until smooth. Using a metal type strainer, hold it over the bowl and sift through the dry ingredients, then whisk until combined.  (Alternatively you can whisk the dry ingredients in a separate bowl and add to the wet). Regardless, mix gently until the mixture is comes together but do not over mix. Fit a piping bag with a large round tip (I like to use an 806). Prepare baking sheets with parchment paper. Preheat oven to 350° F with rack in center position. Pipe batter spaced about 1 1/2 inches apart. Bake one tray at a time 10-12 minutes until just set and when touched they spring back. Let cool on tray for a few minutes then remove to cool completely on wire rack. When cool sandwich with cream cheese frosting recipe. Note: for the 2 1/4 inch cookie size I felt that 1 tablespoon scoop frosting worked perfectly, and the smaller size, just use a little less.

    * A long winded word about templates….I have a heavy paper type macaron template I use for my piping that I slide under the parchment paper and right before the cookies are ready to bake simply remove the template and reuse for the next tray when piping. I have various sizes that I’ve made over the years by copying circles with a sharpie around biscuit cutters. For a useful tip- Fold down the two opposite corners of your parchment sheets and then fold them back up so the corners are standing back up to use as a “Tab” so you can to grab the piping template a bit easier. If you don’t have the patience to make a template here are two recourses of two different sizes. For the 1.5 size the Southern Fatty blog has a template here. For a 2 1/4 inch size, here is a link for a 2 inch template here, and you can quickly trace with a 2 1/4 biscuit cutter using a pen to mark the outline so you have the right size and print out another sheet tape the two sides together so you can slide it under to fill a half sheet pan under your parchment. If this seems like a lot of work, you’re right, but you will be amazed that you will not waste any unmatched sized cookies when it comes to assembling your whoopies. Also, if you like to make macarons like I do- save your templates and you can use them over and over again multiple times. So, it’s up to you how OCD you want to be. Me, I’m a perfectionist when it comes to stuff like this, so hey, I can’t help myself.

    Cream Cheese Filling

    1 stick (1/2 C) unsalted butter (cold), cut into 1/4 inch size cubed pieces

    8 oz. cream cheese (cold) and cut into 12 equal pieces

    3 Cups confectioners sugar, sifted

    1 tsp. vanilla

    In a stand mixer fitted with the paddle attachment, place the cold cubed butter and beat until pliable and the butter is sitting along the sides of the bowl. Scrape down the bowl, and beat a few more times on low. Add in the cold cream cheese and beat on low speed for a few minutes, stopping to scrape down, and in between  the beater to loosen the cream cheese so that it falls to the bottom of the work bowl. Continue to beat on low to medium speed for a few minutes until the two come together. Add in about half the confectioners sugar and stir speed slowly at first so that the sugar does not cause a mess, then increase speed and beat on slow to medium speed, increase speed in bursts, but do not beat at high speed-you want the mixture to remain cold so it does not turn runny. Add in the other half of the sugar and continue to stop and start and scrape down sides a needed and beat on low speed just it has come together. When it looks like it has come together, increase on high speed just for a few seconds to get rid of any lumps, but no longer than a few seconds. Cream cheese frosting is funny-if you beat it to death-it looses its structure and turns too runny. I have been making my cream cheese frosting this way rather than starting from room temperature and it always maintains it’s structure. It helps to have the cream cheese cut into small pieces when you start. You might have to practice a few times, so don’t be too disappointed if you don’t get it perfect the first time.  I hope you like this way!! I always start from cold now and it’s not failed me.


  •  

    I haven’t made a layer cake in a while, but for some reason I was feeling it. My lemon tree is dropping lemons like grenades every four seconds right now as it’s time for the ol’ tree to shed all of it’s lemons, so after making what seemed like endless pitchers of lemonade, I decided a lemon cake was in order. This cake is super fun to make because of the speckled decorating part. It’s a bit of an ambitious cake, so by all means make parts of it ahead; such as the filling and the cake a day before if you like. Just make sure to wrap the cakes well in plastic wrap and chill in the fridge. I even brushed the cakes with the syrup the day before and wrapped the cakes each separately in plastic wrap and chilled in the fridge. If you’re not feeling that ambitious you can of course buy a store bought cake mix such as vanilla- and use that (I won’t judge)- but by all means make the buttercream yourself as you’ll want that amazing vanilla flavor that you can’t get from store bought.


    For pure white looking layers- use a sharp knife to cut off the browned areas of the cakes from top, bottom and sides.    


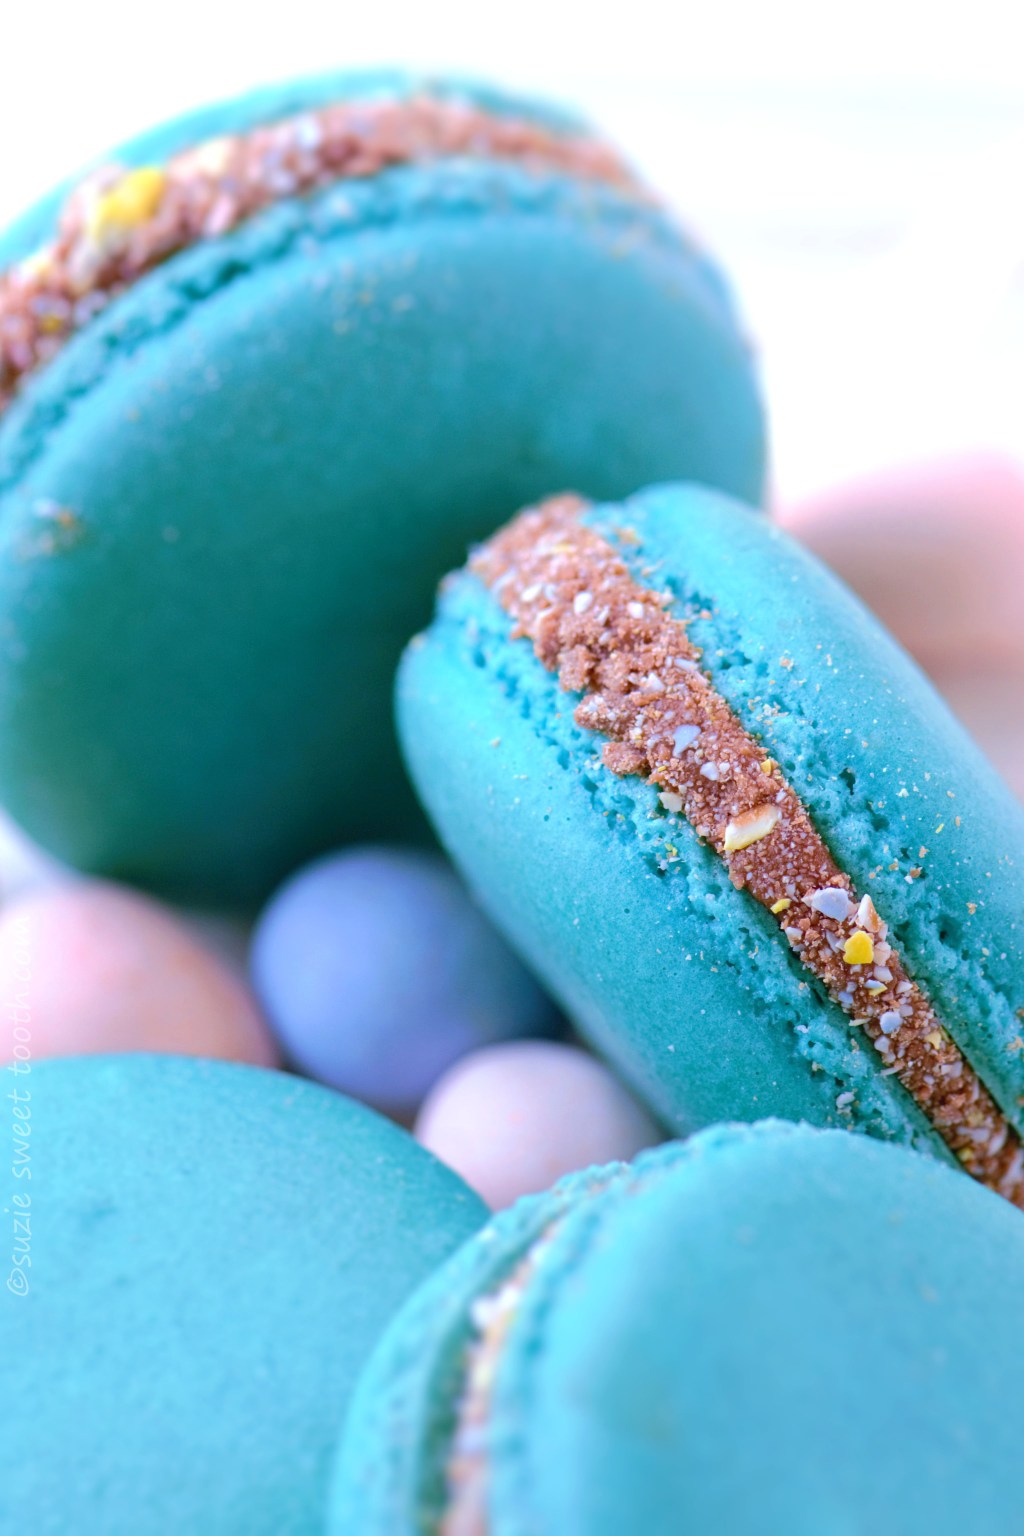
    Speckled Easter Egg Cake: Lemon-Vanilla Cake

    yield: 4 layer 6 inch cake or 2 layer 9 inch cake

    Lemon Vanilla Cake

    1 Cup unsalted butter, room temp (227 g)

    1  1/2 C sugar (300 g)

    finely grated lemon zest of 2 lemons

    6 large egg whites, room temp

    3  1/4 C sifted cake flour

    1 Tbsp. baking powder

    3/4 tsp. salt

    1 tsp. vanilla

    1 tsp. pure lemon extract

    1  1/3 C whole milk (320 ml), room temp

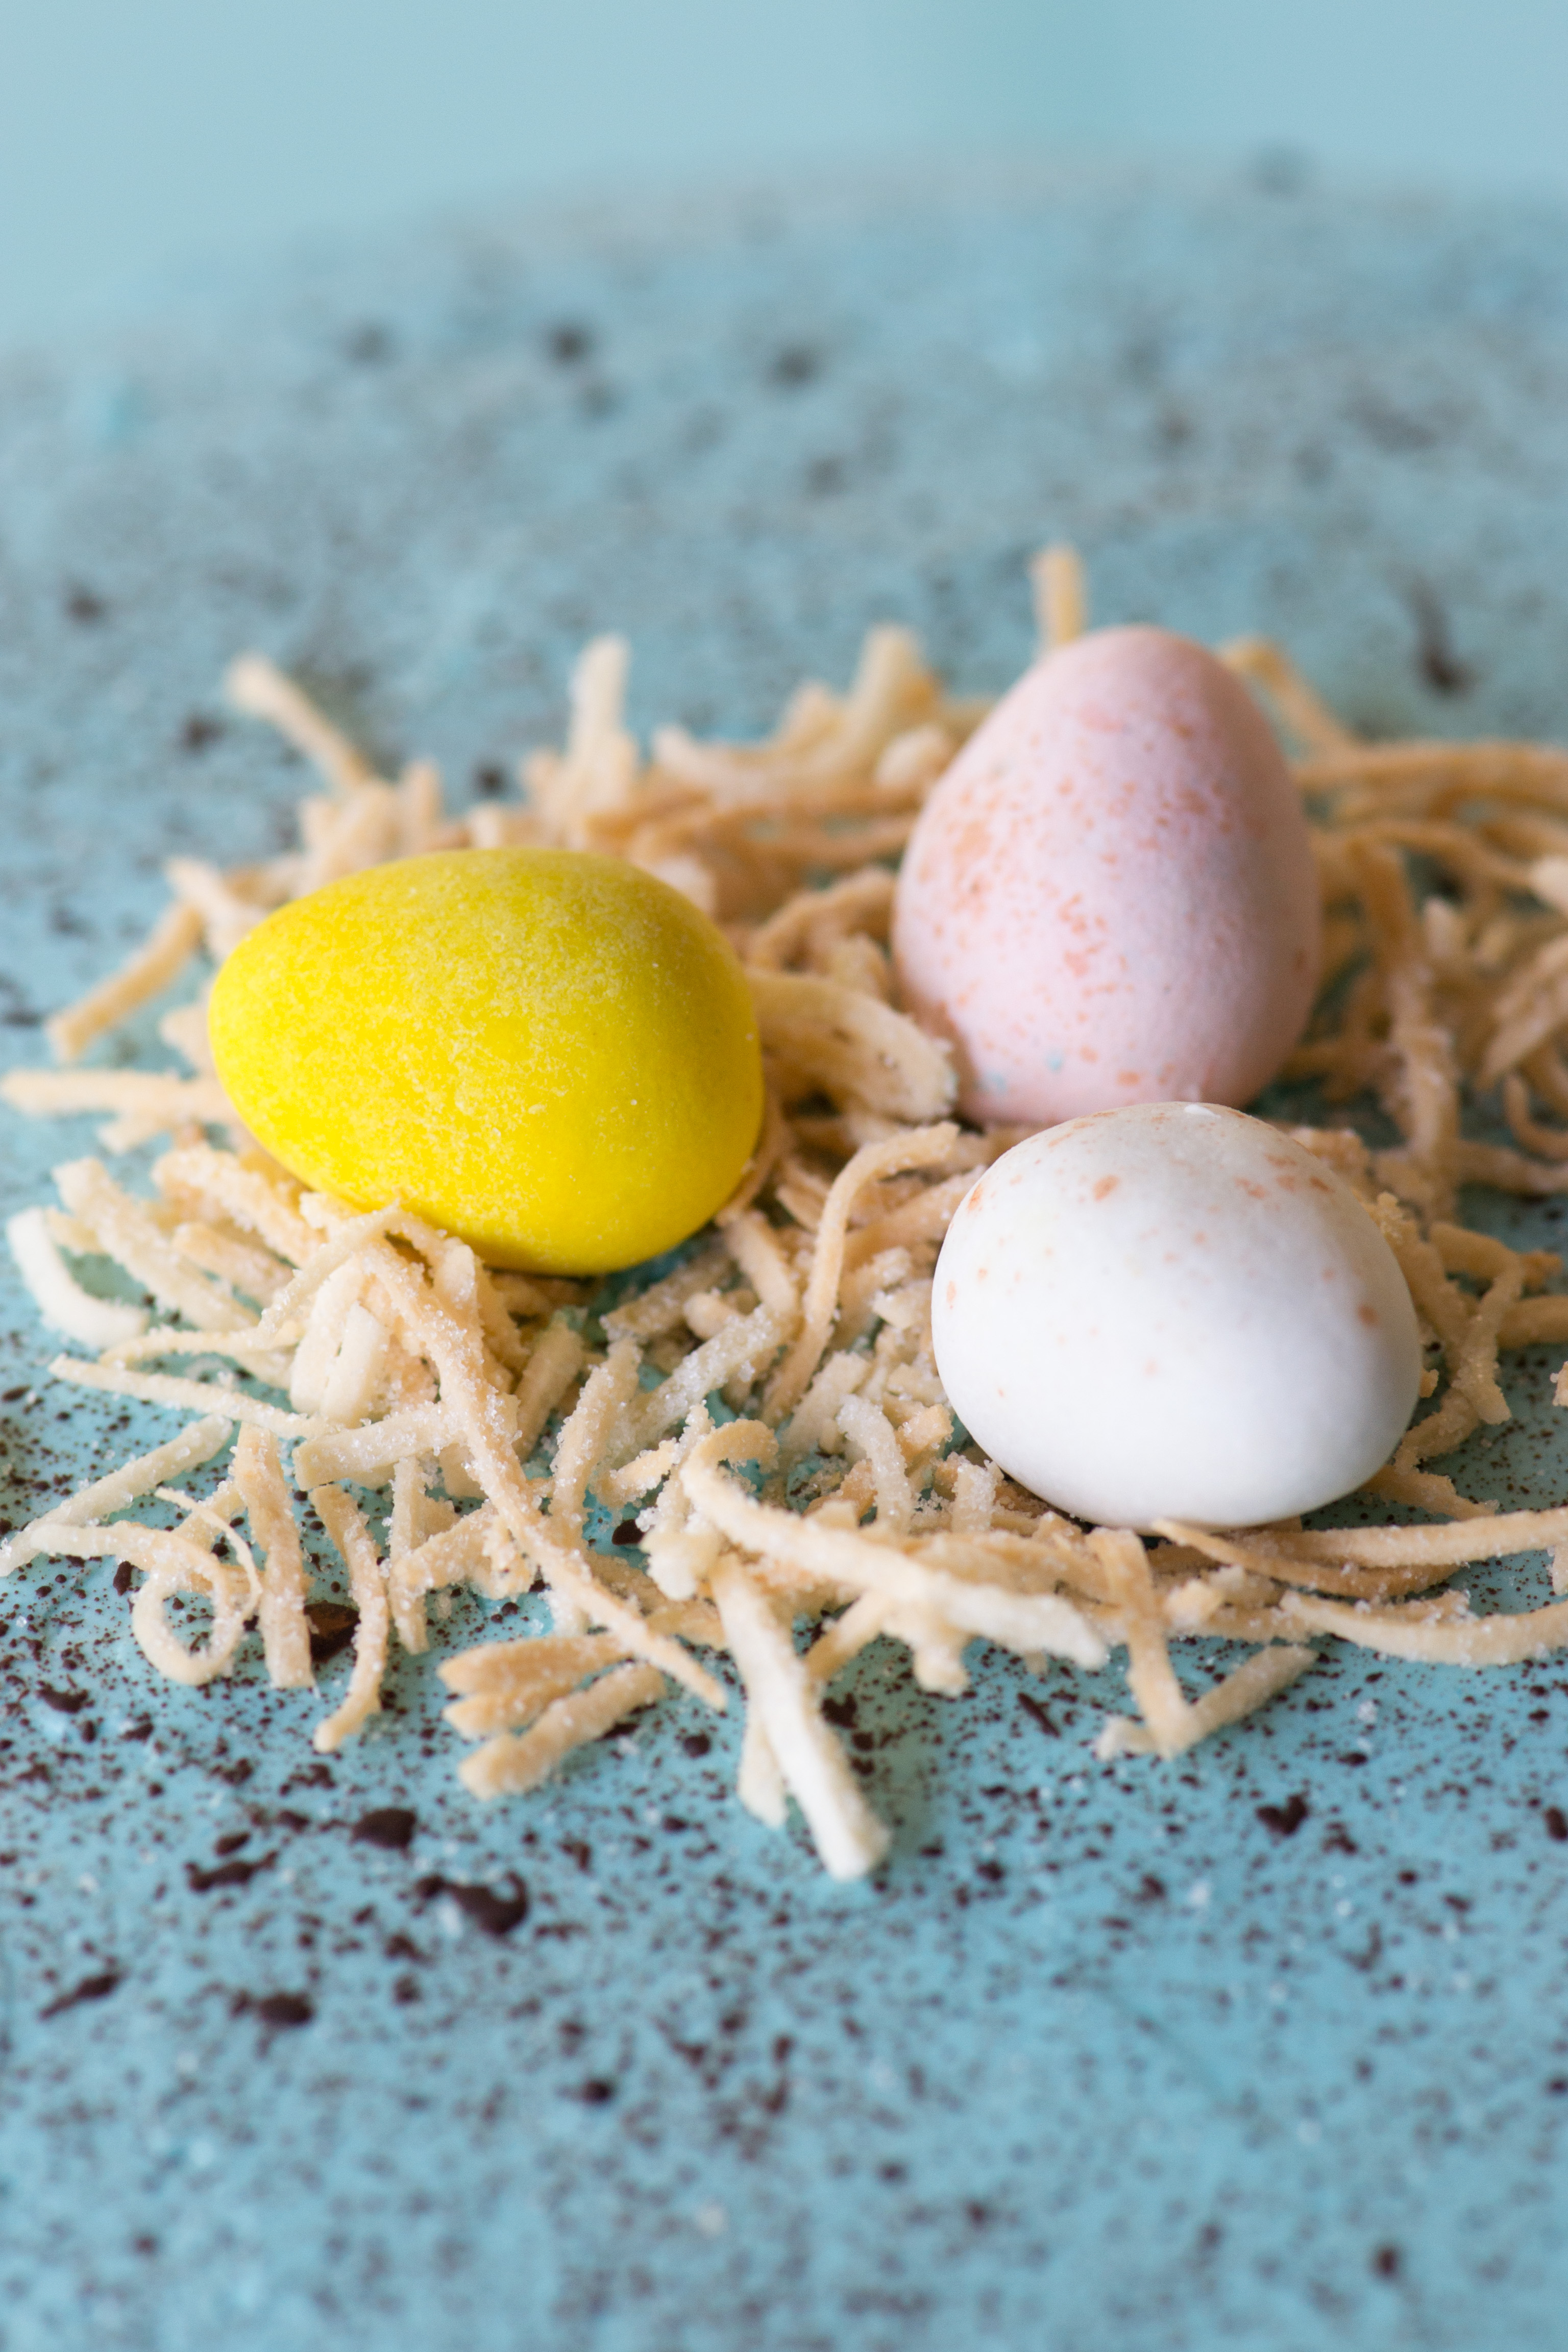
    Optional for finished garnish: toasted coconut and Cadbury mini chocolate Easter eggs


    Prepare four 6 inch cake pans with baking spray; bottom and sides (that contains flour) or grease and flour pans. Line bottom of each pan with parchment paper. You can use 2 nine inch cake pans also if you don’t want to make a six inch tall cake.

    In a medium bowl sift together flour, baking powder, and salt and set aside.

    In the bowl of stand mixer place the sugar and lemon zest and rub the sugar and lemon zest together with fingers to release natural oils in lemon zest. Add in the softened butter and using paddle attachment cream on medium speed until fluffy; about 2 minutes.  Add in the egg whites one at a time and mixing until incorporated. Stir in the vanilla and lemon extracts.

    Add in flour mixture in 3 additions alternating with milk; beginning and ending with flour mixture. Note: I like to fold in the flour mixture and milk with a spatula by hand first then gently turn on the mixer and beat gently- This ensures a lighter cake and avoids over beating the batter and helps that the crumb stays light and soft. Divide the batter evenly between the pans.

    Bake the pans in a preheat 350° F oven for 27-29 minutes or until the cake springs back when pressed gently with a finger. The cakes will just start to pull away from the sides of the pans.  Do NOT overbake. Cool the cakes in the pans for about 15 minutes, then turn out and allow to cool completely.

    Lemon Syrup

    1/2 Cup sugar

    1/2 Cup water

    4 one inch strips of fresh lemon peel (careful to make sure no white pith remains)

    3 Tbsp. fresh lemon juice

    In a glass measuring cup place the sugar, water, and lemon peel and microwave on high until sugar dissolves. Let lemon peel steep for 15 minutes, then remove. Stir in lemon juice. You can do this a day or two before to save time.

    Note: any leftover syrup you can strain to remove any cake crumbs , keep chilled in the fridge and use in iced tea.


    Lemon Cream Filling

    3 oz. cream cheese, room temp

    9 Tbsp. heavy cream, cold

    1 1/2 tsp. nonfat dried milk powder

    1/2 tsp. vanilla

    3/4 Cup purchased Lemon Curd (I like Dickinsons brand)

    Beat the heavy cream and dried milk powder on high speed using an electric hand mixer to stiff peaks. Move the whipped cream to a separate bowl and chill while proceeding. and using the same mixer bowl (no need to wash), beat cream cheese on medium speed for 2 minutes. On low speed, beat in vanilla. Add in the lemon curd and beat until well incorporated and smooth. Fold in the cold whipped cream by hand until mostly blended (don’t overmix), and cover and chill while making buttercream. Note: you can make a day or two ahead if desired and keep covered and chilled.

    Vanilla Swiss Meringue Buttercream

    5 large egg whites

    1 Cup + 2 Tbsp. granulated sugar

    4 sticks unsalted butter

    2 tsp. vanilla bean paste or vanilla, or seeds of one vanilla bean + 1 tsp. vanilla

    Sky blue gel food coloring

    In the bowl of a stand mixer combine egg whites and sugar. Set over a saucepan of simmering water and whisk until mixture is hot and sugar is dissolved. Remove bowl and place on mixer and beat until stiff meringue forms and bottom of mixer bowl is cool to touch; about 5 minutes. Add softened butter one tablespoon at a time until all is incorporated. Add vanilla,  then beat until smooth.

    Note: Reserve about a cup of the buttercream (before coloring blue) to pipe a dam of buttercream on 3 of the layers to “hold” in the lemon cream layer.

    To color the buttercream: Beat in one drop at a time of gel color until desired color is achieved. [I ended up using about 6 drops, but go SLOW and add a tiny bit at a time]. Note: the color of the buttercream will deepen in color about 1-2 shades as it sits.


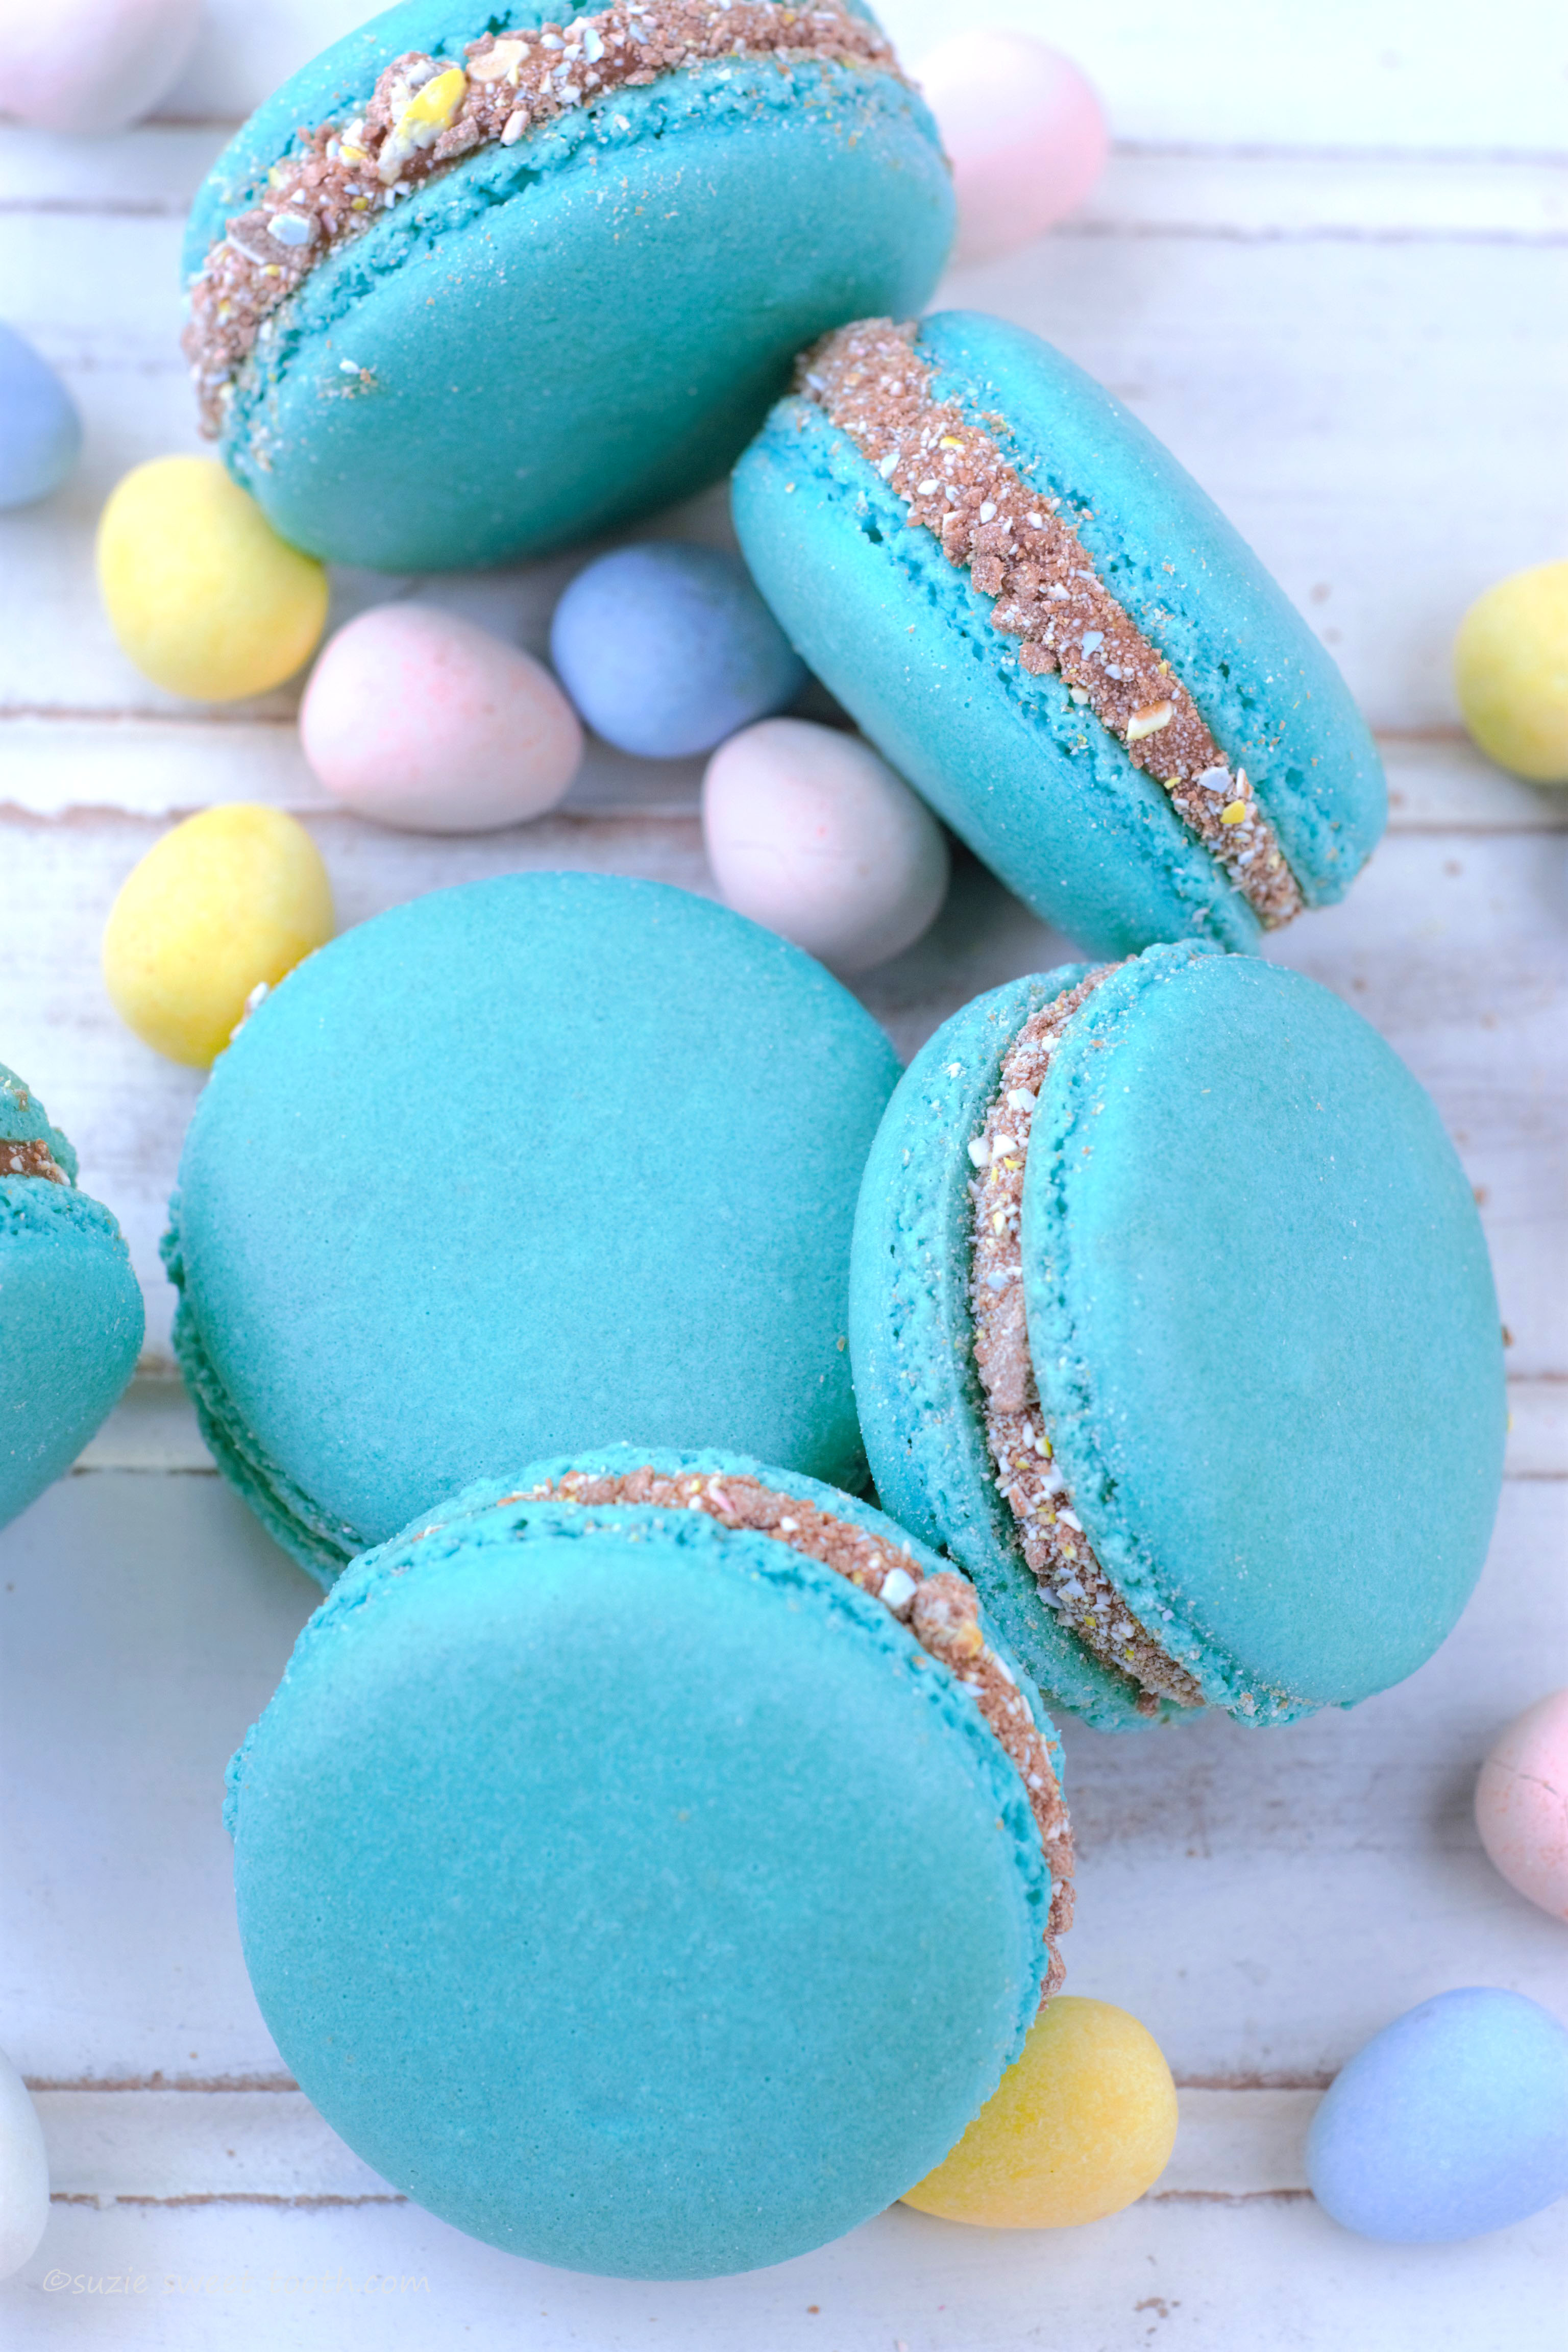
    Cocoa Speckle for decorating

    1 Tbsp. cocoa powder

    1  1/2 Tbsp. vanilla

    small clean brush for decorating (I used a never used clean toothbrush)

    In a small bowl whisk together the cocoa and vanilla. To “speckle” lay down wax paper underneath your work area and dip your brush into the mixture and then dab the brush onto the wax paper to remove any excess. You don’t want it too thick- if too thick you’ll end up with huge spots or unattractive drips. Practice first a few times on the wax paper-you’ll want to use your index finger to quickly flick the bristles of the brush about an inch away from the cake. It’s also best to whisk your cocoa mixture from time to time to prevent it from becoming too thick-you may need to add a few TINY drops of water occasionally if needed. If you end up with a real bad boo boo just chill the cake then use a small offset spatula to lift off any spots you don’t want. Note: you WON’T taste any cocoa flavor in the finished product.


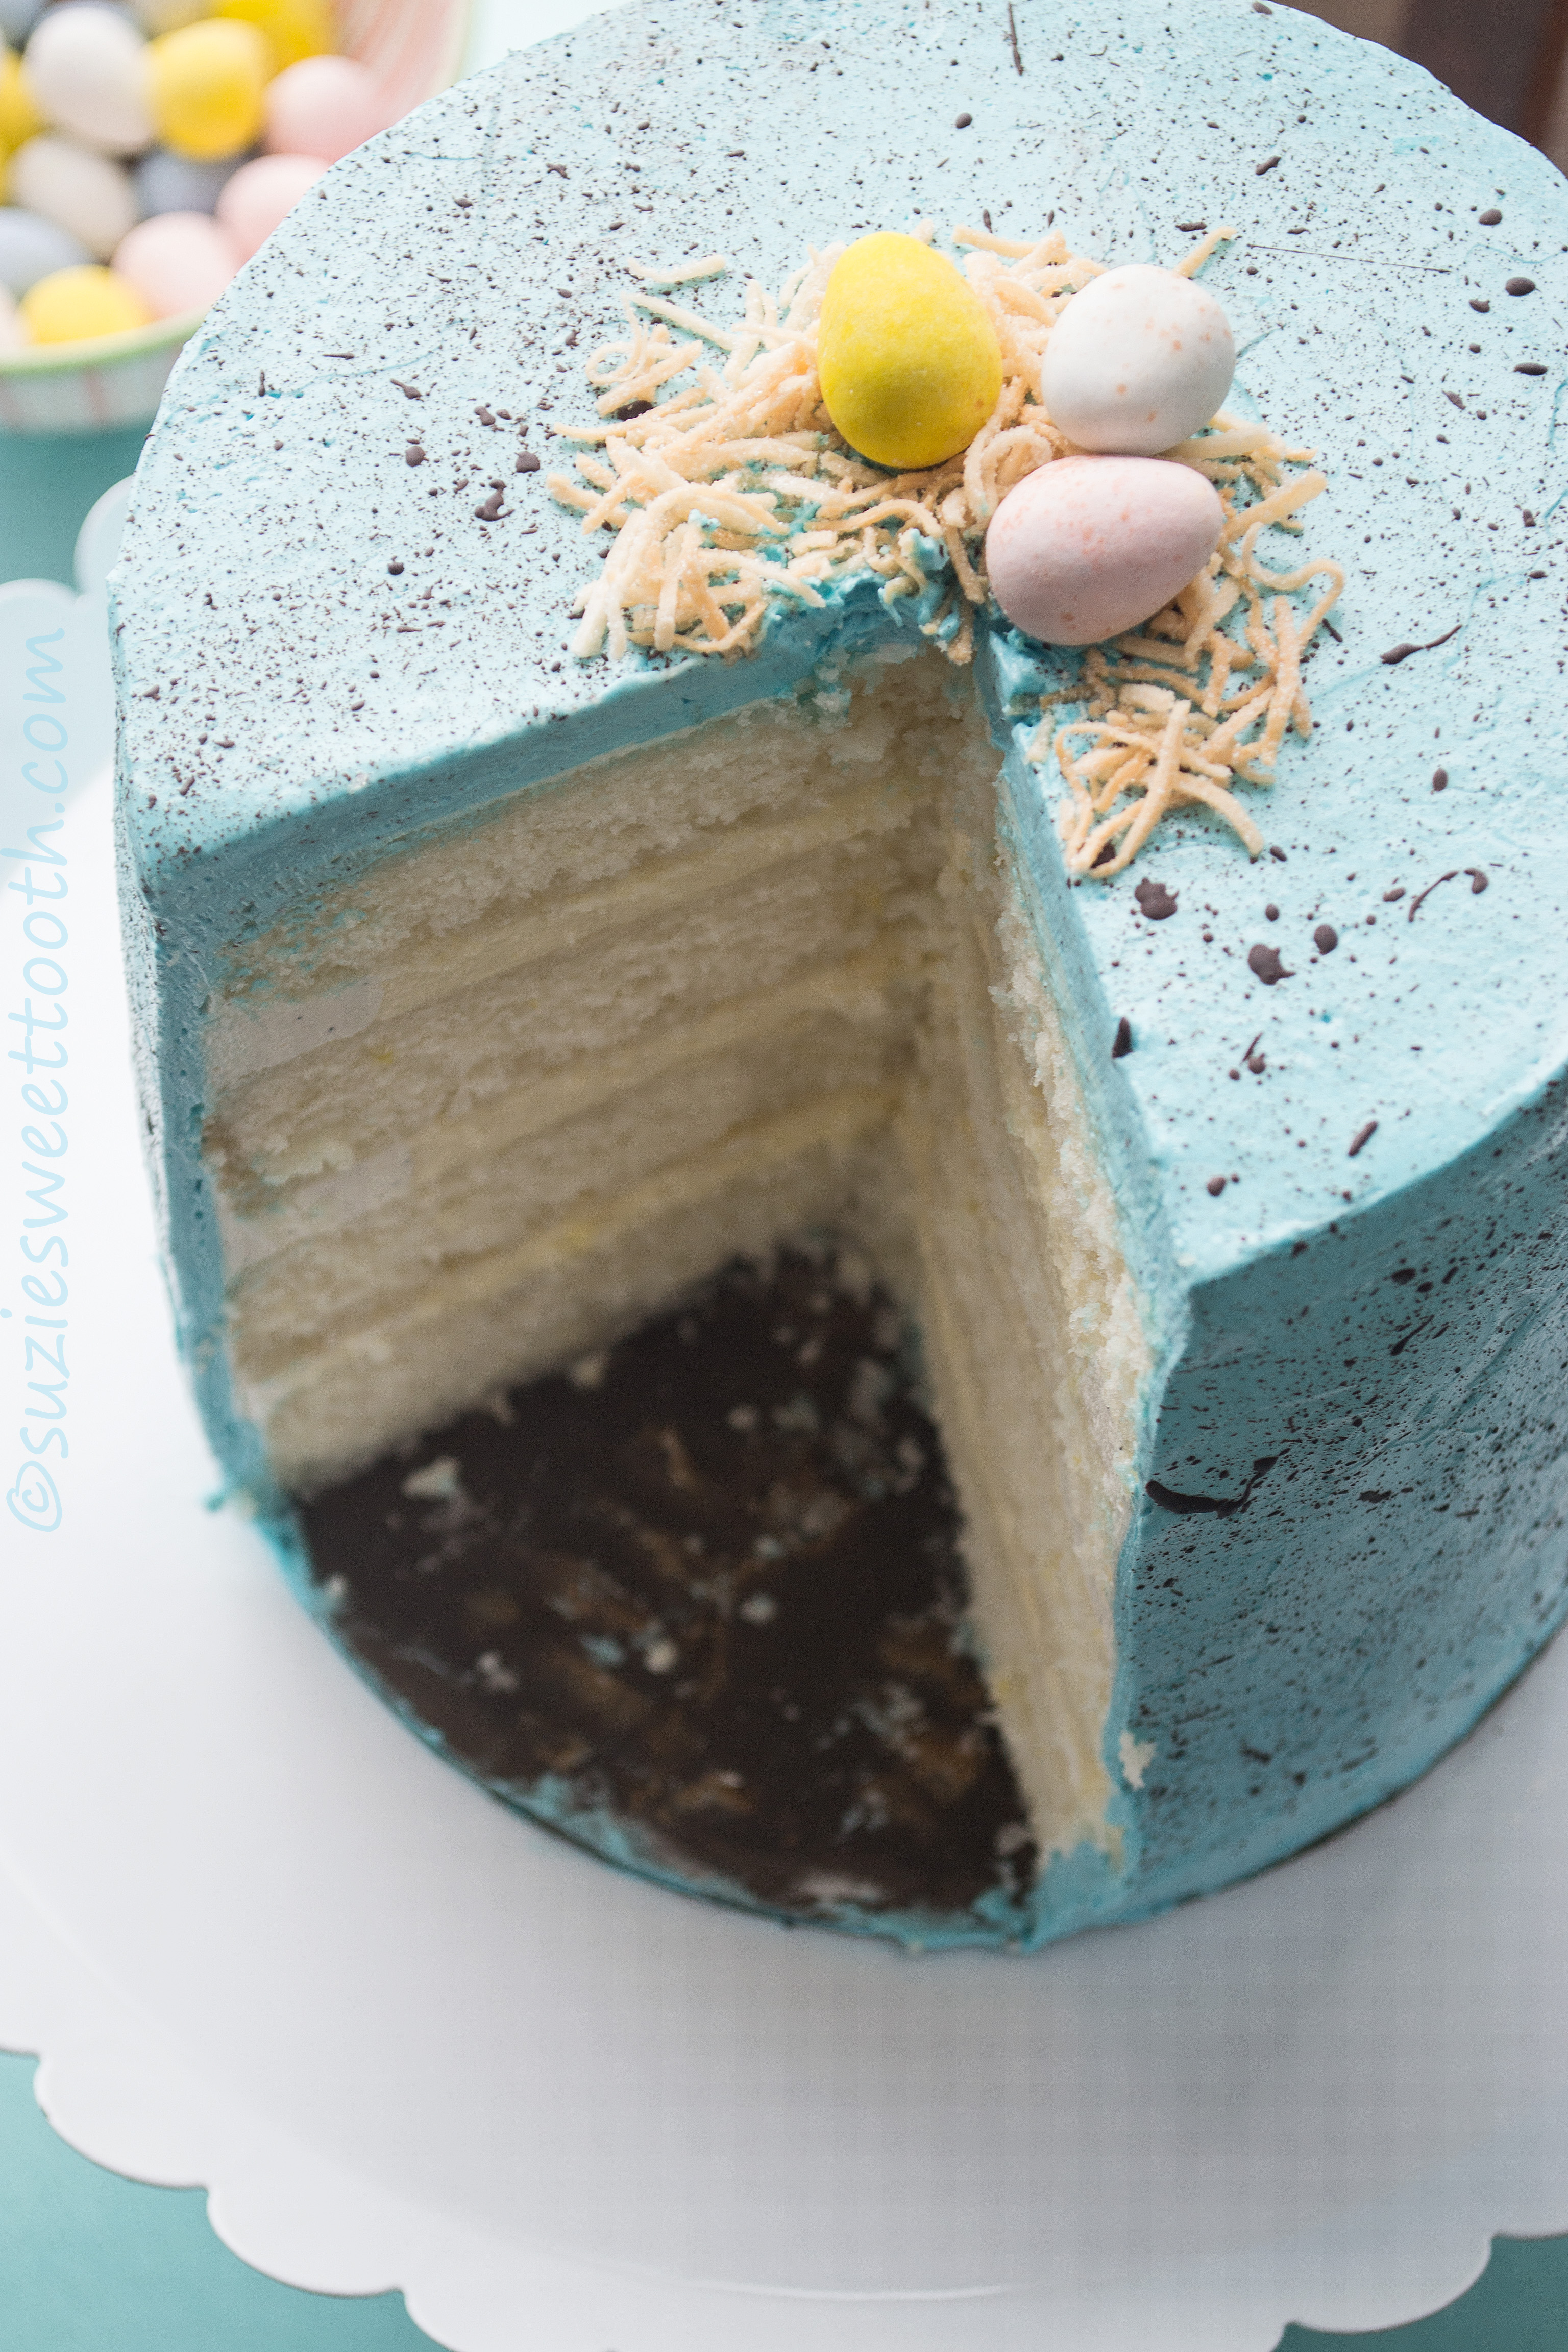
    To Assemble: Brush each layer of cake with the lemon syrup. Pipe a ring of “dam” of vanilla buttercream on 3 of the layers to hold in the lemon cream filling. Spread the lemon cream inside the dam of buttercream and continue stacking until you reach the top layer. Apply a crumb coat of buttercream and chill the cake for about 30 minutes. Continue frosting the top and sides of the cake.

    Make the cocoa speckle mixture and speckle the top and sides of the cake as noted above.  (Note- I find it helpful to lay down a few sheets of wax paper as you will get speckles of brown on your work area).

    Garnish the top of the cake by toasting small amount of sweetened coconut in the oven at 350° F for about 6 minutes or until lightly golden brown. Top off with a few of mini candy coated Easter eggs.

  • Pumpkin Coffee Cake with Pecan and Pumpkin Seed Crumble

    Are you tired of pumpkin spice yet? Not me. I’ll find any reason to come up with a new coffee cake recipe. This time of year I always have a can or two of pumpkin puree for when the mood strikes.

    The house smells amazing as this bakes, and the cake is divine. That’s all you need to know.

    Pumpkin Streusel Coffee Cake with Pecan and Pumpkin Seed Streusel

    Pumpkin Streusel Coffee Cake

    Pecan & Pumpkin Seed Streusel:

    1 Cup all purpose flour

    1/2 Cup sugar

    1 stick unsalted butter (1/2 Cup), cut into small pieces and kept cold

    3/4 tsp.  cinnamon

    1/8 tsp. ground ginger

    1/8 tsp. nutmeg

    1/2 tsp. salt

    3/4 Cup pecan pieces

    1/4 Cup pumpkin seeds

    In a bowl of a stand mixer place the flour, sugar, spices and salt. Stir to combine. Add the cold butter pieces and mix on low speed for about 5-6 minutes until mixture resembles coarse wet sand. Do not allow to form a dough. Mix in the pecan pieces by hand. Reserve the pumpkin seeds to sprinkle over later. Remove the streusel to a bowl and chill until ready to bake.

    Cake:

    1 Cup all-purpose flour

    1 tsp. baking powder

    3/4 tsp. kosher salt

    1/4 tsp. nutmeg

    1/2 tsp. cinnamon

    1/4 tsp. ground ginger

    1/8 tsp. ground mace

    3/4 Cup unsalted butter, room temp

    3/4 Cup sugar

    2 Lg. eggs, room temp

    1 tsp. vanilla

    3/4 Cup pumpkin puree

    Preheat the oven to 350° F. Spray a 9×9 square baking pan with baking spray.

    In a small bowl combine the flour, baking powder, salt, and spices and set aside.

    In a stand mixer fitted with a paddle attachment cream together the butter and sugar until fluffy. Add eggs one at a time and mix until combined. Add in the vanilla and pumpkin and mix until combined; don’t overbeat-note mixture will appear curdled but don’t worry. Add in the flour mixture all at once and mix gently on low until combined. Don’t overbeat. Pour the batter into prepared cake pan and smooth out top.

    Remove streusel from the fridge and sprinkle over cake batter evenly (it will seem like a lot but use it all). Sprinkle the pumpkin seeds over the top of the streusel and bake in preheated oven for about 35-40 minutes. Cover with foil for last several minutes if seeds appear too brown.

    Note: I finished my cake by placing under the broiler on lowest rack for a couple minutes to brown the streusel a bit further.

    Allow to cool over a wire rack and serve warm or at room temp.

  •  

    pumpkin spice scone

    Pumpkin season is here! Have you been to Trader Joe’s?!  If you have, then you know what I’m talking about- they take it to a whole other level,  it’s  a PUMPKINpalooza. Crazy. I left there in awe of all the pumpkin things they offer- it got me inspired to make a good pumpkin scone. It had to be moist, it had to have the right amount of spice, and it had to have a great glaze. I did three variations of the recipe before I came up with the right mixture of spice. FYI, pumpkin spice mix you buy in the store did not do it. Trust me on this. Pumpkin needs a lot of spice in order to let it sing. See below also for my tips on getting moist, tall scones.

    Don’t you just love Fall? A good cup of hot cider, a great scone, the Sunday paper. What more does a girl need?

    PumpkinSpiceGlazedScone

    pumpkin spice scones with classic glaze and spiced glaze


    pumpkin spice scone with classic and spiced glazed

    Pumpkin Spice Glazed Scones

    yield: 8 scones

    2 Cups All Purpose Flour

    1/2 Cup sugar

    1 Tbsp. Baking Powder

    1/2 tsp. salt

    1  1/4 tsp. cinnamon

    1/2 tsp. ground ginger

    1/4 tsp. mace (seek this out- it makes all the difference!)

    1/4 tsp. ground cloves

    1/4 tsp. nutmeg

    1 stick (1/2 C) cold cubed unsalted butter

    1/2 Cup canned pumpkin puree

    1 lg. egg

    1 tsp. vanilla

    3 Tbsp. heavy cream

    [Tips for making great scones:]

    • Cut the butter first into small cubes, and set back in the fridge for 10-15 minutes to keep cold while you measure out the rest of the ingredients.
    • Using a food processor helps to avoid overworking the dough AND keeping the butter cold while mixing.
    • Do NOT overwork the dough. Overworking/overmixing the dough results in a drier less moist scone.
    • Chill the formed scones to help retain their shape when baking (results in a taller scone).
    • Always use an oven thermometer to make sure the oven is calibrated to the exact temp called for in the recipe.
    • Place the rack in the mid high portion of the oven rather than the lower portion (prevents bottoms getting too brown)

    Scones:

    In a food processor place the flour, sugar, baking powder, spices and salt. Pulse 4-5 times to combine well. Add the cubed cold butter and pulse until mixture resembles a coarse meal with the butter resembling size of peas.

    Dump the flour/butter mixture into a large bowl and form a well in the center. In a glass measuring cup whisk together the puree, egg, vanilla, and cream. Add puree mix to the flour mixture and with a rubber spatula fold in the dry ingredients until combined. DO NOT OVERMIX! Turn the dough out onto a lightly floured board and pat into a 7 inch circle. Cut like a pie into 8 equal wedges and place scones on  prepared baking sheet, leaving at least 2 inches space between scones. Chill the scones in the refrigerator for 30 minutes.

    Preheat the oven to 425° F and prepare a sheet pan with either parchment paper or a Silpat liner.

    Bake the chilled scones at 425° F for 15-16 minutes. Avoid overbaking to ensure a moist scone.

    Let the scones cool before glazing.

    To glaze: Prepare the classic glaze and dip the top of each scone into the glaze (some will run down the sides) and set on a wire rack over a piece of parchment. Once set- mix the spiced glaze and drizzle over each scone. FYI: I think they taste better a bit warm, so I nuke mine in the microwave for about 20-30 seconds.

    Classic Glaze:

    3/4 Cup confectioners sugar + more if needed

    2  1/2 Tbsp. milk

    In a small bowl whisk together the glaze until smooth. Add a Tbsp. or more confectioners sugar as needed if glaze not thick enough. You don’t want it too thin.

    Spiced Drizzle Glaze:

    Once the scones are dipped in the classic glaze, use the leftover Classic Glaze in the same bowl and whisk in these spices: 1/4 tsp. cinnamon, 1/8 tsp. nutmeg, pinch of ginger, pinch of cloves.

    Note: to turn the glaze a more pumpkin color- I add a bit of chocolate brown gel paste food coloring along with electric yellow gel paste to achieve the perfect pumpkin color; using a toothpick of each at a time until desired color. Wait until the classic glaze is set until you drizzle the spice glaze over.

  • cajun chicken pie

    Who doesn’t love a good “pot pie?” The Husband, that’s who. When I first got married The Husband informed me “Never make chicken pot pie”. That was the only food flare he shot up. Now, this is a man who will EAT ANYTHING, and I do mean anything. I mean, he hails from Taiwan- the island of stinky tofu for God’s sake. He’s like a clone of Andrew Zimmern, the man would eat rattlesnake if I served it. The back story behind this aversion to the pot pie stems from his childhood. You see, apparently growing up, every Friday night (or maybe more-and I’m sure he’ll clarify it after reading this) his parents would go out to fulfill military social obligations and leave him a frozen pot pie to heat and eat. This little ritual went on for a number of years, hence the extreme aversion. These little gems aren’t really a pot pie. No scary peas and carrots hiding inside. Think of them as an individual pocket of spicy Cajun goodness. Filled with juicy chicken, fresh summer sweet corn, onion, fire roasted red pepper, cilantro and lots of Cajun spice, and topped off with a Serrano chili (if you dare). What’s not to love?!

    cajun chicken pies

    individual cajun chicken pie

    filled cajun pies

    cajun chicken filling

    I mean, seriously, does this filling not look good, or what? there is nothing to fear…

    Individual Cajun Chicken Pies

    recipe adapted from “Pocket Pies” by Pamela Clark

    yield: 4 individual “Texas size” muffin pies

    Short crust Pastry:

    1 1/2 Cups all-purpose flour

    1/2 tsp. salt

    4 oz. cold, butter chopped, kept cold

    1 egg yolk

    2 Tbsp. ice water (approx.)

    In a food processor place the flour and salt and pulse a few times. Add butter and pulse until mixture is crumbly. Add yolk and 1 1/2 Tbsp. water and pulse until dough comes barely together, and add more water as necessary. Knead pastry lightly on a floured board until smooth. Press into a flat circle and wrap in plastic wrap. Chill dough for 30 minutes before attempting to roll out.

    Filling:

    2 Tbsp. olive oil, divided

    1 medium onion, chopped fine

    1 fresh corn cob, kernels removed (if you don’t want to use fresh you can substitute 1 cup frozen corn kernels)

    2 garlic cloves, chopped fine

    2 tsp. Cajun seasoning (I like “Slap Ya Mama” brand- can be found at Cost Plus Markets)

    4 boneless, skinless chicken thighs, chopped into about 1/2 inch pieces

    2 tsp. Cajun seasoning

    1/4 Cup diced roasted red pepper (purchased in jar)

    2 Tbsp. all-purpose flour

    3/4 Cup chicken broth

    2-3 Tbsp. chopped fresh cilantro

    fresh Serrano chilies (optional)

    For egg wash: one egg beaten

    1. Heat olive oil in large saute pan add onion, corn and garlic and cook over medium heat until onion softens. Add Cajun seasoning and saute for 1-2 minutes. Remove to a bowl.

    2. Heat another 1 Tbsp. oil in the same pan and add chicken and seasoning. Cook the chicken until browned. Stir in the diced red pepper. Add the flour and cook, stirring for about 1 minute. Stir in the chicken broth and scrape up the browned bits from the bottom of the pan and continue to cook until the mixture thickens. Stir in the onion corn mixture and stir. Stir in the cilantro. Taste and adjust any seasoning as necessary (I actually added a sprinkling of cayenne and paprika). Remove to a bowl and allow to cool before assembling pies.

    3. Note: if you don’t want to make fresh pastry dough you can also use purchased pie dough, or purchased empanada dough rounds. You could also use puff pastry dough and make hand pies.

    To assemble and bake:

    Brush or spray 4 wells of a texas size muffin pan. Cut out 4 rounds of dough into 5 inch circles. Place the dough rounds into the wells; pressing the sides and bottom to fit. Fill the wells evenly with the chicken mixture. Cut out 4 more rounds that are 4 inch size and brush one side with the beaten egg, then turn over and place the egg side down over the filled pies. Brush the tops of each pie with egg wash, and (if desired) pierce the top and insert a fresh Serrano chili. Bake in a 400° F preheat oven for 24-25 minutes. Cool in the pan until cool enough to remove.

  • In my favorite dream I’m laying in a hammock swaying under a breezy palm tree sipping a cold pina colada. I have no job to return to, no bills to pay, I have thin thighs, and no worries what so ever. Oh, and there are no calories at all in my pina colada. It’s my dream, okay?  My personal beach butler is only there to return every so often to ask me if I want another drink… Yeah, nice fantasy, huh? At least in reality you can create a tasty macaron…

    coconut and pina colada macarons

    Coconut Pineapple Pina Colada Macarons

    pina colada macs

    Coconut Macarons

    3 large egg whites (105 g) (room temperature)

    pinch cream of tartar

    1/4 cup (50 g) superfine sugar

    1/2 tsp. coconut extract

    3/4 Cup (72 g) almond meal, sifted

    1/4 Cup unsweetened (desiccated) coconut

    1 1/4 Cups (156 g) confectioners sugar

    1. In the bowl of a stand mixer place the egg whites and cream of tartar and whisk on medium speed until foamy. Once they start to become foamy slowly add the 1/4 cup sugar and continue to whip until they are stiff. Towards the end of whipping add the 1/2 tsp. of coconut extract.  Hint: if you remove the bowl and turn it upside down and the whites do not slide out they are ready! (Just be careful when checking!)

    2. In a separate bowl whisk together the almond meal, coconut, and confectioners sugar well to remove any lumps. Gradually add the mixture to the egg whites and mix/fold with a rubber spatula until mixture falls in sheets when the spatula is lifted. About every 5th fold lift the spatula up and let the batter fall back into the bowl.

    3. Prepare a sheet pan with either Silpat or parchment paper and preheat the oven to 300° F. Pipe the macarons onto the prepared sheet pan about a quarter size with 1 1/2 inches space between. Note; if after piping there are visible peaks then the batter is too thick and could cause problems such as cracking or not rising correctly. Squeeze out all the batter back into the bowl (with firm pressure) and refill the batter back into the piping bag and re pipe.  Usually the act of doing this will thin the batter enough (without having to mix more) to get a more ideal thickness. Once you have piped the batter take the sheet pan and rap it on the counter a few times (3-6)  to release any air bubbles. If you still see any visible air bubbles pop them gently with a bamboo skewer or toothpick. Allow the sheet pan to sit for 30-60 minute to form a “skin” so when touched the batter is no longer tacky feeling.

    4. Bake the macs for about 13-15 minutes until when touching the top of a macaron, the top does not wiggle or slide but is firmly set. If they look like they are getting too browned then cover with tinfoil for the last few minutes. Remove from oven and allow to cool completely on a wire rack. Do not attempt to remove until they are completely cool. Once cooled; fill with your choice of fillings such as purchased key lime curd, vanilla bean buttercream, purchased pineapple jam, or pineapple curd. See below for a few recipes.

    Pineapple Macarons

    3 large egg whites (105 g)

    pinch of cream of tartar

    1/4 Cup (50 g) superfine sugar

    “Electric Yellow” gel food color (4-6 drops)

    2 Tbsp. finely ground pineapple powder (from purchased freeze dried pineapple)

    1 Cup (96 g) almond meal

    1 1/4 Cups (156 g) confectioners sugar

    1.  In the bowl of a stand mixer place the egg whites and cream of tartar and whisk on medium speed until foamy. Once they start to become foamy slowly add the 1/4 cup sugar and continue to whip until they are stiff. Add the gel color paste towards the end of the whites becoming stiff.

    2. In a separate bowl whisk together the almond meal, pineapple powder, and confectioners sugar well to remove any lumps. Gradually add the mixture to the egg whites and mix/fold with a rubber spatula until mixture falls in sheets when the spatula is lifted. About every 5th fold lift the spatula up and let the batter fall back into the bowl.

    Follow steps 3 and 4 as above with the coconut macarons. Fill with Pineapple curd, pineapple jam or vanilla bean buttercream. For the pina colada macaron sandwich one coconut mac and one pineapple mac and fill with vanilla bean buttercream.

    Vanilla Bean Buttercream

    4 egg whites

    1 Cup granulated sugar

    3 sticks unsalted butter (room temp)

    1 1/4 tsp. vanilla bean paste

    In the bowl of a stand mixer combine egg whites and sugar. Set over a saucepan of simmering water and whisk until mixture is hot and sugar is dissolved. Remove bowl and place on mixer and beat until stiff meringue forms and bottom of mixer bowl is cool to touch; about 5 minutes. Add softened butter one tablespoon at a time until all is incorporated. Add vanilla bean paste,  then beat until smooth.

    Pineapple Curd (click here for recipe link)

  • You know my obsession for mini desserts, right? The shaker lemon pie is no exception. I love these little dainty lemon pies. Perfect for a shower or garden party or a brunch.

    Since Summer is coming, and the last thing you want is a hot kitchen, they are perfect when you don’t want the oven on for too long, as they only take about 20 minutes of baking time. The recipe makes 24 mini pies. If you don’t have a silicon mini muffin pan I highly encourage you to buy one as it will make removing these SO much easier; there is no breaking or tearing of the crusts when you need to remove them, you simply just push them up out of the pan.  I purchased mine quite a while ago and I LOVE love love it. If you plan to make a lot of mini muffin sized desserts it is a good investment. I have several silicon pans of different sizes and they are my favorite.

    Mini Shaker Lemon Pies 4

    Shaker Lemon Pies

    Mini Shaker Lemon Pies 2

    shaker lemon pie inside

    Mini Shaker Lemon Pies

    4 organic (preferably unwaxed) lemons

    1 1/3 Cups sugar (divided),  plus more for sprinkling

    1/4 Cup water

    5 Tbsp. unsalted butter, plus more for greasing pans (if not using silicone pans)

    3 large eggs

    one recipe fearless pie crust dough (or your favorite pie crust)

    flour (for rolling out pie crust)

    egg white for topping prep

    1. Take 2 of the lemons and slice very thinly; removing seeds as you go along.  Place in a medium saucepan with 1/2 cup of the sugar and 1/4 cup water and stir to combine. Heat over low heat until sugar dissolves and lemon slices turn translucent. Remove from the heat and scoop out the candied lemon slices, and place onto a parchment or wax paper lined tray. (Keep the lemon syrup). Once the candied lemon slices have cooled, cut them into quarters and save for assembling the pies; you may wrap them in parchment or wax paper and store in the fridge.

    2. Grate the rind from 1 1/2 lemons as well as squeeze all the juice; add to the lemon syrup.  With the remaining half of lemon- slice paper thin slices to equal roughly 1/4 cup (I used a mandolin for this) and also add to the syrup. Add the butter and remaining sugar to the syrup and then heat over low heat until butter is melted. Once butter is melted, remove from heat.

    3. In a small bowl beat the eggs, then using a strainer- add the eggs to the syrup mixture-a little at a time while whisking after each addition to ensure the eggs do not scramble. Once all the eggs are added, return the pan to the heat and cook gently while stirring frequently until the mixture becomes thickened and the consistency of jam. Increase the heat a little bit if needed, but be careful to ensure it does not get too hot, or the eggs will curdle. Remove from the heat and transfer the filling to a bowl and allow to cool. You may make the filling the day before and store in the fridge if you like.

    4. Prepare mini muffin tins by lightly greasing; or as I prefer- use a silicone mini muffin pan. No need to grease if using a silicon pan. Roll out half of the pie dough thinly on a lightly floured surface. Stamp out 24 circles using a 2 1/2 inch cutter. Press each dough circle into prepared pan(s), rerolling trimmings as needed. When pressing the dough into the wells make sure to allow an edge of the dough so there is a bit of ridge around each well; this will help when placing the tops on to adhere to form a seal.

    5. Using the other half of the dough cut out 24 circles with a 2 or 2/14 inch cutter with scalloped edge. Cut 3-4 slits in the tops of each of the dough tops. Fill each well of the prepared bottom crusts 3/4 full and top with 2 pieces of the candied lemon slices you made in step one. Brush the top edge of each of the filled pies with beaten egg white (I prefer to use a clean finger as opposed to a pastry brush for this as it is easier), then top each filled portion with the dough tops and press well to seal. Brush the tops of the completed assembled pies with beaten egg white, (rescore your vent slits at this time if need be) then sprinkle each pie with sugar and bake in a preheated oven for about 15-20 minutes. Remove from oven and let cool over a rack for about 10 minutes before removing carefully. Serve slightly warm or cool.

  • Okay, I have a confession. I buy crescent rolls from a can. Sometimes. I know, I know…. Probably only twice a year. My son loves them and I admit I kind of like them too. I know I preach about not buying cinnamon rolls from a can so I feel kind of weird admitting this. Wednesday I accidently forgot to buy the can of rolls; and there was no way in heck I was going to maneuver the gauntlet store on Thanksgiving day just for a can of silly rolls. I always have packages of yeast in my cupboard, so I did what I should have planned from the beginning. I made rolls from scratch, and I’m so glad I did.


    crescent rolls


    crescent rolls ready for the oven

    proofed, pillowy soft,  and ready for the oven…

    tray of crescent rolls

    out of the oven and ready for melted butter to be brushed onto each one…

    buttery crescent rolls

    Crescent Rolls

    original recipe from: thekitchenmccabe

    yield: 24 rolls

    3/4 Cup milk (2 % is fine)

    1/2 Cup  unsalted butter, divided

    1/2 Cup (scant) sugar

    1/2 an egg: (whisk and egg w/ a fork in a small bowl, then use 1/2-comes out to about 2 Tbsp. if you measure it).

    4 1/2-5 1/2 Cup flour, divided

    1 1/2 tsp. salt

    1 Tbsp. active dry yeast

    1 Cup warm tap water

    1 1/2 tsp. sugar


    1. In a small saucepan combine the milk, 1/4 Cup butter, and scant 1/2 Cup sugar until the milk is very warm (scalded) but not boiling. Pour this mixture into the bowl of a stand mixer.

    2.  To the mixer: Add 1 C. of flour, 1 1/2 tsp. salt, and the 1/2 egg to the milk mixture and quickly stir together with a dough hook attachment. Attach the dough hook to the mixer and turn on to low speed to help the mixture cool down while  you quickly prepare the  yeast

    3. To prepare the yeast: in a small bowl combine the 1 Tbsp. yeast, 1 Cup warm (not too hot-or you will kill the yeast) water and 1 1/2 tsp. of sugar. Stir quickly to combine then let sit for about 5 minutes or until the mixture bubbles and appears foamy. Once yeast has bubbled, add it to the mixer bowl and continue to mix on slow/stir mode while you prepare to add remaining flour.

    4. Add 3 C. of flour and mix together on medium/low speed. When mixed together, slowly add in enough remaining flour a little at a time until the dough is just slightly sticky. The dough should gather around the dough hook.

    5. Prepare a large bowl greased with butter. (I used the paper from the butter to do this). Scrape the dough into the prepared bowl and cover lightly with plastic wrap and sit in a warm place to proof until mixture appears to have doubled. This should take about 40 minutes.

    6. Divide the dough into 2 equal parts and roll each ball into a circle on a floured surface so that the thickness is a little less thick than 1/4 inch. Rub the circle with 2 Tbsp. of softened butter. Cut the circle into 12 equal wedge portions (like you would a slice of pizza). Roll each wedge crescent style starting from the back edge and place on a greased baking sheet. You want the tip end of the rolls turned under when you place them on the sheet pan. Place rolls on sheet pan so that across you have 3, and length wise; 8 deep.  Prepare and roll out the 2nd ball of dough the same, and  place rolls until all 24 rolls are placed on sheet tray. Curve the ends of the rolls forward slightly. Cover tray lightly with plastic wrap and let rolls rise until doubled. The rolls will push each other and touch until snug. This is what you want.

    7. Bake the rolls in a preheated 350° F oven for about 15-20  minutes or until rolls are just turning lightly golden. Remove from the oven and brush top of rolls with melted butter. Let cool and serve warm or at room temp.


  • I have an abundance of “cuties” (clementines) in my fruit drawer. We love them but sometimes they seem to linger around a bit before we can eat them all. Anyone who knows me, knows I love citrus of any kind. I especially love citrus desserts or snacks. These little cuties were calling me from the fridge to use them in breakfast. So I did. You could certainly make these rolls with just exclusively orange and they would be great. Enjoy~

    orange sweet rolls

    Orange & Clementine Sweet Rolls

    Dough:

    3/4 Cup milk

    1/4 Cup unsalted butter, softened

    3  1/4 Cups all-purpose flour

    1 package (1/4 oz.) fast rising yeast

    1/4 Cup + 1 Tbsp. sugar

    1/2 tsp. salt

    1/4 Cup water

    1 egg

    1. In a small sauce pan scald the milk, then remove and add in the butter and stir until melted. Add the water. Set aside to keep lukewarm.

    2. In the bowl of a stand mixer whisk 2 1/4 Cups of the flour with the yeast, sugar and salt. With the paddle attachment add in the milk mixture and blend. Add in the egg and beat well. Add in the additional cup of flour a bit at a time until the dough pulls away from the sides of the bowl. Note; depending on the humidity you might have to add an additional 1/4 to 1/2 cup more of flour. Switch to the dough hook and knead the dough using the mixer for about 5 minutes until the dough comes together in a ball.

    3. Coat a large bowl with a little oil and place the dough inside the bowl and cover with a tea towel and let dough rest for 15 minutes.

    4. Roll out the dough into a rectangle about 16 x 13 inches. See recipe below for filling. Prepare the filling by using your fingers to spread the 1/4 Cup of softened butter all over the surface of the dough except leave a border about 3/4 of an inch on all sides. Combine the sugar and zests well in a small bowl and sprinkle evenly over the butter. Scatter the candied orange zest over the sugar mixture. Using your hands pat the filling mixture down into the butter. Roll the dough into a log starting at the bottom edge. Pinch the seam down the length of the dough. Trim the ends of the log if necessary if too thin. Using a sharp serrated knife cut the log in half then each half cut into 6 equal pieces so you have 12 equal pieces. Spray a 9 x 13 inch pan liberally. Place the rolls cut side up 3 across. Cover the pan loosely with plastic wrap and let the rolls rise for about 30 minutes or until doubled in size.

    5. Spray a piece of tinfoil (large enough to cover the pan) with non stick spray. Cover the rolls loosely with tinfoil. Bake the rolls at 350 degrees F for 15 minutes, then remove the tinfoil and continue to bake for another 15 minutes or until light golden brown. Let the pan cool slightly on a wire rack while you make the glaze.

    6. For glaze: whisk together all the ingredients in a medium bowl until combined. Pour over the warm rolls. Serve warm or at room temperature. Once glaze sets cover rolls with tinfoil to keep from drying out.

    Filling:

    1/4 Cup unsalted butter, softened

    1 Cup granulated sugar

    zest of one large orange

    zest of one clementine

    1/4 Cup finely diced candied orange peel

    Clementine glaze:

    2 Cups confectioners sugar

    2 clementines, (cuties) juiced

    1/2 tsp. zested clementine

    **Note: If you like, you could use orange cream cheese icing instead of the clementine glaze. For the recipe click here:

  • I remember as a little girl we would have “snack cake” after school. It was usually some type of apple or banana cake. Something that was easy and a little “something something” to tide you over until dinner. This is NOT your mother’s snack cake. No offense Mom.  New Yorkers will know this cake; this is a simple recipe but something you will be craving at all times of the day- not just after school or work. I changed the crumb topping slightly from the original recipe (which used half granulated and half dark brown sugar) because I was out of dark brown sugar and did not feel like running out to the store to get some. I like it just fine that way.

    New York Crumb Cake

    NY Crumb Cake 2

    NY Crumb Cake 4

    New York Crumb Cake

    recipe adapted from Cook’s Illustrated

    yield: 8×8 inch square (about 8-10 servings)

    Crumb Topping

    1 3/4 C (7 oz.) cake flour

    2/3 C light brown sugar (original recipe calls for 1/3 C sugar, plus 1/3 Cup dk. brown sugar)

    3/4 tsp. cinnamon

    pinch salt

    1 stick (1/2 C) (113 g) unsalted butter, melted but still warm

    1. In a bowl whisk the flour, sugar, cinnamon and salt. Pour the warm butter over mixture and stir with a large metal spoon. Push down the mixture with the spoon to compact to mix and then “rake” the mixture back and forth to break it up but allow clumps to form. Set aside.

    Cake

    1 1/4 cups cake flour (5 ounces)
    1/2 cup granulated sugar (3 1/2 ounces)
    1/4 teaspoon baking soda
    1/4 teaspoon table salt
    6 tablespoons unsalted butter (3/4 stick), cut into 6 pieces, softened but still cool
    1 large egg
    1 large egg yolk
    1 teaspoon vanilla extract
    1/3 cup buttermilk*
    Confectioners’ sugar for dusting

    *If you don’t have buttermilk; take1/3 Cup milk and stir in 1 tsp. white vinegar and let sit for 10 minutes

    1. Prepare a 8x8x2 inch square pan with a parchment sling. Spray liberally with non-stick baking spray. Preheat oven to 325° degrees F. Place rack in middle to upper middle position.

    2. In the bowl of a stand mixer with a hand whisk; whisk together the flour, sugar, soda, and salt. Fit the mixer with the paddle attachment and on low speed mix in the butter one piece at a time until the crumbs resemble no lumps; about 2 minutes. Mix the buttermilk, eggs and vanilla in a measuring cup and add in slowly with mixer on medium. Mix until smooth and light and fluffy about 1 minute. Careful to scrape down bottom of bowl and sides. Spread the batter into prepared pan evenly and top with crumb mixture starting on the outsides of the pan and working towards middle. You want pea size as well as larger clumps to stay intact including crumbs. Bake at 325° F for 35-40 minutes until a toothpick inserted comes out clean. Cool on a wire rack and when completely cool dust generously with confectioners sugar.

  • This recipe is great on a cold Winter day. I’m probably a week or so late though since the polar vortex in the Midwest and Eastern United States has past. For my peeps in the Midwest; keep this in mind for the next time it gets really cold or you need an activity to keep the kiddos busy. The pretzels are really fun to make, so it’s great to get the kids involved to have a go at shaping the pretzels. Chances are you have all the ingredients already on hand. You will need granulated (active dry) yeast though. An added bonus if it’s really cold is these bake at a pretty high temperature so the house gets nice and toasty. You could also shape these into little 1 inch bits (dip size) and make them for the “Big Game” or a fun party snack served with different types of mustard. The recipe is from Alton Brown and I added an extra step by brushing the pretzels once they come out of the oven with butter; just like the ones you get in the mall. If you like a sweet version, dip the pretzels in cinnamon sugar on both sides. Another alternative is you could sprinkle on some pizza type seasoning, or sprinkle with chopped jalapeno/chopped green chili and shredded cheddar cheese.

    pretzels sweet or salty tray

    Salty Classic or Cinnamon/Sugar Soft Buttery Pretzels

    pretzels buttered and salted

    salty version (with kosher salt)

    pretzel cinnamon sugar variety

    Cinnamon-Sugar (my fave)

    pretzels out of the soda bath

    Shown: pretzels out of the soda bath and brushed with egg yolk mixture ready for the oven. Note: The pretzels puff up in the soda bath, (and in the oven), (next time I would make the rope a little longer than the recommended 24 ” so it is thinner-say 26 “) to define the shape a bit better

    Soft Buttered Pretzels (sweet or salty)

    • 1 1/2 cups warm (110 to 115 degrees F) water
    • 1 tablespoon sugar
    • 2 teaspoons kosher salt
    • 1 package active dry yeast
    • 22 ounces all-purpose flour, approximately 4 1/2 cups
    • 2 ounces (1/4 Cup) unsalted butter, melted
    • Vegetable oil, for pan
    • 10 cups water
    • 2/3 cup baking soda
    • 1 large egg yolk beaten with 1 tablespoon water
    • Pretzel salt (or coarse sea salt or kosher salt would be fine)
    • Optional: cinnamon sugar (mix 1/2 Cup sugar with generous 1/4 tsp. cinnamon in a shallow bowl)

    1. Combine the water, sugar and kosher salt in the bowl of a stand mixer and sprinkle the yeast on top. Allow to sit for 5 minutes or until the mixture begins to foam.

    2. Add the flour and butter and, using the dough hook attachment, mix on low speed until well combined. Change to medium speed and knead until the dough is smooth and pulls away from the side of the bowl, approximately 4 to 5 minutes (the dough should make a slapping noise as it hits the side of the bowl and you know it is ready).

    3. Remove the dough from the bowl, (it will be sticky and that’s normal). Place it in an oiled large bowl and turn dough over so both sides are oiled. Cover with an oiled piece of plastic wrap or wax paper (I like wax paper) and put in a warm place for approximately 50 to 55 minutes or until the dough has doubled in size.

    4. Preheat the oven to 450 degrees F. Line 2 half-sheet pans with parchment paper and lightly brush with the vegetable oil. Set aside.

    5. Bring the 10 cups of water and the baking soda to a rolling boil in an 8-quart saucepan or roasting pan.

    In the meantime, turn the dough out onto a slightly oiled work surface and divide into 8 equal pieces. Roll out each piece of dough into a 24-26 inch rope. (The original recipe says 24 inches, but I think a bit longer would be better). Make a U-shape with the rope, holding the ends of the rope, cross them over each other and fold down the tails towards you to press onto the bottom of the U in order to form the shape of a pretzel. Place onto the parchment-lined half sheet pan.

    6. Place the pretzels into the boiling water, 1 at a time, for 30 seconds. (I find it easy to place the pretzel onto a very large spatula; like a pancake turner size and then place into the water- the pretzel will release on it’s own). Remove from the water. Return to the half sheet pan, brush the top of each pretzel with the beaten egg yolk and water mixture and sprinkle with the pretzel salt (omit the salt for cinnamon sugar version). Bake until dark golden brown in color, approximately 12 to 14 minutes. Transfer to a cooling rack for at least 5 minutes before serving. Brush with softened butter while pretzels are still warm. (I find it handy to use the other half of a stick of butter; just peel off a bit of the paper and “brush” over the pretzel).

    7. For cinnamon sugar version: omit the salt before baking and after resting for 5 minutes, brush pretzel with butter as above and dip both sides generously into a shallow bowl filled with the cinnamon sugar mixture.

    For 1 inch pretzel bits: bake ~ 10 minutes

  • I don’t know why but I’m not one to start early on making Christmas cookies. For some reason I tend to trudge along until about the week before Christmas and then suddenly the mood strikes me with full force to start making cookies. Once it grabs hold then I’m in deep. Today the mood finally struck me and I went all out in serious cookie mode. I’ll admit I don’t usually make gingerbread men or gingerbread cookies for that matter, but when I saw a picture in Donna Hay magazine with them strung along on a cute ribbon as gingerbread garland, it was so cute I had to make them.

    I adapted this recipe from Sweetopia’s recipe for her gingerbread.

    gingerbread garland

    gingerbread men garland

    Gingerbread Men Cookie Garland


    Gingerbread Trees frosted with Royal Icing, Sanding Sugar and Edible Glitter

    Frosted Gingerbread Trees

    It’s a “White Christmas!”

    White Christmas Gingerbread Trees

    gingerbread trees 3

    Gingerbread Cookies

    recipe: adapted from Sweetopia

    yield: ~ 5-6 dozen cookies, depending on size

    1/2 Cup + 1 Tbsp. (125 gm) unsalted butter, softened

    3/4 Cup packed brown sugar

    1/4 Cup white sugar

    1 large egg

    1/2 Cup molasses (I use Grandmas brand)

    3 1/4 C (400 gm) all purpose flour

    1 1/2  teaspoons ground cinnamon

    1 1/2  teaspoons ground ginger

    1/2  teaspoons ground cloves

    1/2  teaspoon salt

    1. Cream together the sugars and butter until fluffy. Add the egg and mix until combined. Add the molasses and beat until combined. Note; the mixture will initially look like it will not mix together, and will remain a bit grainy looking until the flour mixture is added.

    2. In a medium bowl whisk the flour and spices and salt. Add the flour mixture and beat until just combined. Remove the cookie dough to a large bowl and separate into 3-4 balls and knead each ball of dough lightly in your hands to combine if any flour spots remain. Flatten each ball and wrap in plastic wrap and chill for at least 30 minutes before rolling out.

    3. Roll out cookie dough to 1/4 inch thick between two sheets of parchment paper. Chill shapes for 15 minutes before baking. Bake at 350° F for about 14-15 minutes. Let cool on wire rack.

    4. Decorate if desired with royal icing. I use her technique for “10 second icing” for both outlining and flooding the cookie. Check out the blog for sweetopia.net as she has amazing tutorials and how to’s for decorating with royal icing.

    Royal Icing

    4 Tbsp. meringue powder

    1/2 C cold water

    1 lb. powdered sugar

    1/2 tsp. clear vanilla

    Combine the meringue powder and H2O until foamy. Add the sugar a cup at a time [if the sugar is lumpy; make sure to sift it first] and beat on low until combined. Once all the sugar is combined, turn up the mixer to high and beat for about 5 mins. until the meringue forms stiff peaks. To thin frosting for outlining and flooding; add cold water one tsp. at a time until the mixture is thinned to consistency of heavy cream. Ice the cookies and let the icing dry until the icing is totally dry.

  • Are you ready for Thanksgiving? Are you ready for all your relatives in your house at once? Are you ready for the big love fest that will ensue?

    That’s what I thought. You are so not ready. You’ve got about 9-10 days before the big event.

    You know there is going to be a lot of hugs, kisses, and a little extra spice thrown in. That’s what makes life interesting- the spice part. Yes, count on some bickering, some whispering; “Seriously, what is that she is wearing?!”, some whining about who gets the comfy chair, and all the little annoyances  gifts that make up a family unit.

    But you still all love each other.

    Deeply. Never forget that part.

    Thanksgiving is about love, sharing, and yes- embarassing family stories…and pie.

    At some point that embarrasing story about cousin Timmy will bubble to the surface from someone who has had a little too much chardonnay. It’s okay. This is why we have pie on Thanksgiving.

    Pie smoothes out all the bumpy spots. Pie=peace. Pie= silence. Pie=happiness.  It’s my belief pie should be served at all foreign summits and UN meetings and much more would get solved…. But I digress. There is only one problem I can think of with pie. At some point, one of your clan will ask you to slice them just a sliver. You know there is always that one annoying relative who will refuse pie, (sure go ahead and refuse after I slaved all day). Diabetics are exempt. Don’t you know that it is a turkey day crime to refuse pie on Thanksgiving?!

    “Oh, okay then, just a sliver for me” they mutter… (who are you kidding with that piece of sliver).

    I can’t stand trying to slice a sliver.

    Of anything.

    Let’s get that straight- right now.

    Now, I am in no way knocking the fact you are watching your weight or counting points or calories. Not in the least. I just have a big aversion to sliver slicing….So I have come up with a solution. Just try to refuse one of these mini pies bites. They are like pumpkin pie poppers; in essence the equivalent of a sliver of pie.

    One last thing- I totally spotted you behind the fridge earlier with the can of Redi-Whip tilting your head back squirting in whipped cream. Your secret is safe with me. Sliver indeed….

    It’s okay because I love you deeply.

    Mini Pumpkin Pie Tarts

    Yield: 24 mini tarts

    Cream Cheese Press in Crust

    3 oz. cream cheese, cubed at room temp

    1 stick butter, cubed at room temp

    1 Cup all-purpose flour

    1  1/2 tsp.  sugar

    pinch of salt

    In a large shallow bowl combine flour, sugar and salt. Add the cubed butter and cubed cream cheese. Using a fork mix to combine into one cohesive mass. Knead gently into a ball to gather up any scrappy bits of dough. Let rest in the fridge for 30 minutes.

    Pumpkin Filling

    3/4 cup solid pack pumpkin (from a can)

    1/4 cup heavy cream

    1 Lg.egg

    1/4  cup packed dark brown sugar

    1  1/2 tsp pumpkin pie spice

    1/4 teaspoon salt

    raw sugar or regular sugar (for sprinkling crust)

    1. prepare a 24 well mini muffin tin and  spray with baking spray or use a silicone mini muffin pan. Whisk all the filling ingredients in large bowl until combined. Set aside. Using the dough, pinch off enough to form about a 1 inch ball size. Flatten dough ball into a disk and press into the bottom and up the sides of each muffin well. Pour 1 Tbsp. of filling  into each pie crust well. Brush each top edge of crust with cream and sprinkle with raw sugar or granulated sugar.  Bake at 375 degrees F for 25 minutes. Because it is a custard;the filling will continue to cook even after removed from the oven and set thoroughly once cooled. The filling will puff up but will flatten once out of the oven.

    2. Rest the muffin tin over a wire rack and let the tarts rest for about 15 minutes before attempting to remove from each well. To guide out of the tin; use a thin edge knife and coax out of the wells, then let the tarts cool a bit more on a wire rack.

    2. Serve at room temperature or chilled. Whipped cream optional. Store leftover tarts in an airtight container in the fridge.

  • Perfect for Christmas morning, that’s what this is. This tastes like Christmas to me. The crust of the tart is basically an amazing gingerbread cookie topped with ground almonds, sweet marmalade coated pears and topped off with a sprinkling of icing sugar. The dough is so amazing it would also make wonderful cookies on its own. The recipe comes from the creative Donna Hay from Australia issue # 63.

    Gingerbread Pear and Almond Tart

    recipe from Donna Hay magazine issue # 63

    yield: serves 6-8

    125 gms unsalted butter (9 Tbsp.) softened

    1/2 Cup light brown sugar

    2/3 Cup golden syrup (I use Lyles golden syrup brand)

    2  1/2 Cups all purpose flour, sifted

    2 tsp. ground ginger

    1 tsp. baking soda

    1/2 Cup almond meal (ground almonds)

    2 Tbsp. caster sugar (superfine sugar)

    3 firm brown pears, unpeeled, cored and sliced (ea. pear slice into 8 slices)

    1/4 Cup caster sugar

    1 tsp. vanilla

    1/4 Cup orange marmalade

    1 egg white, beaten

    confectioners sugar for dusting

    Preheat oven to 325° degrees F. Place the butter and sugar in an electric mixer and beat for 8-10 minutes until pale and creamy. Add the golden syrup, flour, ginger, and baking soda and beat until mixture just comes together to form a smooth dough. Wrap in plastic and chill for 30 minutes.

    Roll the dough out between 2 sheets of parchment paper to 8 inches wide by 15 1/2 inches long. Mix the almond meal and 2 Tbsp. caster sugar together in a small bowl. Sprinkle down the center of the dough leaving a 2 inch border on all sides. In a medium bowl toss the pears, marmalade, vanilla, 1/4 Cup sugar to combine. Top the dough with the pears shingling them in an alternate pattern. Fold the edges of the dough over the pears. Brush with egg white and bake at 325 degrees for 30 minutes until the tart is golden. Let cool on a wire rack and dust with sprinkling of powdered sugar.

  • In 1998 I  lived in New Mexico for only a short time; 4 months in the dead of summer. I’ll never forget that kind of heat. We are talkin’ 115-120 degree summer weather. The hot dry climate of New Mexico is perfect for pine nut trees as they are drought tolerant. I have a great fondness for New Mexico still, and one of my memories is remembering the pinon trees. There was a trail I used to ride my bike down and along the trail was a cluster of pinon trees. I used to wonder, what does one really do with pine nuts other than using them in pesto? Well, I can tell you they are really good tucked into a tiny tart with honey cream! The Italians have long loved their pine nuts and you will see them used a lot in baking there in cookies. In New Mexico they love their pine nuts and they even impart them into their coffee providing a nutty flavor to the coffee. I have to be honest, I never really got into pine nuts much when it comes to baking, but when I saw this recipe I thought it sounded really good and I was right. I have adapted the recipe slightly but toasting the pine nuts and making tiny tarts instead of a full muffin size which is called for in the originally recipe.

    Honey~Cream Pine Nut Tarts

    recipe adapted from “Mini Pies” cookbook

    yield: ~ 24 mini muffin size tarts

    1/4 Cup sugar

    1/4 Cup honey

    1 tsp. kosher salt

    6 Tbsp. unsalted butter chopped into 1/4 inch pieces

    1/4 Cup heavy whipping cream

    1 egg

    1 tsp. vanilla

    2  1/4 Cups roasted pine nuts

    1 recipe all butter pie dough; click HERE  for my “fearless pie crust” recipe

    1. In a medium saucepan combine the sugar, honey and salt over medium heat. Bring to a boil, stirring constantly, until the sugar is completely dissolved. Add the butter gradually and stir until combined. Remove from the heat and allow to cool for 10 minutes.

    2. Whisk the cream and egg together in a bowl. Slowly whisk this into the honey sugar mixture until combined. Add the vanilla and stir.

    3. Preheat the oven to 325 degrees F. Spray a mini muffin tin with nonstick cooking spray. Roll out the pie crust to about 3/16 inch. Using a 2 1/2 inch fluted cutter cut out rounds and carefully shape into the mini muffin wells. Fill a heaping teaspoon of pine nuts into each pie well and top with about 1  1/2 tsp. of the honey cream mixture until almost full to the brim. Top with a small decorative pie shape if desired. Bake at 325 degrees for about 30 minutes or until the crusts are done. Allow to cool in the muffin tins for about 10 minutes then remove to a wire rack to cool.

  • Here bunny bunny bunny….I have a treat for you. I know it is a long road down the bunny trail to get to my house and I wanted to make sure by the time you get here you don’t pass out. That’s right. I’ve tied it in a nice little bundle for you so you don’t spill it along the way hopping along the trail.

    I came across this recipe last year RIGHT after Easter and was so bummed I did not find it before. This addictive mix of salty sweet is for sure going to be a winner in your house; whether it be for the Easter bunny or for one of your little gremlins.  A nice bribe, errr I mean incentive to be quiet in church. It will take you all of 15 minutes to whip it up. Once it cools package it in bags and give the extra away to your friends. Original recipe for bunny bait  by Bake at 350.

     I realized after I took this picture I forgot to include the M&M’s in the shot…But you get the idea.  

    Easter Bunny Bait 

    One package Wilton White Candy Melts

    2 packages “Tender White” Micro wave Popcorn

    3 handfuls pastel M&M’s

    3 handfuls salted party peanuts

    2 handfuls mini twig style pretzels snapped into 3rd’s

    confetti confectionery sprinkles of your choice.

    Directions: Microwave the popcorn and sort through it to pick out any unpopped kernels; discard. In a large bowl place the popcorn, M&M’s, peanuts, and pretzels. Place the candy melts in a glass measuring container and microwave on high and checking every 30 seconds stir and reheat until the coating is melted. Pour the melted candy melts over the popcorn mixture and working quickly mix the contents making sure to get down on the bottom of the bowl and mix thoroughly make sure all the peanuts and twigs get incorporated. Sprinkle on the confetti a little at a time and stir and repeat until you are satisfied with the amount. Once its mixed dump out onto a Silpat lined sheet tray or a tray lined with baking paper. I’m not sure if this would stick so I used the Silpat just in case.

    Happy Trails.

  • There is no way of getting around it. The Holidays involve a lot of eating and a lot of drinking. Most parties or holiday gatherings will certainly have alcohol and non alcoholic beverages but it’s nice to have something special for guests that is not the expected norm. Chai is a nice alternative to have waiting on the stove permeating the house with wonderful smells. This recipe is self-proclaimed as “Decadent Chai latte” as it has heavy cream in the original recipe. I love home-made chai. The first time I had “real chai” not from a mix was 12 years ago when I first moved to San Francisco. I was at a holiday party and the host had a large pot of warm chai on the stove. I was in heaven at the first sip. You could taste the difference with the fresh spices and it was so sublime compared to the mix version of chai you normally get at coffee houses. The real star of a good chai is of course the fresh spices and the tea so if you want to replace the heavy cream with a lighter milk it will still be tasty. I’ve posted the original “decadent” recipe here which is from the November issue of Southern Living. Swap out the heavy cream and replace with regular milk or 1- 2 % milk if you don’t want the chai to be so rich. Your choice.

    Decadent Chai Latte

    (recipe from 2011 November issue Southern Living)

    (serves 7-8)

    4 Cups milk

    1 Cup heavy whipping cream

    1/2 cup firmly packed light brown sugar

    1 inch piece fresh ginger, sliced

    6 cardamom pods

    1 star anise (suzie tip: buy this at an asian grocery store- much cheaper!)

    1/4 tsp. whole cloves

    1/4 tsp. black peppercorns

    4 regular-size black tea bags (I used 6 bags for a bit stronger chai)

    Dark Chocolate Chai Latte Version (see below)*

    1. Bring the first 8 ingredients and 2 cups water to a boil in a large saucepan over medium-high heat, stirring occasionally. Add tea bags; cover, reduce heat to low, and simmer 10 minutes.

    2. Pour the mixture through a fine wire-mesh strainer into a heatproof pitcher, discarding solids. Serve warm with a cinnamon stick.

    Dark Chocolate Chai Latte Version: Stir in 4 oz. chopped dark chocolate and 1/4 tsp. ground cinnamon in with first 8 ingredients, stirring until chocolate is melted. Bring to boil and tea bags and proceed with the recipe as directed.

    Printable Recipe:

    https://docs.google.com/document/d/1sV9CDw5M5KUFWn4UUcuCYEktAalludzqmVanyuxu74Y/edit

  • Pumpkin Orange Spice Cake

    Fall is officially here according to the calendar. This is exciting for us San Franciscans because it means finally our fog is lifting and we are coming into our “Indian summer”. The sky is suddenly blue instead of white, the sun is shining, the days are shorter but the smell of fall is in the air, and it’s such a fabulous time. This means pumpkins and orange colors of every hue. Big pumpkins, orange pumpkins, white pumpkins, cute little mini pumpkins and everything pumpkin in terms of baking.

    I make this cake every fall and I always make the marzipan pumpkins that go on top of the cake. I actually taught my son Seth how to make the marzipan pumpkins and once he starts there is no stopping him. Seth loves to make anything out of marzipan. Everytime I whip out the marzipan he begs me to get involved. Molding shapes out of marzipan is like playdoh for adults. I think that’s why Seth really likes the marzipan……..you see I sort of banned playdoh in our house when he was little. Don’t judge…It’s just that I got tired of picking pieces of hard gunk out of the carpet….but I digress. This cake is very moist because of the pumpkin in the batter. It is a great way to welcome in the beginning of Fall.

    Pumpkin Orange Spice Cake (yields 8 inch 3 layer cake, or 10 inch 2 layer cake)

    3/4 C Unsalted butter, softened (1  1/2 sticks)

    1 C Light brown sugar

    1 C Sugar

    3 Lg. eggs

    1 C Pumpkin puree

    1/2 C Buttermilk

    2 tsp. Vanilla

    2 oranges; zested

    2 C All-purpose flour

    2 tsp. Baking powder

    1 tsp. Baking soda

    1  1/2 tsp. Cinnamon

    1/2 tsp. Nutmeg

    1/4 tsp. Ground ginger

    1 tsp. Salt

    1/2 C Toasted walnuts or pecans (+ more for sides of cake)

    1/3 C candied orange peel* (optional) [around this time in the stores you can start to find it in little shallow tubs packed in syrup] or you can make your own. (I make my own; but that is a recipe for another time).

    Mascarpone cream cheese Icing (recipe below)

    1. Preheat the oven to 350º. Prepare your chosen pans by spraying with baking spray and lining with parchment circles; spray again lightly.

    2. Combine the pumpkin, buttermilk, orange zest, and vanilla. Set aside.

    3. Combine the flour, baking powder, baking soda, cinnamon, nutmeg, ginger and salt; whisk to combine.

    4. Using a stand mixer, cream the butter and sugars on medium  high speed until smooth and well combined.

    5. Add in the eggs one at a time; stopping the mixer to scrape down the sides and bottom of the bowl after each addition.

    6. Starting with the flour, alternate adding the flour and pumpkin mixture; scraping bowl in between each addition and ending with the flour mixture.

    7. Divide the batter evenly into the pans and Bake at 350º for ~ 25-30 minutes or until the edges are browned and a toothpick coms out clean.

    8. Cool the cakes on a wire rack for about 15 minutes, then remove to cool completely on the rack. Ice the cake with the cream cheese icing when completely cool.

    Mascarpone cream cheese icing

    (3) 8 oz. bricks cream cheese; softened

    8 oz. container  mascarpone cheese; softened

    1/2 stick (1/4 C unsalted butter, softened)

    1  1/2 tsp. vanilla

    5 Cups confectioners sugar (measure, then sift)

    1. Sift the sugar, then set aside.

    2. Using a stand mixer with a paddle attachment; beat the cream cheese, mascarpone, and butter until smooth. Add in the sugar a little at a time on low speed until combined. Add the vanilla and beat on medium high speed until smooth. Refrigerate until ready to use.

    Marzipan pumpkins

    Marzipan

    orange food coloring (gel type) * found at cake supply stores

    toothpicks

    whole cloves (or chocolate jimmies)

    Method: Wear latex free gloves or use a plastic bag to color your marzipan.  Add a little bit of orange coloring to the marzipan and knead in the coloring with your hands until desired color. I like to do two different colors of orange; one a bit darker. Once the color looks evenly distributed; pick off a ball of marzipan and roll into a ball. Using a toothpick rock the toothpick against the sides of the ball lightly to create pumpkin lines. Flatten the top of the ball slightly. Stick the whole clove or chocolate jimmy into the top. Warning; if you use the cloves; warn your guests not to eat the cloves; they are only for decoration or you can use the chocolate jimmy if you have small children or are concerned. I love to use the cloves because it the stem looks more real and also it gives off a nice scent.

    Happy Baking,

    Suzie

  • Pumpkin Orange Spice Cake

    Fall is officially here according to the calendar. This is exciting for us San Franciscans because it means finally our fog is lifting and we are coming into our “Indian summer”. The sky is suddenly blue instead of white, the sun is shining, the days are shorter but the smell of fall is in the air, and it’s such a fabulous time. This means pumpkins and orange colors of every hue. Big pumpkins, orange pumpkins, white pumpkins, cute little mini pumpkins and everything pumpkin in terms of baking.

    I make this cake every fall and I always make the marzipan pumpkins that go on top of the cake. I actually taught my son Seth how to make the marzipan pumpkins and once he starts there is no stopping him. Seth loves to make anything out of marzipan. Everytime I whip out the marzipan he begs me to get involved. Molding shapes out of marzipan is like playdoh for adults. I think that’s why Seth really likes the marzipan……..you see I sort of banned playdoh in our house when he was little. Don’t judge…It’s just that I got tired of picking pieces of hard gunk out of the carpet….but I digress. This cake is very moist because of the pumpkin in the batter. It is a great way to welcome in the beginning of Fall.

    Pumpkin Orange Spice Cake (yields 8 inch 3 layer cake, or 10 inch 2 layer cake)

    3/4 C Unsalted butter, softened (1  1/2 sticks)

    1 C Light brown sugar

    1 C Sugar

    3 Lg. eggs

    1 C Pumpkin puree

    1/2 C Buttermilk

    2 tsp. Vanilla

    2 oranges; zested

    2 C All-purpose flour

    2 tsp. Baking powder

    1 tsp. Baking soda

    1  1/2 tsp. Cinnamon

    1/2 tsp. Nutmeg

    1/4 tsp. Ground ginger

    1 tsp. Salt

    1/2 C Toasted walnuts or pecans (+ more for sides of cake)

    1/3 C candied orange peel* (optional) [around this time in the stores you can start to find it in little shallow tubs packed in syrup] or you can make your own. (I make my own; but that is a recipe for another time).

    Mascarpone cream cheese Icing (recipe below)

    1. Preheat the oven to 350º. Prepare your chosen pans by spraying with baking spray and lining with parchment circles; spray again lightly.

    2. Combine the pumpkin, buttermilk, orange zest, and vanilla. Set aside.

    3. Combine the flour, baking powder, baking soda, cinnamon, nutmeg, ginger and salt; whisk to combine.

    4. Using a stand mixer, cream the butter and sugars on medium  high speed until smooth and well combined.

    5. Add in the eggs one at a time; stopping the mixer to scrape down the sides and bottom of the bowl after each addition.

    6. Starting with the flour, alternate adding the flour and pumpkin mixture; scraping bowl in between each addition and ending with the flour mixture.

    7. Divide the batter evenly into the pans and Bake at 350º for ~ 25-30 minutes or until the edges are browned and a toothpick coms out clean.

    8. Cool the cakes on a wire rack for about 15 minutes, then remove to cool completely on the rack. Ice the cake with the cream cheese icing when completely cool.

    Mascarpone cream cheese icing

    (3) 8 oz. bricks cream cheese; softened

    8 oz. container  mascarpone cheese; softened

    1/2 stick (1/4 C unsalted butter, softened)

    1  1/2 tsp. vanilla

    5 Cups confectioners sugar (measure, then sift)

    1. Sift the sugar, then set aside.

    2. Using a stand mixer with a paddle attachment; beat the cream cheese, mascarpone, and butter until smooth. Add in the sugar a little at a time on low speed until combined. Add the vanilla and beat on medium high speed until smooth. Refrigerate until ready to use.

    Marzipan pumpkins

    Marzipan

    orange food coloring (gel type) * found at cake supply stores

    toothpicks

    whole cloves (or chocolate jimmies)

    Method: Wear latex free gloves or use a plastic bag to color your marzipan.  Add a little bit of orange coloring to the marzipan and knead in the coloring with your hands until desired color. I like to do two different colors of orange; one a bit darker. Once the color looks evenly distributed; pick off a ball of marzipan and roll into a ball. Using a toothpick rock the toothpick against the sides of the ball lightly to create pumpkin lines. Flatten the top of the ball slightly. Stick the whole clove or chocolate jimmy into the top. Warning; if you use the cloves; warn your guests not to eat the cloves; they are only for decoration or you can use the chocolate jimmy if you have small children or are concerned. I love to use the cloves because it the stem looks more real and also it gives off a nice scent.

    Printable Recipe:

    https://docs.google.com/document/d/1v0nbMDuqRWdNA6tnD3mHkacuwTM1OaJuP0BDr2Et6-c/edit?hl=en_US

    Happy Baking,

    Suzie

  • Pan-Banging Snickerdoodle Cookies

    I had a snickerdoodle years ago- I’m talking like probably 40 yrs. ago and I was not a fan. With all the recipes floating about I thought I might try it again, and this time did not disappoint. I tried the viral “pan banging cookies” from the 100 cookies book by Sarah Kieffer.

    Not only am I now a fan of the doodles, but I’m all in on this pan banging style of baking. It’s just too fun. Baking is already therapy but throw in a much-needed pan bang in the mix and it’s rather soul satisfying. I’m now making my way through the rest of the book in search of my next try it recipe.

    If you’re not aware of why the pan bang? It’s because it creates these ripples of crunchy edges with a soft and chewy center.

    Snickerdoodle Pan Banging Cookies

    (Recipe by Sarah Kieffer 100 cookies) slightly modified

    2 Cups all-purpose flour

    1 tsp. baking soda

    1/2 tsp. cream of tartar

    1/4 tsp freshly grated nutmeg

    3/4 tsp. Kosher salt

    2 sticks (1 Cup) unsalted butter, room temp

    1 3/4 Cup sugar, divided

    1 large egg

    1 tsp. vanilla

    1 Tbsp. ground cinnamon

    Place oven rack in middle position. Preheat oven to 350 degrees.

    In a small bowl combine the flour, soda, salt, cream of tartar, and nutmeg.

    Beat the butter until creamy, about 1 minute. Add 1 1/2 cups of the sugar and beat until light and fluffy. Add the egg and vanilla and mix on low to combine. Add the flour mixture and mix on low until combined. In a small bowl mix the remaining 1/4 cup sugar and the cinnamon.

    Form balls of dough (1/4 cup size) and roll each into the cinnamon-sugar mixture.

    Place only 3-4 cookies on a Silpat lined baking sheet. (The original recipe says to use tinfoil-and have the dull side up, but I did not like that idea). IYKYK. I went with Silpat and it worked perfectly.

    Bake one pan at a time. Bake for 8 minutes, then open the oven and (obviously wearing a hot pad) lift one corner of the sheet pan about 4 inches and let it drop down against the oven rack, so the edges of the cookies set and the center falls back down. After 2 minutes, lift the pan and drop/bang as before. Repat bang 3 times 2 minutes apart and bake for ~ total 14-15 minutes total. until the cookies have golden brown edges and the centers are much lighter but not fully cooked.

    Transfer the pan to a wire rack and let the cookies cool for 10 minutes. I also like to sprinkle extra cinnamon-sugar onto the cookies as soon as they come out of the oven. Your choice. Once cookies are cool, transfer to a wire rack to continue cooling. Store in an airtight container at room temperature for 2 days (or refrigerate for up to 3 days.

  • Blueberry Chai Spice Crunch Pie

    I know you’re probably thinking chai spice in a blueberry pie? Hear me out- it’s the magical blend of the spice’s cinnamon, ginger, clove, cardamom, black and white pepper that come together in just the perfect amounts that make this amazing blend.

    I use this spice blend in my chai spice cookie thins and one day decided to throw it into a pie and voila, this pie was born. I love things that at first sound a little weird but end up being so tasty that it’s like magic. Coming up with new recipes and flavor combinations; it is what keeps the joy and passion alive.

    I love a good crunchy topping on a pie. This streusel aka cookie crumble like topping is one of my go to toppings when I want a crunch. Depending on the pie I sometimes add pecans or walnuts in the mix. This pie can also be made with blackberries or even a 50-50 blend. I’m making this for a client who eats organic so I’m using organic big plump blueberries this time. Do not turn your nose up over using frozen fruit as it is picked at the peak of freshness, and you can count on it being the best. I like Sprouts brand or Costco has organic blueberries that are awesome.

    Blueberries and berry pies can sometimes be a bit of gamble as you’re never really sure how juicy and much liquid they give off- so this is the reason I like to precook the filling before I assemble and bake the pie. You can use fresh berries in this- I would cut back on the cornstarch by 1 tablespoon if using fresh, as frozen berries give off more liquid.

    Chai Spice Blend

    3 Tbsp. cinnamon (I use Saigon cinnamon)

    1 1/2 Tbsp. ground ginger

    2 1/2  tsp. ground cloves

    1/2 tsp. ground cardamom

    1/4 tsp. finely ground black pepper

    1/4 tsp. white pepper

    Mix together all the ingredients and store in a glass jar (you’ll have some leftover). This is the same spice I use in my chai spice cookie thins.

    Pie Crust Recipe: Fearless Pie Crust – SUZIE SWEET TOOTH

    You’ll need 1/2 recipe for pie crust as the topping is streusel. You can use your favorite pie crust recipe if you like.

    Roll out pie dough and line a pie tin and crimp as desired. Brush with either heavy cream or half and half and sprinkle the crimped edge with sugar. Place the prepared pie crust in the fridge to chill at least 30 minutes while you prepare the filling. Prepare the blueberry pie filling as per below.

    Cookie Crunch Streusel:

    3/4 Cup flour

    3/4 Cup sugar

    1/4 tsp. ground ginger

    pinch of salt

    6 Tbsp. cold cubed unsalted butter

    In a bowl combine all ingredients with a pastry cutter until the butter is the size of small peas.

    Blueberry Chai Filling:

    6 Cups frozen blueberries

    3/4 Cup granulated sugar + 1 Tbsp.

    5 Tbsp cornstarch

    1 tsp. chai spice blend (recipe above)

    1/2 tsp. fine sea salt

    2 Tbsp. fresh lemon juice

    1/2 tsp lemon zest

    I like to pre cook the filling for this so you can ensure the filling will set properly. There is nothing worse than cutting into a pie that has not set.

    Place all the ingredients for the filling in a dutch oven and on medium heat stir gently to combine. Heat until the filling has thickened and starts to bubble. Once the filling is bubbling continue to cook for another 1-2 minutes. Remove from heat and place in a heat proof bowl and set in the fridge to cool until room temperature or until just slightly warm.

    Assemble and Bake:

    Preheat the oven to 425 degrees F. Remove the chilled pie crust and place on a baking sheet. Fill the pie crust with room temperature blueberry chai filling and top with the cookie streusel. I like to make small clumps of the streusel by holding some in my hand to make small and larger cookie like clumps so there is a variety of the sized crunchies. Bake the pie at 425 F for 20 minutes, then drop the temperature to 375 and continue to bake with a pie shield to protect the edge of the pie to make sure it does not get too brown. Bake until the filling starts to slightly bubble up through the topping ; about another 45-50 minutes. Also watch the topping and cover the pie with tinfoil as needed to prevent it getting too dark. Remove and allow to cool over a wire rack.

    You can enjoy the pie either room temperature or chilled.

  • This is my all-time favorite Fall or Winter pie. I know, I know that sounds like a heady claim, but it really is. This recipe alone is a reason to hoard cranberries. I implore you to make it. Everyone who tastes it agrees with me. The sweet tart notes along with the spices and the crunchy topping ticks all the boxes. The streusel is everything- do NOT skip that as it makes the pie. I totally forgot to snap a picture of the entire pie I was so amped to dive into it for Thanksgiving. This streusel is also my go to favorite crunchy topping- I also use it for my chai spice blueberry pie, but I leave out the walnuts for that one. Happy baking!

    1/2 Recipe of my “Fearless Pie Crust” or single pie crust of your choice.

    Filling:

    1 lb. Fresh cranberries

    1/4 C lightly packed light brown sugar

    1/2 Cup granulated sugar

    1 medium- large orange, zested

    1 1/2 tsp cinnamon

    1/4 tsp ground ginger

    1/4 tsp nutmeg

    1/2 tsp salt

    1/4 C all-purpose flour

    Preheat the oven to 350 F. In a food processor add in 1/2 amount of the cranberries and blitz a few times until coarsely chopped. Remove and place in a medium bowl. Add in the rest of the filling ingredients and stir to combine. Set aside. Place a single crust into a pie tin and crimp as desired. Brush the edge of the crust with heavy cream or egg wash. Fill the crust with the filling and prepare the streusel recipe as per below. Gently pile the streusel on top of the filling- it will look too much- but use it all as it will bake down and you definitely want to use it all. Bake on a sheet pan in the middle of the oven for 50-55 minutes or until the filling starts to bubble out through the top or sides slightly; cover the crust with a pie shield halfway through to prevent the crust edge from getting too dark. I also cover the entire pie about 40 minutes in with a sheet of tinfoil to prevent the streusel from getting too dark as well.

    Streusel Recipe

    3/4 flour

    3/4 Cup granulated sugar

    6 Tbsp unsalted butter, cubed

    1/2 tsp salt

    1/2 tsp ginger

    3/4 Cup coarsely chopped walnuts

    In a medium bowl place all the ingredients and combine with a pastry blender. Once the butter is the size of large peas, take your fingertips and scrunch the mixture to create larger clumps of streusel so you have some larger clumps shaped like pebbles.

  • Are you a pistachio fan? I love to eat them cold from the freezer.

    Stay with me- I know it sounds a bit weird, but if you keep them in the freezer and when ready to snack on, remove a handful or two or three- they actually taste a bit sweeter. My brother-in-law who is Italian taught me that trick years ago. Besides the fact that if you are not using any type of nut right away, it is good practice to keep them in the freezer, so they do not go rancid. Mind you, a bag of pistachios in our house doesn’t last very long anyways. I made a pistachio – rose cake Birthday cake recently for a dear friend and I had some leftover pistachio buttercream so decided to whip up some pistachio macs. Some people will use ground pistachio as part of the almond flour in their recipes- and yes you can certainly do that, but it will take time to get them ground the right fineness that you need or if you buy the pistachio meal, it is not cheap. This was more a spur of the moment bake.

    I like this version because with the pistachio paste made fresh gives the macs such great flavor once you fold it into Swiss meringue buttercream.

    Alot of times when I’m making Swiss meringue buttercream, I will freeze leftover portions of it and pull it out to come to room temperature. I always try to have vanilla SMBC frozen so I can add any flavorings to it to make it into a certain desired flavor. In this case I stirred in 3 Tablespoons of my pistachio paste for each 2 cups of my vanilla Swiss meringue buttercream (SMBC is easier to type).

    Macaron Shell Recipe:

    124 g confectioners sugar

    140 g almond flour

    108 g fresh egg whites (I don’t age mine)

    110 g granulated sugar

    1/4 tsp. cream of tartar

    mint green gel food coloring

    1. In a food processor place the almond flour and confectioners sugar and run for 30 seconds. Stop and scrape down the sides so the mixture settles into the processor bowl. Repeat this 2 more times, then sift mixture through a strainer (it doesn’t have to be fine) over a large bowl (I use a 5 quart size stainless steel bowl). Preheat the oven to 300° F convection, 325° F for non convection setting. (If you want to try a different drying technique and/temperature see below about drying). Prepare two baking sheets with Silpat mats. I use these mats by Velesco (you can get 2 for 13 dollars on Amazon).
    2. In the bowl of a stand mixer place the egg whites, sugar, and cream of tartar and whisk by hand to combine. Place over a ban marie and stir gently for about 5 minutes until the mixture reaches about 130 F or when you touch the mixture with your index and thumb fingers you don’t feel any sugar crystals. Remove from the heat and place on the stand mixer fitted with the whisk attachment and start the meringue by running mixer on power level 4 (Kitchen Aide) and run for about 3 minutes.  Stop once to scrape the sides of the bowl to push down the mixture that appears on the sides.
    3. Increase mixer then to power level 6 and run for 3 minutes.~ 3 minutes.
    4. Stop mixer and with a bamboo skewer or toothpick add in a bit of mint green gel food color. You can add more color later during the end folding stage.
    5. Increase mixer to power level high (10) and run until the meringue is stiff peaks and it has started leaving tracks in the meringue and a good portion has collected inside the whisk . A sign that meringue is ready is there will be a good amount collected within the whisk and if you turn the bowl upside down the meringue will not slip or move. If you stop the mixer and tap the whisk gently on the side of the mixer bowl it will look like a bird beak; the meringue is stiff but it has a slight hooked curve when holding the whisk horizontally. If the color does not appear to be mixer to your liking at this point I add in any color and mix gently by; being careful not to overmix.
    6. Add one half of almond flour/sugar mix and start folding with a rubber spatula until mixture starts to look cohesive. Add in the remaining half and continue to gently fold, stopping occasionally to scrape the sides and bottom of the bowl as needed. After the almond/sugar mixture is all added, I do about 4 reps of where I smash the mixture against the walls of the bowl with either my spatula or bowl scraper, stopping after each time to test the “flow” of the batter.. The batter is perfect when you lift up the spatula and tip the pointed end of the spatula down and ribbons of batter fall smoothly back into the bowl. I like to gauge its ready when I can count 6-7 ribbons falling without breaking and I can “draw” a figure 8 with the batter when lifting the spatula and letting it fall into the bowl. Fill your pastry bag by using a heavy tall cup or mason jar to hold your pastry bag with the top folded over the glass. When preparing your bag after you drop in your round tip (I use Ateco 804), twist the bag right above the larger end of the tip and push it down into tip. Fold the top 4 inches of the bag over the jar or glass.
    7. Let the batter fall right into the bottom of the bag and continue filling to ensure you don’t get air bubbles. When ready to pipe and all of the batter is in the bag, twist the top of the bag and when ready to pipe, push down with your dominant hand to force the bottom of the tip to open.
    8. Pipe the batter onto prepared baking sheet with 30 macarons per sheet. Six across the long side, and five rows perpendicular. Take the sheet pan and let it drop onto the counter about 5-7 times, then look for any visible air bubbles and pop with a toothpick or bamboo skewer.
    9. I bake the macarons one tray at a time in a preheated (convection oven ) for NON convection oven* you’ll want to play around and determine what the perfect temp for you is; generally it would be 20 degrees hotter than convection) for about 15 minutes or until the cookie does not wiggle when attempting to check by carefully grabbing both sides of a cookie and gently testing. Let the tray rest on a wire rack and then bake the second tray. Cool the cookies completely and pipe the buttercream between two cookies and sandwich together.
    10. I recently started drying my macs in a different way using the technique known by “Sugarbean” on Youtube. She has a technique whereby she dries her macs in lower degree oven for 2-3 minutes with the door ajar and then she increases the temp and bakes at the higher temperature. After a few thousand trials #kiddingnotkidding I finally (for me) arrived at the perfect temp for my oven at a convection temp of 248° F for drying and then 293° F for baking and here is the process I use.

    Drying macs w/ oven method: (known as the Sugar Bean method). She has videos on you tube if you search for her.

    I preheat my oven to 248° degrees F before I have piped my macs. I place one tray in the oven and immediately turn off the oven, then open the oven and place something like an oven mitt or something to keep it ajar a couple inches. Then I immediately turn back on the oven at 248° F again, and time for 2-3 minutes. After 3 minutes I close the oven door and turn up the oven to 293° F. Once the oven temp comes up to 293° F, I then start timing my bake time for 15 minutes. After the bake time I open the door and check a macaron; if it’s super wiggly still I bake for another minute. If it barely wiggles or not at all, I turn off the oven and open the oven door ajar and time for another 2-3 minutes; “Sugar bean” calls this the “oven shower”. After the 3 minutes, I remove the tray and then let them cool over a wire rack. Now; since the second tray has already been drying at room temperature; I usually only oven dry for 2 minutes and repeat the bake as I did for the first tray.

    *A word about oven temperatures: EVERY one’s oven is different and after painstaking doing several batches of macarons I determined that in MY oven 293 F convection setting is best for me. Check your oven temperature against a thermometer placed in the middle of your oven. Some people bake there’s at 285, 290, 310 etc. unfortunately it’s something that you have to play around with and determine what is best for you and your oven. 

    Have you ever made the Easy Buttercream from Sugar Geek? Here is the link for her recipe:

    Easy Buttercream Frosting + Video Tutorial | Sugar Geek Show

    It uses pasteurized egg whites and confectioners sugar in the recipe and like the name says- is super easy. You could use that same recipe and factor in the ratio the same for stirring the 3 Tablespoons for every 2 cups of vanilla buttercream. Options- it’s always good to have options.

    Pistachio Paste Recipe

    1/2  Cup shelled unsalted & roasted pistachio nuts

    6 Tbsp.  sugar

    1 1/2  Tbsp. water

    1 Tbsp. pistachio, avocado oil, or vegetable oil (not same as the oil below which is a flavoring oil)

    1. Prepare a sheet pan with either a Silpat or by lightly greasing with vegetable oil.

    2. Pour the water in a saucepan and then add the sugar. With a clean finger mix the sugar and water until it looks like wet sand. Have a cup of water with a clean pastry brush placed in the cup.  Bring the sugar to a boil stirring to dissolve the sugar. Once sugar dissolves-stop stirring. If sugar crystals form along the sides of the pan; use the wet pastry brush to let water drip down to dissolve the crystals. Continue to cook until the mixture comes to a light caramel color. Remove the pan from the heat and stir in the nuts. Return to the heat and cook until comes to a medium amber color. Working quickly- pour the nut mixture onto prepared pan and with a heat proof spatula do your best to flatten out nuts. Allow the nuts to cool until they become hard.

    3. Once mixture is hard and completely cooled- use your hands to break apart any large clumps. Place the mixture in a food processor and pulse several times to initially break up the mixture. Proceed to process the mixture until it starts to form a thick paste. When the blade no longer seems to move add the oil and continue to process until as smooth as possible. Leftover should be stored in an airtight container in the refrigerator for up to one month or the freezer.

    Pistachio Buttercream– first you have to prepare a Vanilla SWMC or “Easy Buttercream”.

    Stir in 3 tablespoons of prepared fresh pistachio paste for every 2 cups of either “Easy buttercream” or my recipe for vanilla Swiss Meringue Buttercream (SWMC). I also like to add in a drop or two to taste of Lorann’s pistachio concentrated flavor oil if I have it on hand. See picture reference below.

    Vanilla SMBC Recipe

    3 large egg whites

    3/4 Cup sugar

    Pinch of salt

    2 sticks unsalted butter, room temp

    3/4 tsp. vanilla

    In the bowl of a stand mixer combine the eggs whites and sugar, and pinch of salt and place over a pot with simmering water. Whisk the egg whites and sugar and heat until the sugar has dissolved, and the mixture is about 160 degrees F on an instant read thermometer* (*alternatively- you can feel the mixture with your first two fingers and if you don’t feel any sugar granules then it is ok). Turn off the heat. Attach the mixer bowl onto the mixer with the whisk attachment and whisk the mixture on medium until the bottom of the bowl is almost cool to the touch and the mixture has turned into a nice stiff meringue. This will take several minutes. With the mixer on medium high, add the softened butter one tablespoon at a time and continue to mix until all the butter is incorporated, and the mixture is smooth. It will go through a curdled looking stage as it mixes; but don’t worry keep adding the butter and it will come together. Add in the vanilla and mix to combine.

    [Tip to scale up or down a recipe of Vanilla SMBC] (now, this is MY ratio recipe, if you like to use less butter, or you’ve seen recipes that are different- then so be it-please don’t write me saying its wrong or whatever; don’t come at me. You do you boo).

    For every one large egg white– I use 1/4 Cup of granulated sugar. If I’m using 4 egg whites, then from there I know how much sugar to use and how much butter. For instance: if using a recipe with 4 egg whites, I’ll use 1 Cup of sugar, pinch of salt, and 3 sticks of butter, and 1 tsp. of vanilla. Note- I just make the pinch of salt a bit bigger- it’s not really crucial to measure it, just use a bigger pinch etc. if using 5 egg whites or 6 whites. I only buy unsalted butter and bake with unsalted butter.

    5 egg whites would be 1 1/4 Cup granulated sugar, pinch of salt, and 4 sticks of butter. The process is always the same as far as technique. This way you can increase the amount of SMBC and adjust the addition of vanilla based on whether you’re going to be adding in other flavorings. I typically will use 1 tsp. of vanilla for every 4-egg white portion of SMBC, I’ll typically go by taste when it comes to the vanilla- once I make it, I’ll take a small tase with a spoon and decide if I want to add more. For a 5-egg white SMBC I might go with 1 1/4 tsp. of vanilla. It’s simply a matter of taste.

    6 egg whites would be 1 1/2 Cups granulated sugar, pinch of salt, and 5 sticks of butter. Vanilla per taste.

    3 egg whites would be 3/4 Cups granulated sugar, pinch of salt, and 2 sticks of butter. Vanilla per taste.