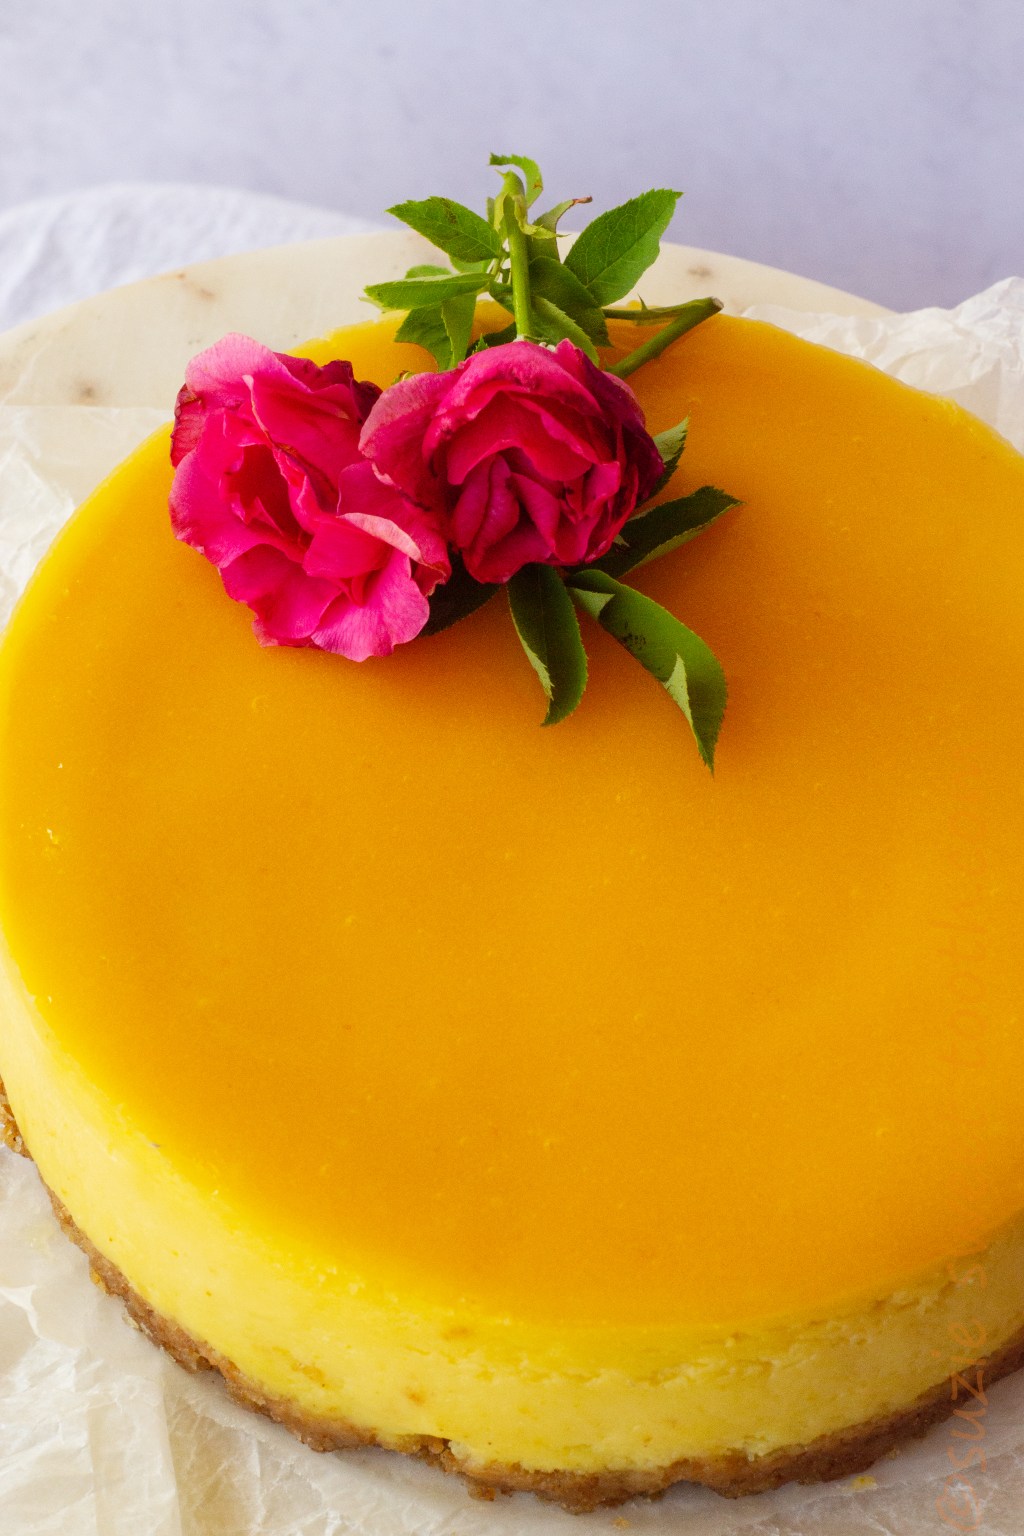
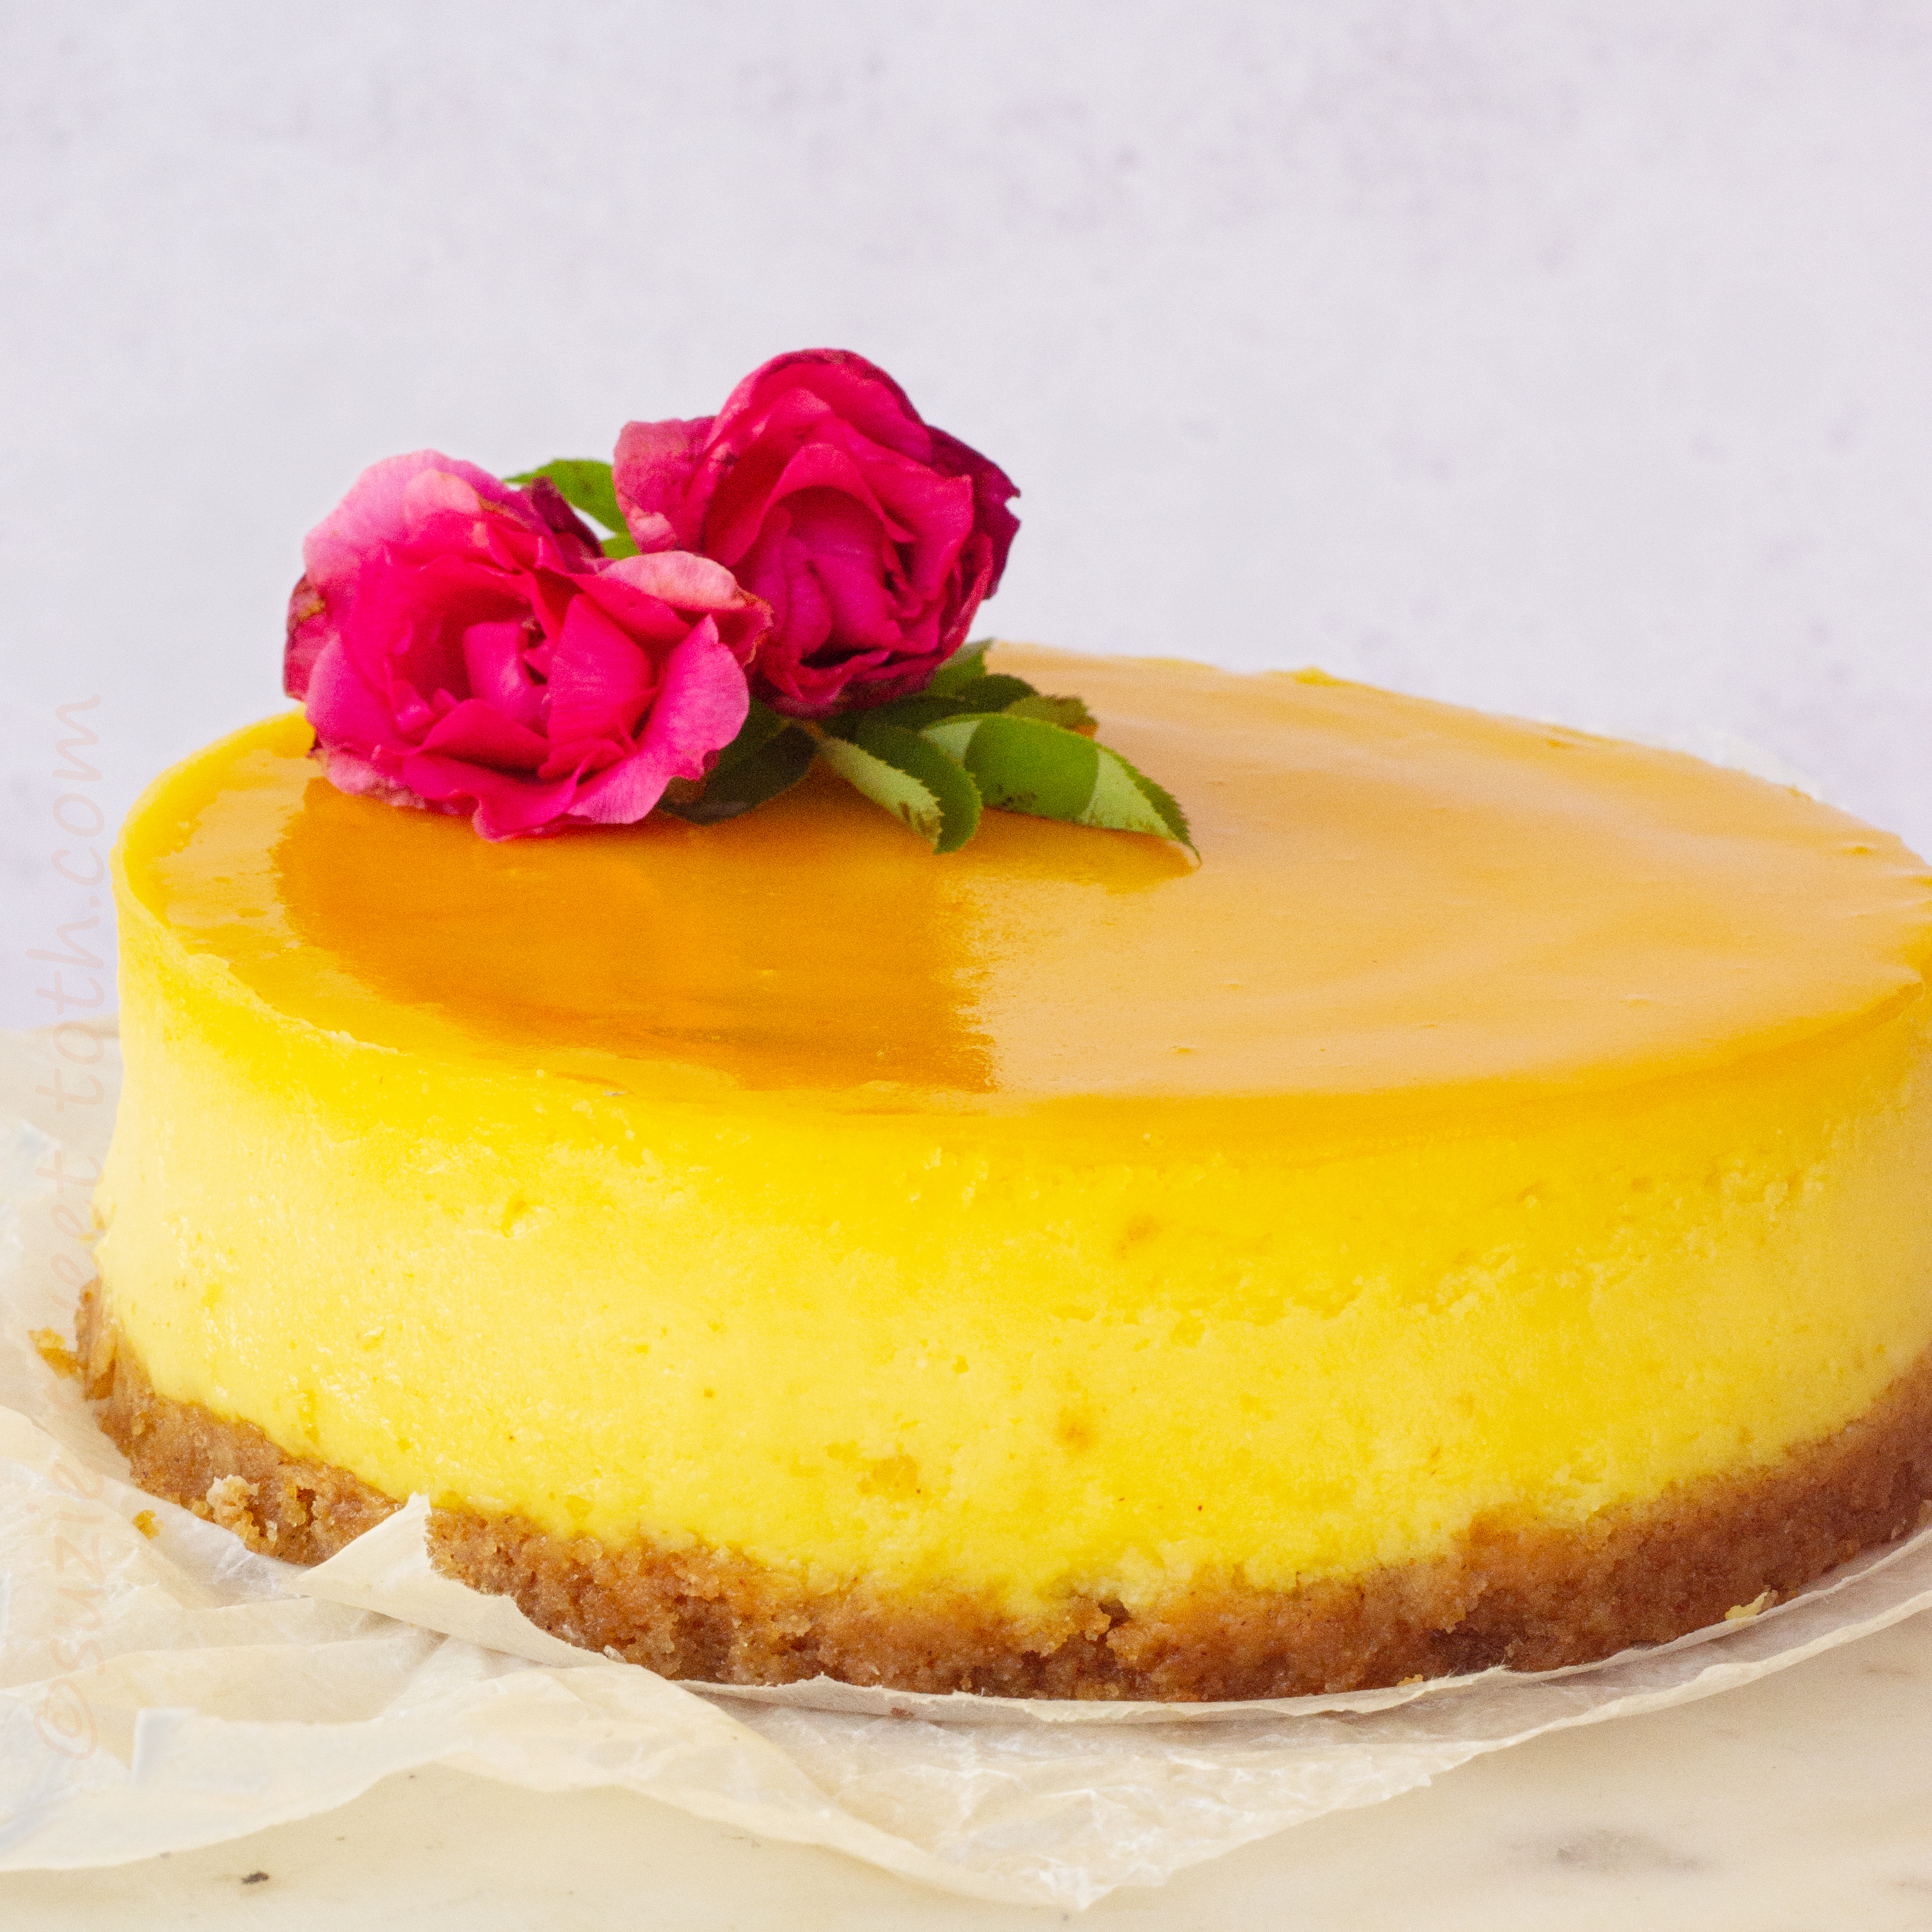
I never knew what passionfruit was until pastry school. Ever since, I have been obsessed with the flavor and love it immensely. It’s something that is hard to describe; but I’ll try. It is tangy, sharp but a pleasant floral fruity taste. If you are a lemon or citrus lover you will like passionfruit. If you are buying it fresh it is quite expensive unless you happen to live below the equator or in a region where it is grown. I buy the frozen passionfruit pulp by Goya brand which is easily found in either Asian or Hispanic markets. I always have one in the freezer stashed away. Buying it frozen is inexpensive. If you are lucky to buy them fresh, you’ll want to wait until the outside thick skin gets quite wrinkly in appearance which at that point you will get it at it’s peak ripeness. When you cut one open you will see seed pockets with juice inside. You’ll need to scoop out the contents and strain to get maximum juice. The flowers of a passionfruit vine are amazingly beautiful. If you decide to make the optional curd it does freeze nicely of any leftover amount. It blends nicely into buttercream as well to make a tantalizing buttercream. For any leftover passionfruit curd, I simply place in an airtight container and freeze.
Passionfruit Cheesecake
Crust:
9 sheets of Graham crackers
1 Tbsp. sugar
6 Tbsp. unsalted butter, melted
pinch salt
1/2 tsp. cinnamon
In a food processor grind the crackers until finely ground, then add in the rest of the ingredients and pulse to combine thoroughly. Preheat the oven to 350 degrees F.
Grease the sides and bottom of a 9 inch springform pan. Press the crumbs into the springform pan.
Filling:
1 lb. cream cheese, softened
1 cup granulated sugar
1/3 C. sour cream, room temperature
3 large eggs, room temperature and lightly beaten
3 large egg yolks, room temperature and lightly beaten
2/3 C. strained passion fruit pulp or puree
Place the cream cheese and sugar in a stand mixer and with the paddle attachment beat on medium speed until smooth. Add in the sour cream and mix until combined. Turn down the speed to medium low and pour in the whisked eggs and yolks in a steady stream. Beat thoroughly, then gently stir in the passion fruit juice and gently combine. Pour the filling into the chilled crumb lined prepared pan.
Bake for about 55-60 minutes or until the edges are set but the center remains slightly wobbly when you shake the pan slightly. Turn off the oven but leave the cheesecake inside for one hour with the door propped open with a wooden spoon. Remove from the oven and set aside to cool completely.
Optional: cover the cheesecake with passionfruit curd and chill in the fridge overnight to firm up. The cheesecake will be very soft, so do not attempt to remove the ring until at least chilled for 8 hours. I actually like to make the curd the day prior and take it out and stir to loosen a bit to get smooth before spooning over the cheesecake.
Optional passionfruit curd:
(yield: ~ 2 Cups)
1/2 Cup passion fruit puree, divided
1 tsp. powdered gelatin
1 Cup sugar
1 large egg
2 egg yolks
pinch of salt
2 Tbsp. unsalted butter
1. a small bowl measure out 2 tablespoons of the passion fruit puree and sprinkle the gelatin over and set aside to bloom. Keep the rest of the puree for the remainder of the recipe in step 2.
2. Place the remaining passion fruit puree, sugar, egg, egg yolks, and salt in a saucepan and whisk over medium heat until mixture reaches 160° F. Remove from the heat and stir in the bloomed gelatin until combined. Strain mixture into a clean bowl and stir in the butter. Cover the mixture with plastic wrap directly over the surface and place in the refrigerator to chill. Spoon a generous amount over the chilled and set cheesecake a few hours prior to you serving the cheesecake.
Note: you will have some curd leftover which you can freeze or store in the fridge to spread on scones etc. or stir into yogurt (coconut yogurt in particular is fabulous!) You can also stir curd into vanilla buttercream to make passion fruit buttercream.
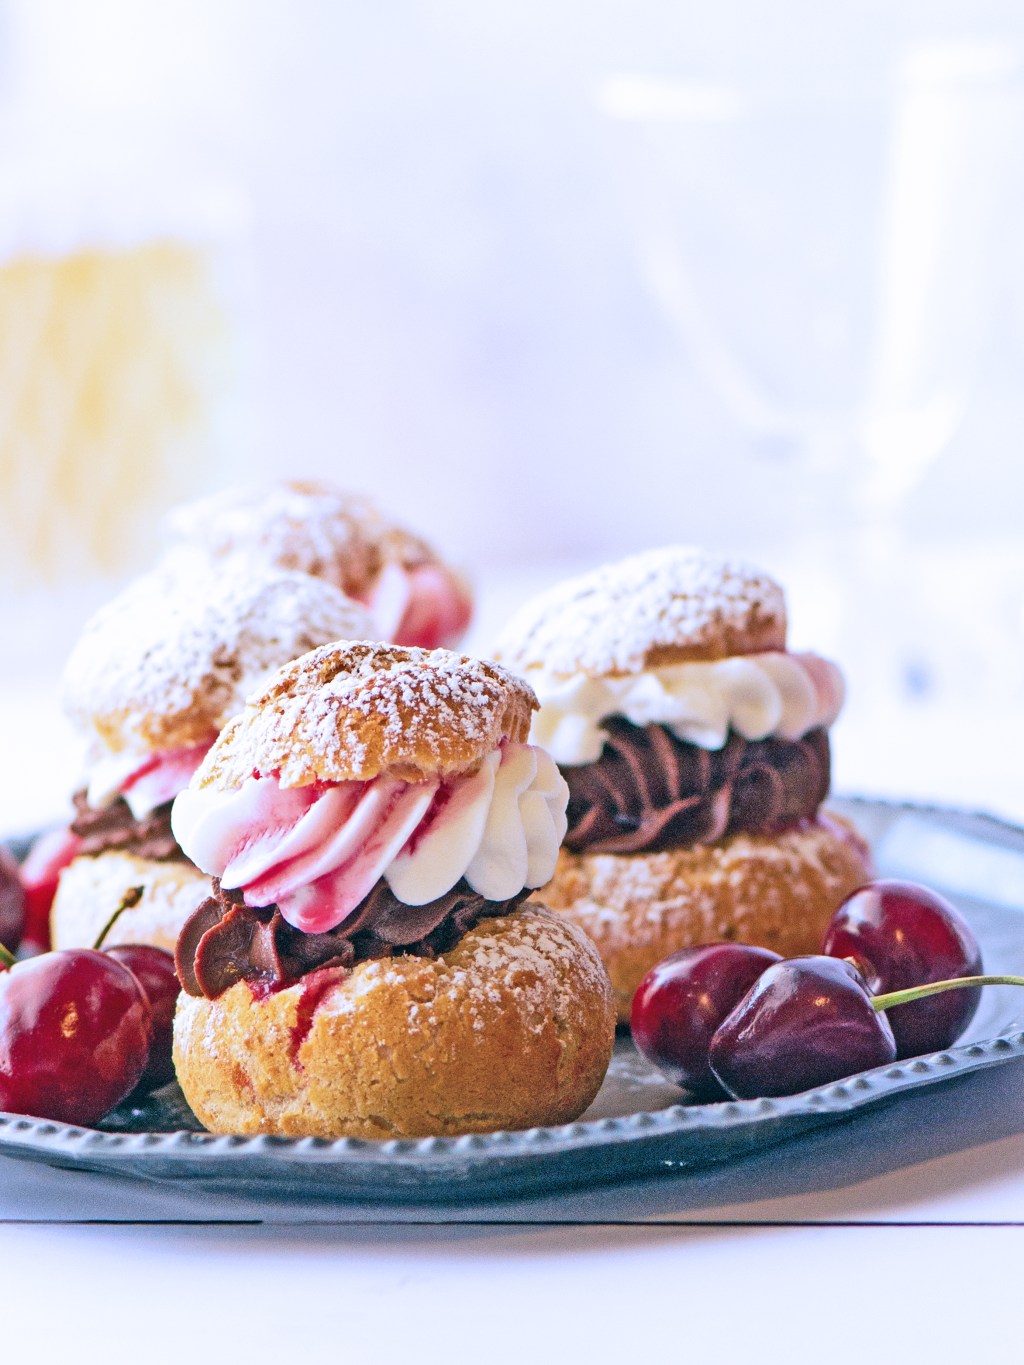
I feel like cream puffs don’t get as much love as they should. Their first cousin the eclair does, but not sure why the simple and understated cream puff does not. I’m about to change that; or a least try with this elegant recipe that uses the fresh harvest of cherries that are in stores right now. These puffs are great for a party as you won’t have to worry about slicing anything last minute. It also solves the annoying “just a sliver” request some people call for. #Sorrynotsorry . The flavor is very chocolate forward with some softened cooked cherries hiding inside the filling to give a nice burst of freshness and flair to break up all the rich chocolate. They are so dainty and small that some hungry men or women may even go for seconds. This I have witnessed firsthand. The recipe makes a dozen or bakers dozen, so nothing too crazy, but it can be easily doubled if you want to.
I decided to go with a thicker and more rich filling with a chocolate cremeux and inserted a couple of fresh cherries that I cooked down to a softer texture. A stabilized slightly sweetened topping of whipped cream tops the little morsels and a quick dusting of confectioners sugar adds the elegant finesse on top.
This recipe can be made easily in stages and it’s much easier to assemble if you do to save some time.
I made the chocolate cremeux a couple days in advance and the cherries also the day prior so they have time to chill. I had some cherry syrup by way of cooking the cherries so I took advantage of it and poured a little over the whipped cream; but you should do this right before serving if you can.
These were a big hit for a party I attended. I always bring a dessert; and I not only love bringing the dessert, but everyone expects it. Don’t you just love cherry season?
Cream puff dough (pate choux)
(yield ~ 12 or 13 puffs)
45 g whole milk
45 g water
3 Tbsp. unsalted butter
1/2 tsp. sugar
1/2 tsp. kosher salt
tiny pinch of white pepper (optional)
tiny pinch of cardamom (optional)
tiny pinch of cinnamon (optional)
103 g. bread flour
36 -37 g. whole eggs lightly mixed in a separate small bowl.
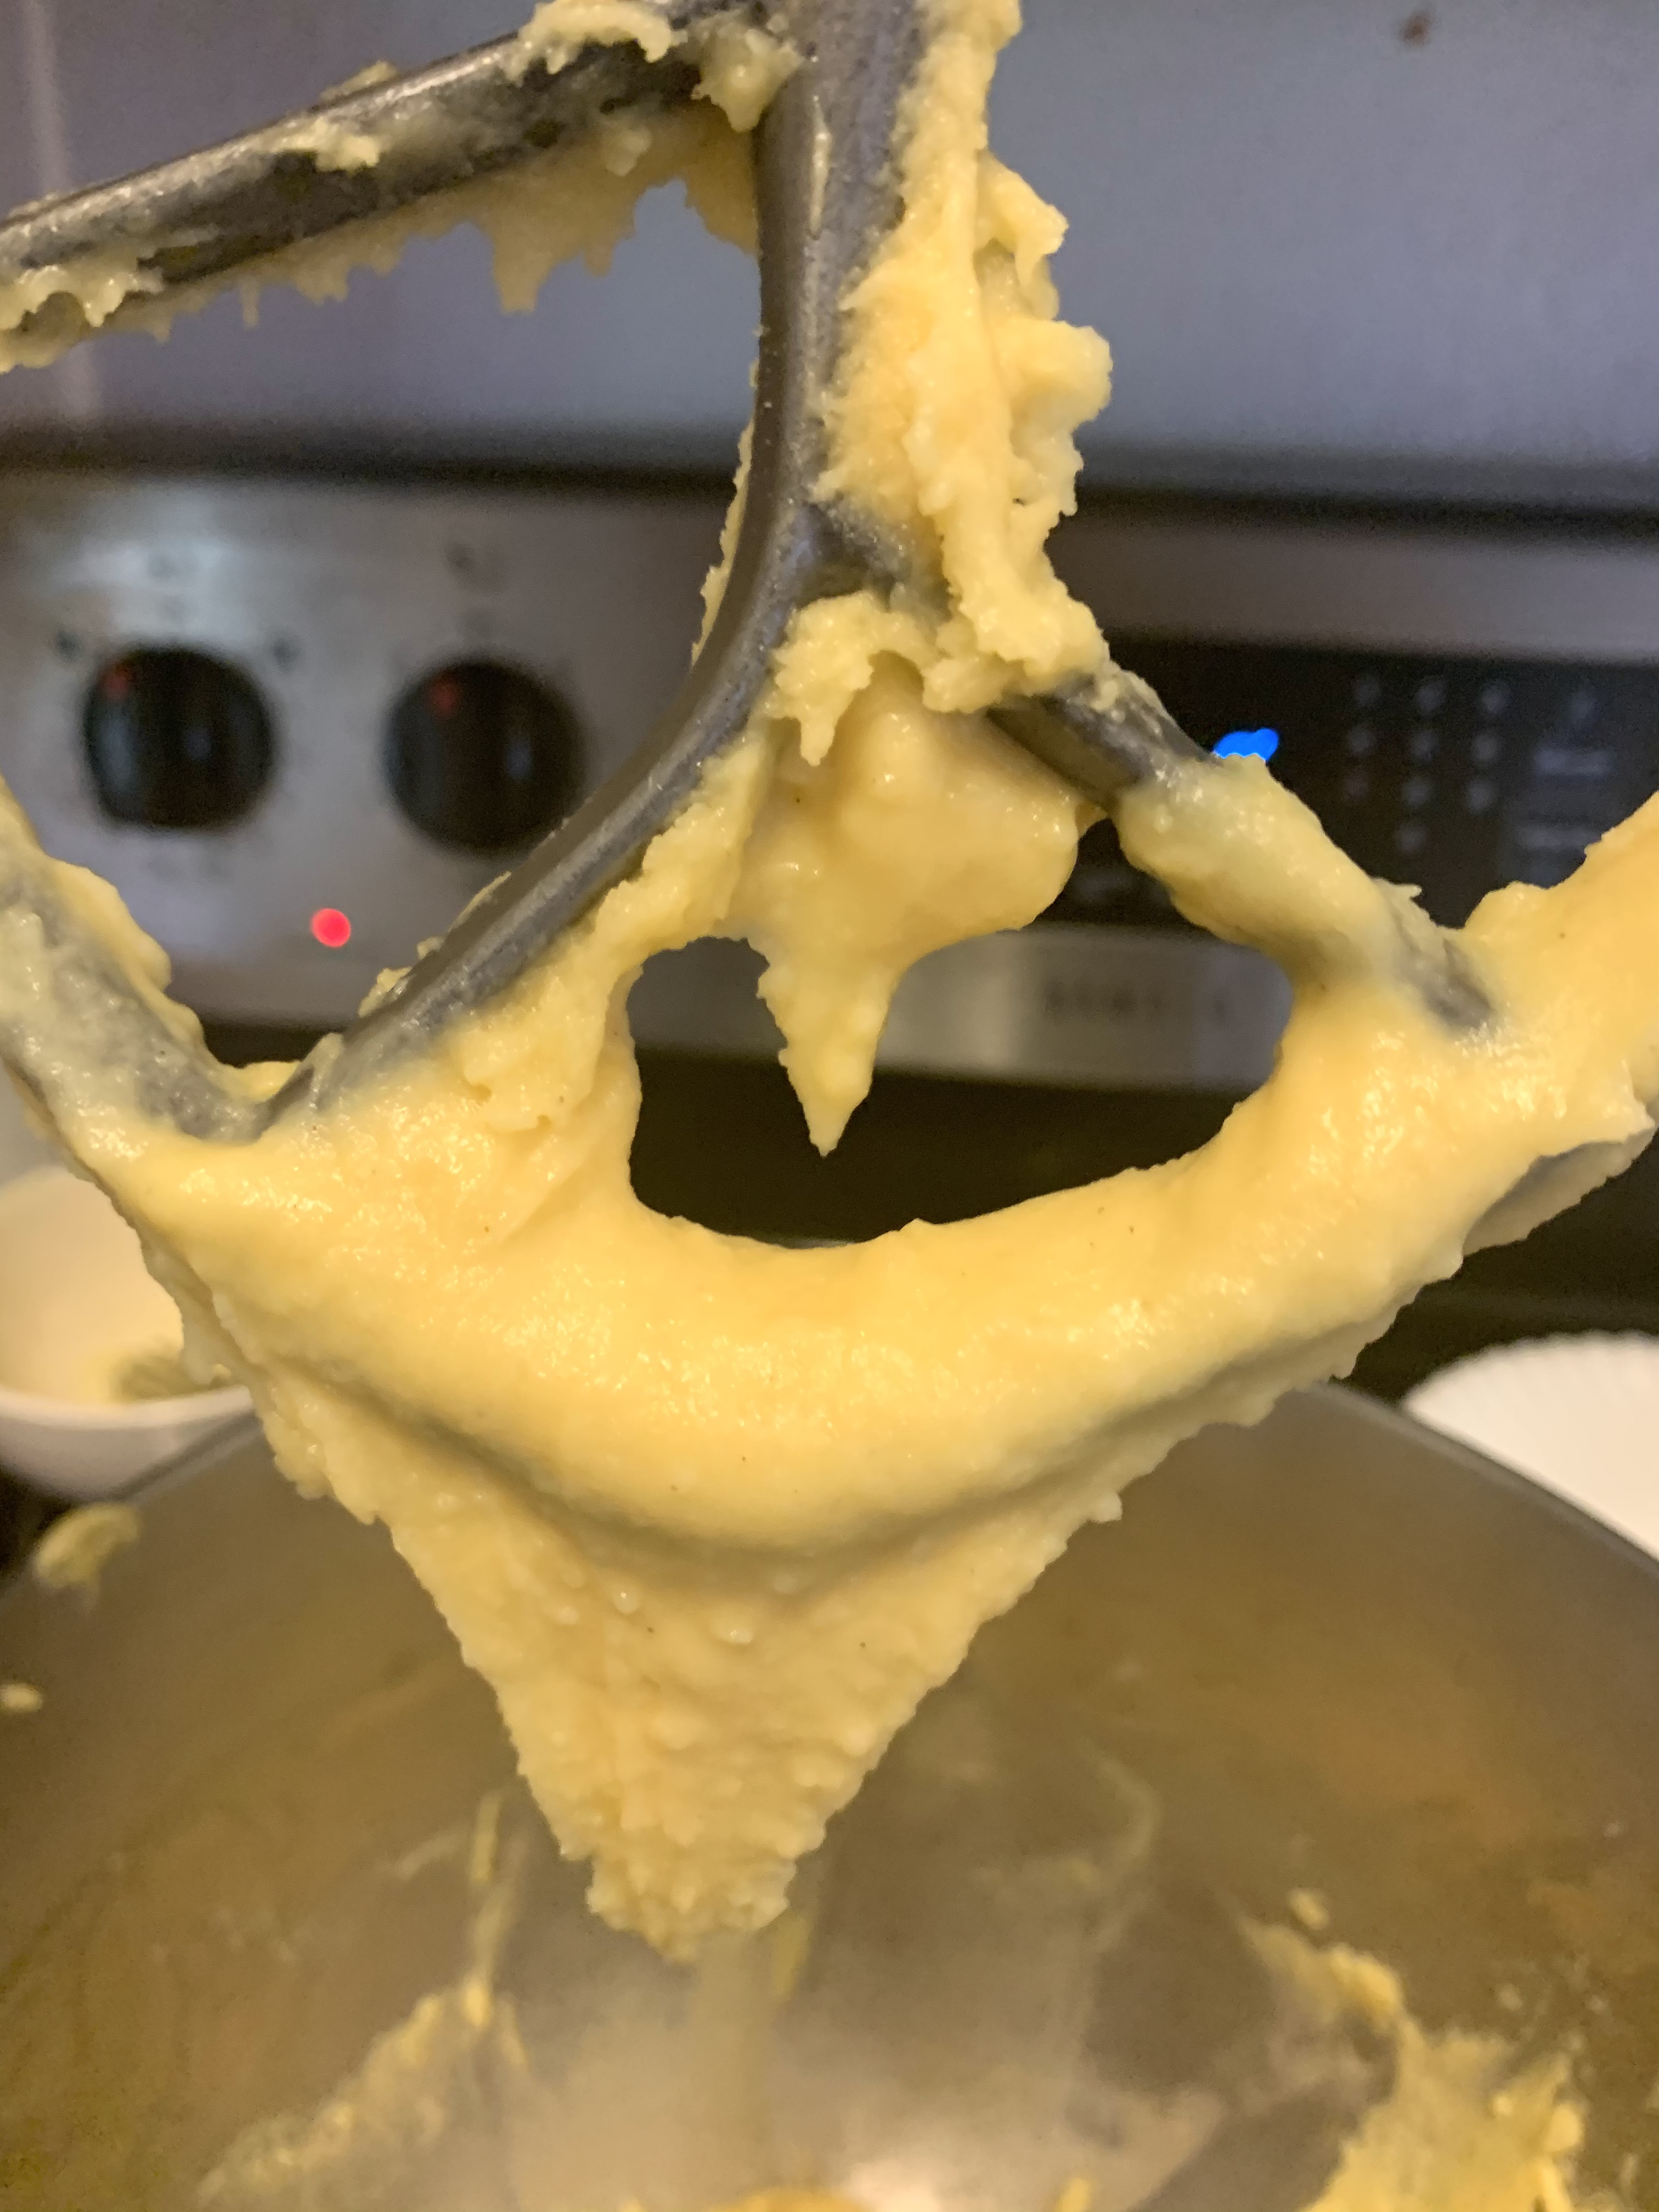
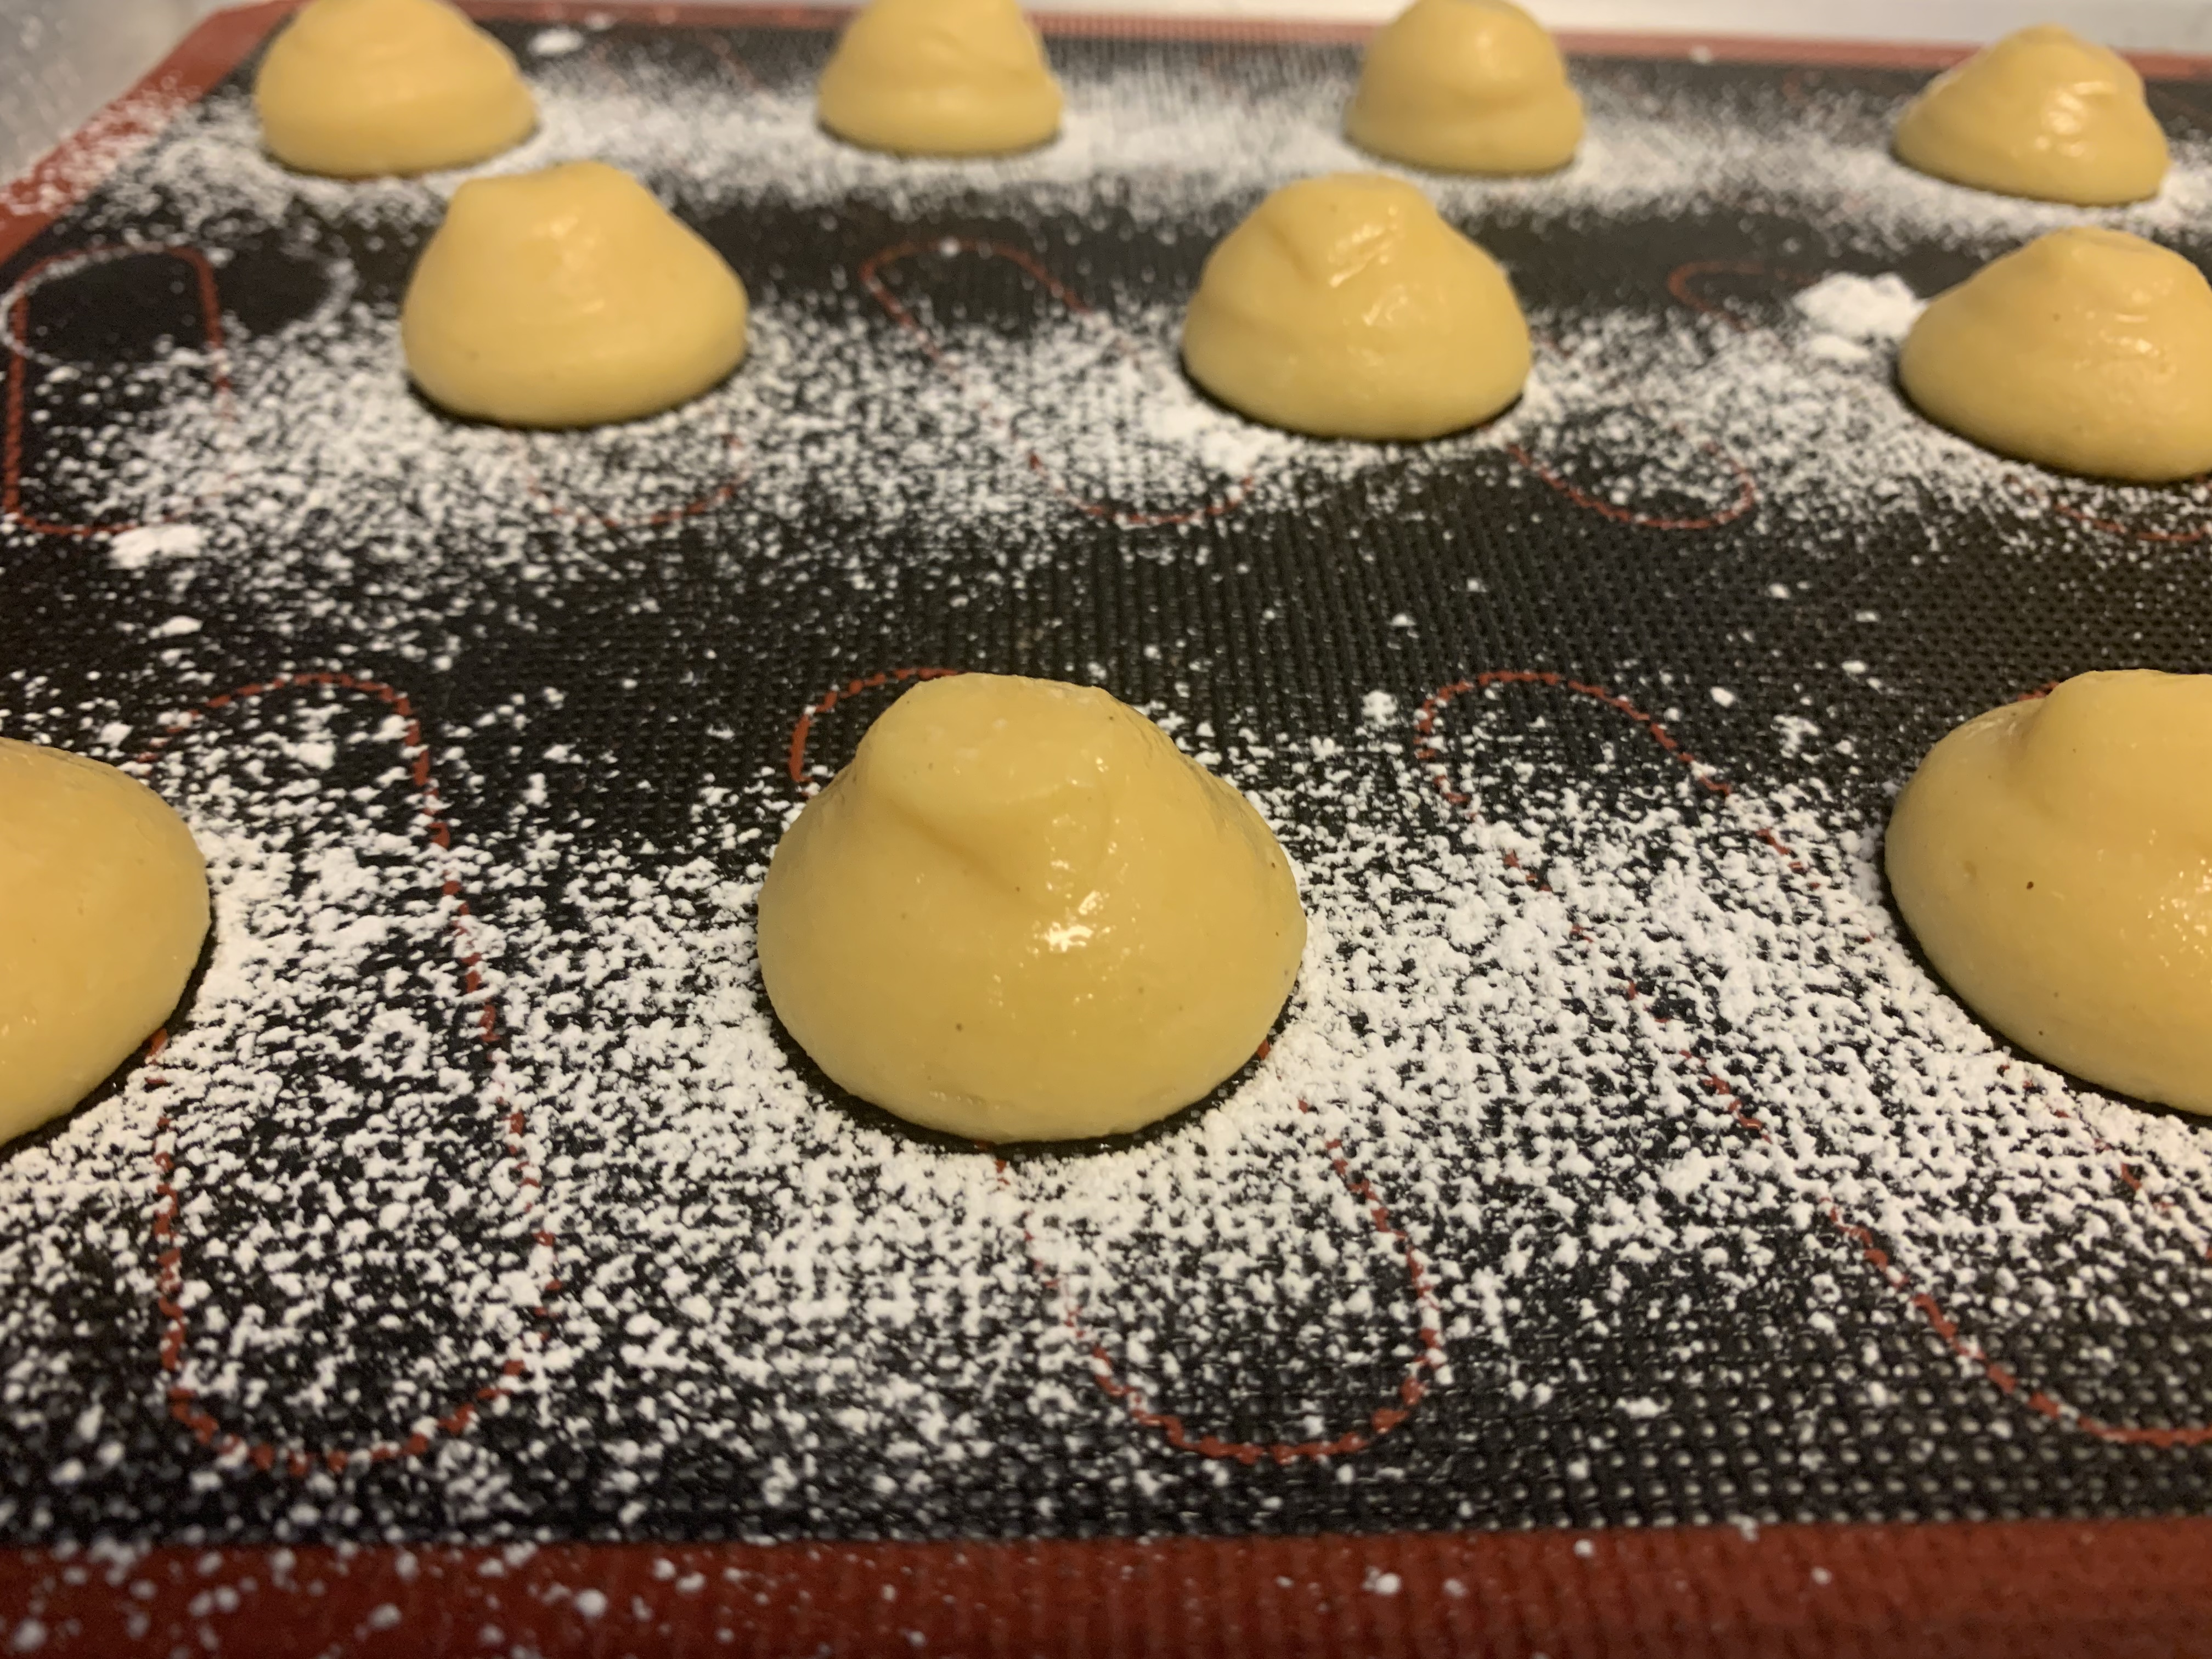
In a 3 quart saucepan or similar size place the milk, water, butter, sugar, salt, and spices if using . Bring to a full boil and remove from the heat and dump in all the flour at once. Return to a medium heat and stirring constantly with a wooden spoon, or heat proof spatula; heat the mixture for exactly five minutes. I use a motion of flattening the mixture to the bottom of the pan, then turning/or flipping over the dough back again to a flattened state, and repeating this continuously for five minutes. Why 5 minutes? it removes a lot of the steam so that you can add more eggs which helps create a nice crispy puff and helps the puffs rise better. As you are cooking the dough, the mixture will leave a film on the bottom of the pan (normal) and the don’t try to scrape up the hardened cooked film. After five minutes remove the dough mass from the pan; leave the dry film on the bottom behind; don’t attempt to scrape if off. Remove the dough ball and place into a stand mixer on stir setting [first setting on a kitchen aide] and stir the dough for exactly five minutes with the paddle attachment. This will help cool down the dough to just the right temperature so that you can add in the eggs gradually. Once the 5 minutes are up, increase the speed to medium and slowly add in a bit of the egg at a time, stopping and scraping both the sides and the bottom. Don’t beat the mixture at too high of a speed as you are tying to avoid incorporating too much air. I use just a medium speed. You are looking for a smooth dough that is somewhat sticky but the key is when you lift up the paddle attachment you see a “V” shape on the paddle. If the dough is too sticky; you’ve not added enough eggs in. See pic below. Stop several times and add in the eggs a little at a time until you see this “V”shape; it will depend on your environment and humidity etc. whether you’ll need the full amount of eggs. I live in Arizona desert and the day I made mine I actually ended up putting a wee bit extra . Place the dough into your prepared piping bag fitted with a large plain tip; I use an Ateco #809. Pipe round mounds of dough onto a silpat or parchment lined sheet approx. 1.5 inches in size. Tap down any peaks of dough with a dab of water on your finger. Sprinkle a light dusting of confectioners sugar over all the dough puffs once piped, and repeat another dusting one more time. Place in a preheated oven at 375 degrees F for 20 minutes, then reduce the temperature ; don’t open the door! and bake for another 20 minutes at 335 or something close to that degrees F; depending on if your oven ; I have a digital so I use 335 degrees, but keep watch on them. You are looking to dry them out on the inside a bit so they are not too doughy. I usually sacrifice one and slice open the top of one to check at around the 18 minute mark [slicing through as an equator motion]. If too doughy then keep baking a minute or two. Remove from the oven and allow to cool for a couple minutes until you can handle them and then poke with a wooden skewer through the top 1/4 portion going through to the other side to remove excess steam {this helps them not deflate}. Allow to cool completely over a wire rack before filling.
V shape: This is is the consistency you are looking for when you pull the paddle up out of the dough; you are looking for the classic V shape. Once you reach this; don’t add anymore eggs. Pipe round shapes about 1.5 inches wide by about 1 inch in height. I bake mine on a perforated eclair mat, but you can use a Silpat or parchment lined tray. Tap down any peaks with a slightly wet finger. Sift confectioners sugar over the dough twice right before baking.
Chocolate Cremeux Filling
150 g heavy cream
150 g whole milk
100 g large eggs (about 2 large eggs)
15 g granulated sugar
200 g finely chopped dark chocolate
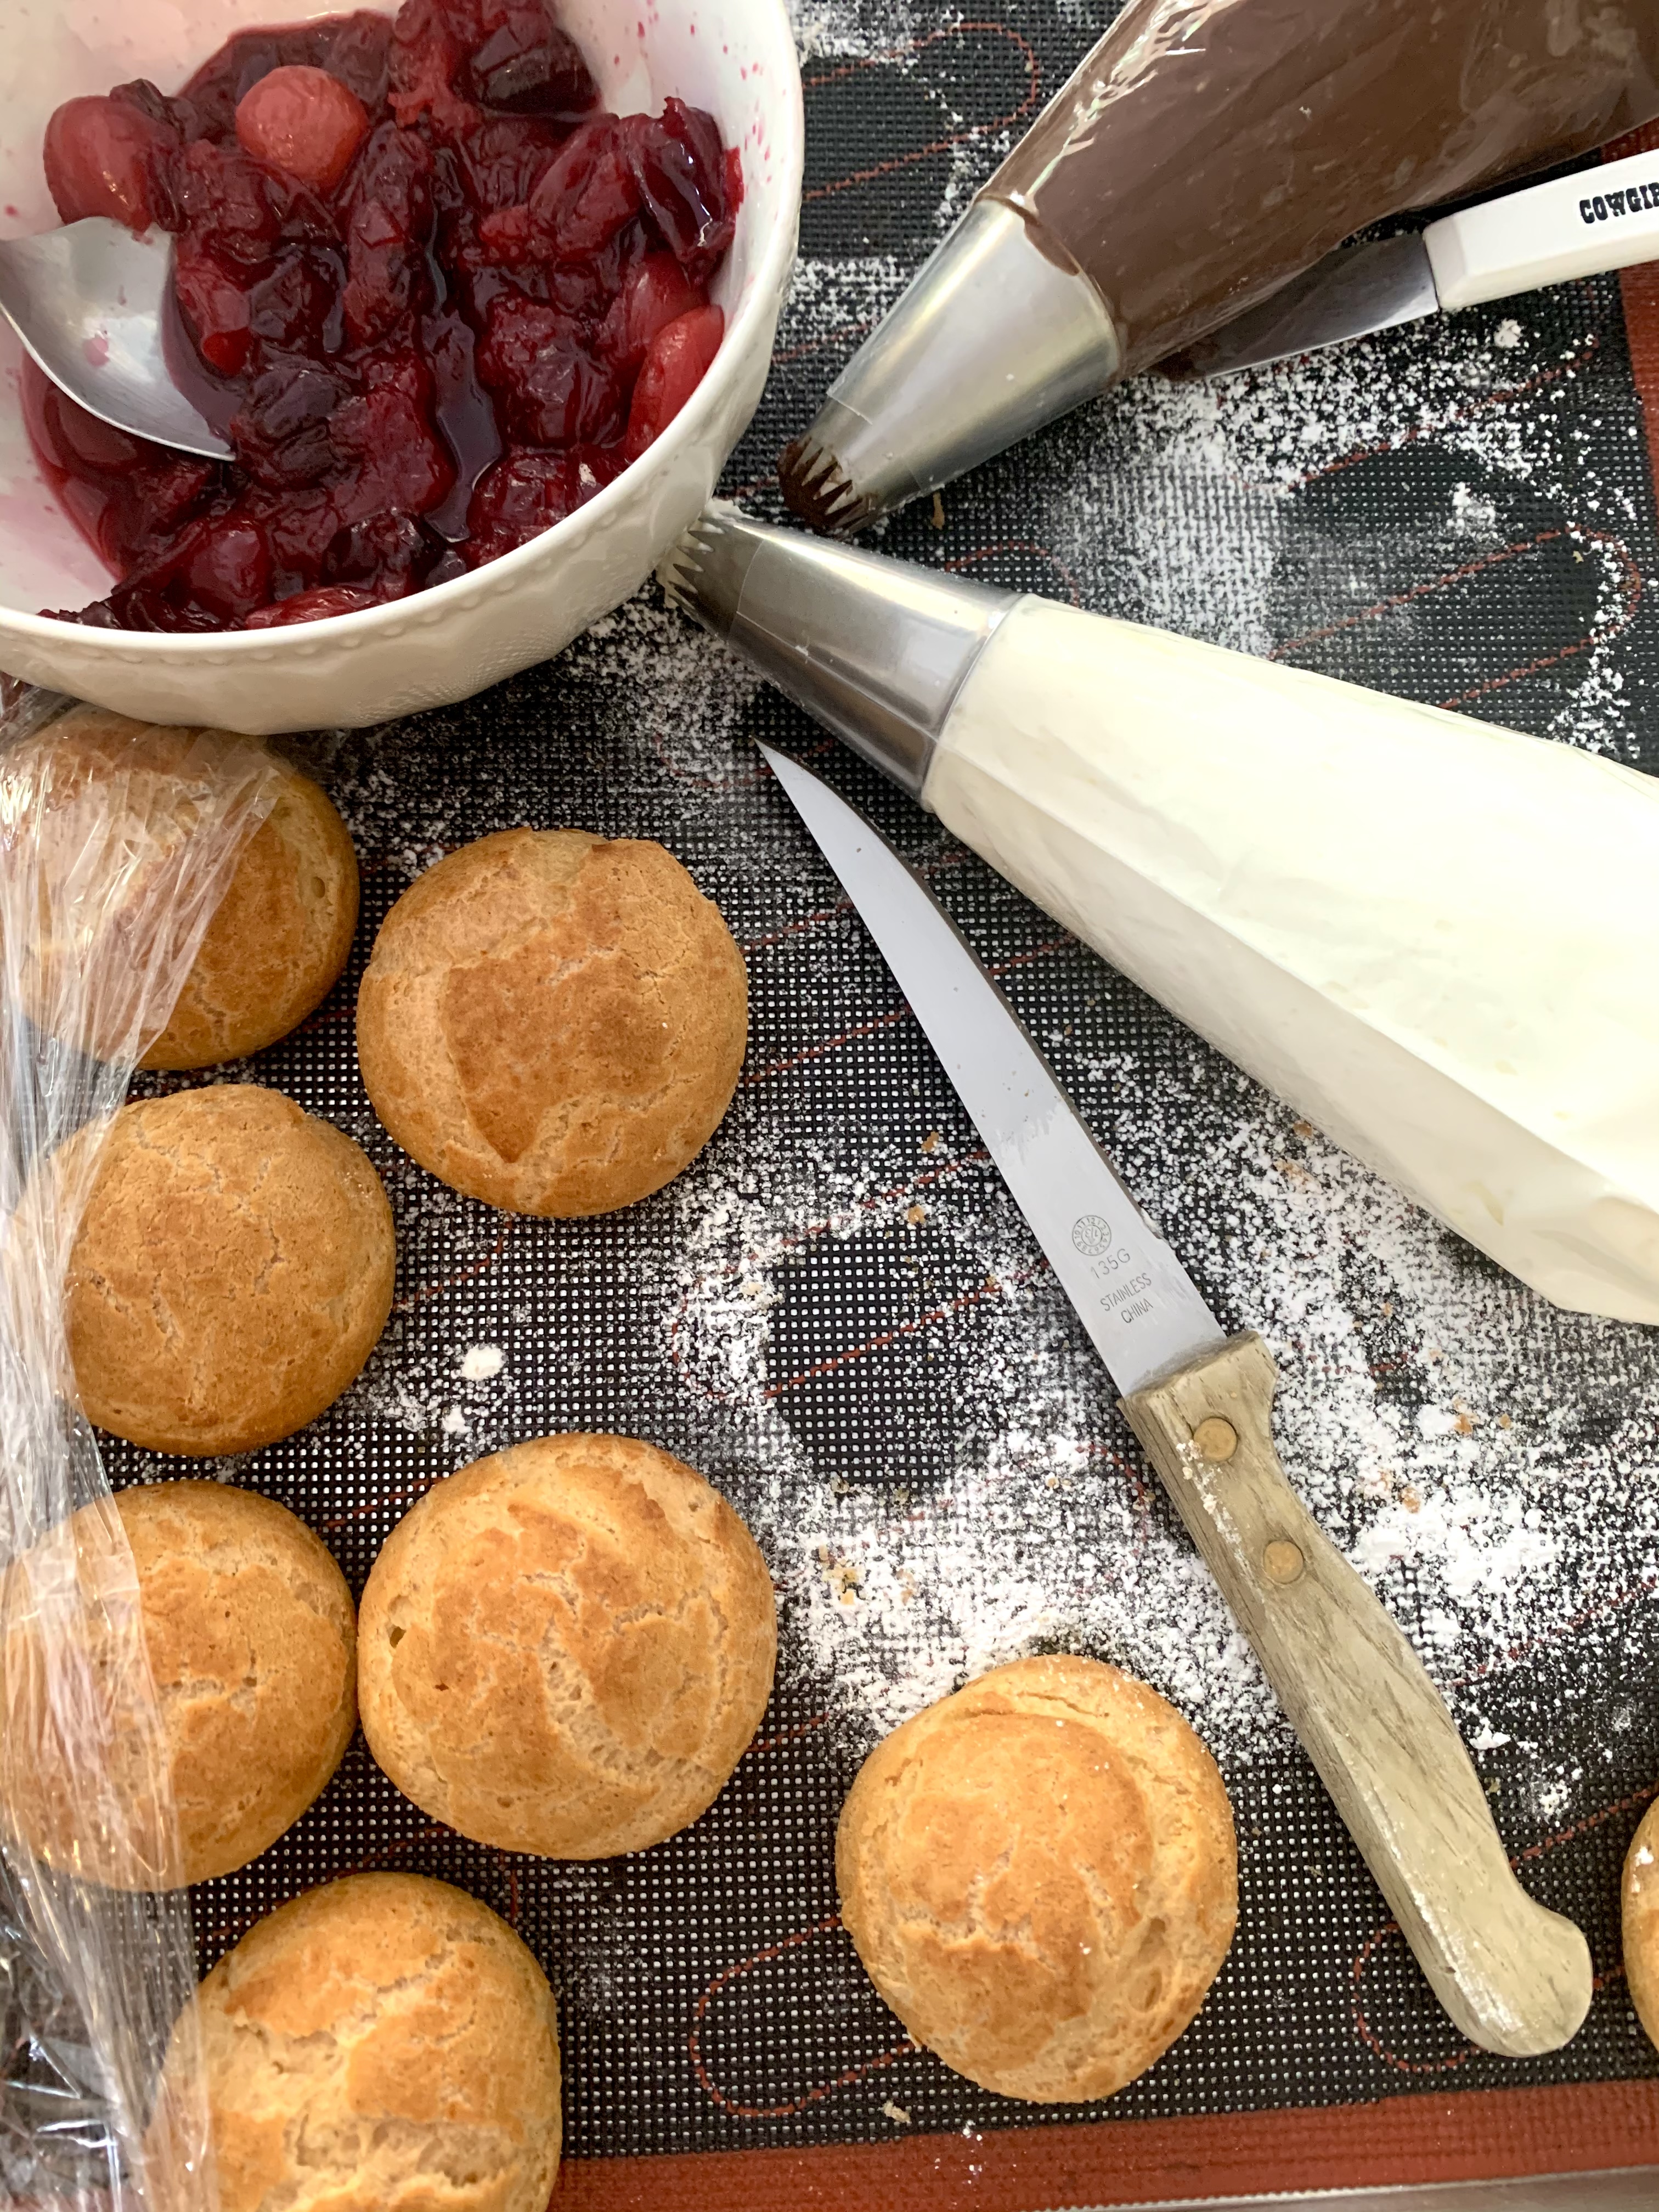
In a small bowl combine the eggs and sugar and whisk to combine. Meanwhile in a saucepan place the cream and milk and bring to a boil. Once the milk mixture is up to temperature, temper in the mixture to the egg mixture and whisk to combine. Pour the mixture back into the pan and heat over a low temperature until the mixture is thickened, (you’re not looking it to be as thick as a pastry cream, but slightly thickened, then remove from the heat and pour in the chopped chocolate and stir until chocolate is melted and the mixture is smooth. The mixture will be quick thin. Pour it into a heatproof container and place plastic wrap directly over the surface and allow to chill in the fridge until thickened; its best to do the day before to save time. Once cold it will be much thicker.
Cooked softened cherries
200 g fresh cherries (weighed w/ the stone in), then rinsed & pitted
50 g granulated sugar
8 g fresh lemon juice
In a small saucepan place the cherries, sugar, and lemon juice and cook over low heat stirring constantly until the cherries are softened but still mostly whole; some will break apart and that is fine. It will create a cherry syrup as a result, and strain the cherries and reserve the juice for pouring over a little once ready to assemble, reserving leftover cherry syrup for another use as desired. Reserve in a glass jar in the fridge.
I used a French star tip to pipe both the filling and the whipped cream.
Stabilized Whipped Cream
1 cup very cold heavy whipping cream
1 1/2 Tbsp. confectioners sugar
1 1/2 Tbsp. non fat dried milk powder
In a stand mixer bowl or a medium bowl whip the cream until you reach stiff peaks. This is my go to method for stabilized whipped cream; I know there are several methods people use, but this is my favorite by far. The milk powder does not add or mask any flavor in my opinion, and I find it really helps the shape hold once its piped and does not weep over time.
To assemble:
Cut off about 1/4 of a cooled puff and pipe a rosette of chocolate filling into the bottom of the puff. Then stuff 2 cherries down into the chocolate filling, and pipe another dab of filling on top of the cherries. Pipe a rosette of whipped cream and if serving right away; spoon a tiny amount ~ 1/4 tsp. of the reserved cherry syrup. Cap off with the top portion of the puff and dust with confectioners sugar. You can assemble them on a tray also about an 30 minutes before serving and put back into the fridge to keep cold. You can forgo the cherry syrup drizzle if you want a neater cleaner appearance but I happen to like the color it gives; you only need a tiny bit to achieve a small cascade of color.
Fresh strawberries when ripe and rich in deep red color are so flavorful that you’ll want to make everything you can think possible. Strawberry cakes quite often though lack really deep flavor and or call for strawberry jello as part of the recipe. Upon researching different recipes I found a common suggestion of cooking down fresh berries into a thick paste to not only concentrate the flavor but also help reduce the liquid in the batter. The cake also gets a boost from a wee bit of strawberry emulsion and the result is very fresh and delightful. I made this for a friend of mine for her birthday; I make her cake every year and always do something different and everyone at the party raved on how much they loved this cake. The recipe is from Liz at sugergeekshow.com and I just changed it slightly. I upped the wow factor by dipping some fresh berries in a striped effect with candy coating, but you could use also semi or dark chocolate if you like, or just keep it simple without.
1 1/2 tsp. strawberry emulsion (such as LorAnn oils bakery emulsion) or 1 1/2 tsp. strawberry extract
4 oz. (113 g) strawberry reduction room temperature (see below)
1/2 tsp. pink gel food color (I used 1/4 tsp. electric pink and 1/4 tsp. deep pink)
Prepare your baking pans with non stick spray with flour and line with parchment paper. Preheat the oven to 350 degrees F.
In a separate bowl whisk together the dry ingredients, except the sugar.
In large glass measuring container; such as 4 cup size; if you have one (or bowl) whisk the milk, lemon juice, strawberry reduction, strawberry emulsion, vanilla extract, lemon extract, and pink food coloring.
Cream together the butter and sugar, and lemon zest until light and fluffy and almost white; about three to five minutes. I actually rub the lemon zest into the sugar first before I add it to the mixer bowl.
Add in the egg whites a little at a time, beating about 15 seconds in between. The mixture should not look curdled; if it does your butter or egg whites were too cold.
Mix on low speed and add about 1/3 of the dry flour mixture to the batter, alternating with about 1/3 of the milk mixture ; repeating again 2 more times, ending with the flour mixture. When the batter is almost combined, stop and scrape down the sides and bottom of the bowl and stir gently by hand with a spatula any uneven colored spots.
Divide the batter between your 3 pans and smooth the tops to even out the batter. Bake in the preheated oven 25-30 minutes or until a toothpick comes out with just a few crumbs on it.
Place the pans on top of a wire rack and let cool for about 10 minutes. Then turn out the cakes onto the racks to cool completely. I also do this the day before and wrap my cakes while still slightly warm in plastic wrap; double wrap and keep on the counter to assemble the following day to save time.
Additional items: optional
additional strawberries (washed and dried) for garnish and also dipping
Strawberry syrup (purchased) optional; I used Monin brand
In a food processor blitz the berries until you have a puree. Place the puree in a medium saucepan and over medium high cook until bubbling, then turn down to low to medium heat, cook the puree down until it resembles a thickened paste like consistency. This will take several minutes; mine took about 30 mins. If your mixture looks still loose and watery, continue to cook it until all the liquid is removed. You will probably end up with about 3/4 cup or a tad more. Allow to cool; you can make it the day before to save time and chill, just bring out to room temperature when making the cake.
Easy Strawberry Buttercream
4 oz. (113 g) pasteurized egg whites
16 oz (454 g) unsalted butter room temperature
16 oz. (454 g) confectioners sugar
1/2 tsp. salt
1 1/2 tsp. strawberry emulsion
3-4 Tbsp. strawberry reduction
In the bowl of a stand mixer place the egg whites and confectioners sugar. Using the whisk attachment combine on low, then whip whip on high for about 5 minutes.
Add in the room temperature butter a tablespoon at a time with the mixer running and whip until all the butter is in and the mixture looks very pale and shiny. Add in the strawberry reduction, salt and the strawberry emulsion until combined and smooth. I like the then run a spatula through the mixture and pressing down to remove any air bubbles; alternatively, you can switch to the paddle attachment and run for about 5 minutes on low to achieve this. To assemble and decorate, place one layer of cake onto your desired base and brush with some strawberry syrup. If you don’t have syrup you can spread some strawberry jam; this helps keep the cake moist as well as give some extra flavor. An option (which I did is to remove any of the browned areas of the cake top/bottom/and sides with a serrated knife before assembling; it gives the cake a more refined and polished look). I use a standard size ice cream scoop to dollop my buttercream before spreading as this makes sure you have an even layer of buttercream; I think I used 2 1/2 scoops per layer; it mighty have been three but you get the idea. I had some buttercream left over so you could definitely do three scoops. Repeat with the next cake layer by brushing with the syrup, then apply buttercream until you have all three layers assembled. Apply a thin crumb coat of buttercream and chill the cake at least 30 mintues before completing with the final layer of buttercream to the top, and sides. Decorate with fresh cut strawberries or as desired.
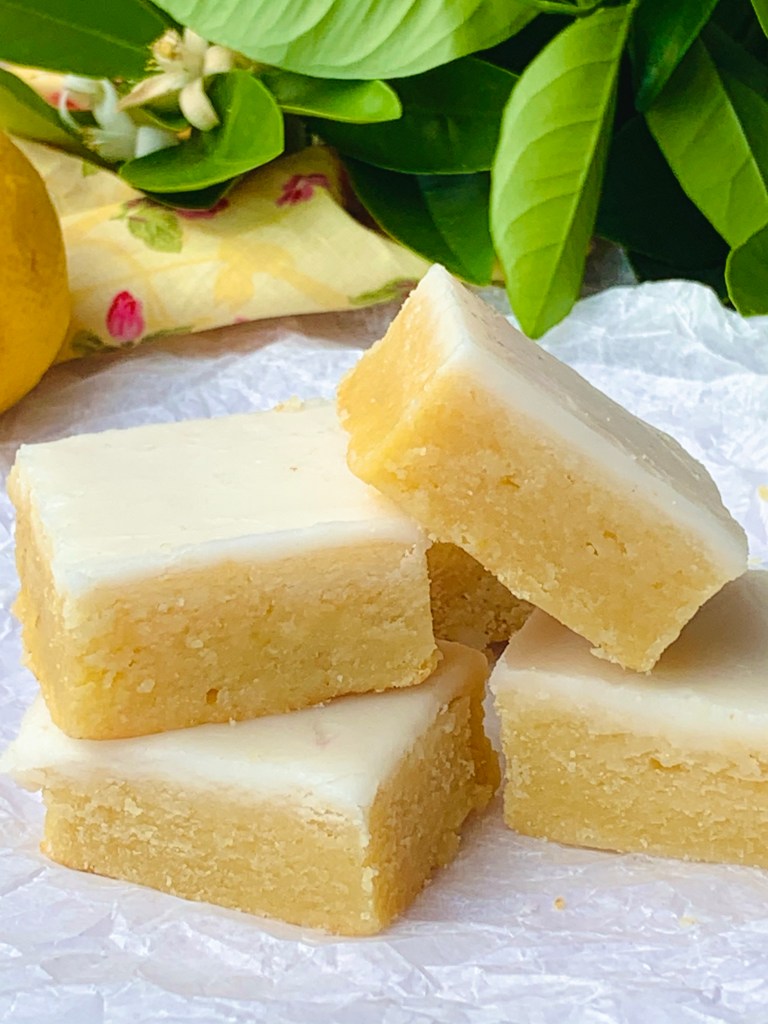
What’s a Lemonie you ask? A Lemonie is wonderful soft and somewhat dense lemon bar; but not in the sense one normally thinks of a lemon bar. Calling them a lemon brownie seems kind of misleading. Well imagine if a lemon bar and a shortbread cookie had a love child. The texture is meltingly yielding while still somewhat dense- but when you bite into it, its tender and the tart lemon glaze lends the perfect bit of bright punch of flavor. I have a ginormous lemon tree in my backyard and try to do it justice by coming up with as many lemon treats as possible. Right now my tree is dumping lemons as fast as it can while Spring is on our doorstep. It always makes me sad this time of year as I wish I could have lemons all year round. I just love having a lemon tree in our backyard. But all good things usually ebb and flow and my lemons are no exception.
“Lemonies”
~ 16 bars
2 sticks unsalted butter, softened
3/4 Cup + 2 Tbsp. granulated sugar
1 large whole egg + one egg yolk
1/4 Cup fresh lemon juice
zest of one large lemon
2 Cups all purpose flour + 1 Tbsp.
1/2 tsp. salt
1/2 tsp. baking powder
Preheat the oven to 350 F. Line an 8×8 inch baking pan w/ parchment paper on both sides so you have at least a 2 inch overhang. Spray w/nonstick spray.
Cream the butter and sugar until light and fluffy. Add in the egg and yolk and mix until homogenous. Add in the zest and lemon juice and mix. Add in the dry ingredients and mix them by hand w/ a spatula as to not overmix. Spread the batter evenly in the prepared pan and bake in the preheated oven for ~ 25-30 mins. or until set and a wooden skewer inserted comes out clean. While the bars are baking mix up the glaze because you’ll want to pour the glaze over them while still warm. Remove the bars from the oven and set over a wire rack to cool. Pour the glaze immediately out of the oven or w/in a few minutes. Its advantageous to use oven mitts and grab the sides of the pan and tilt it back and forth to let the glaze flow evenly. Allow to cool completely then set in the fridge (to allow the cut easier when cold). Cut into bars.
Lemon Glaze:
2 Cups confectioner’s sugar
5 Tbsp. fresh lemon juice
In a bowl whisk the sugar and lemon juice until smooth and no lumps. If the glaze starts to harden before you pour it, just re whisk gently; try to avoid vigorously whisking as to avoid air bubbles.
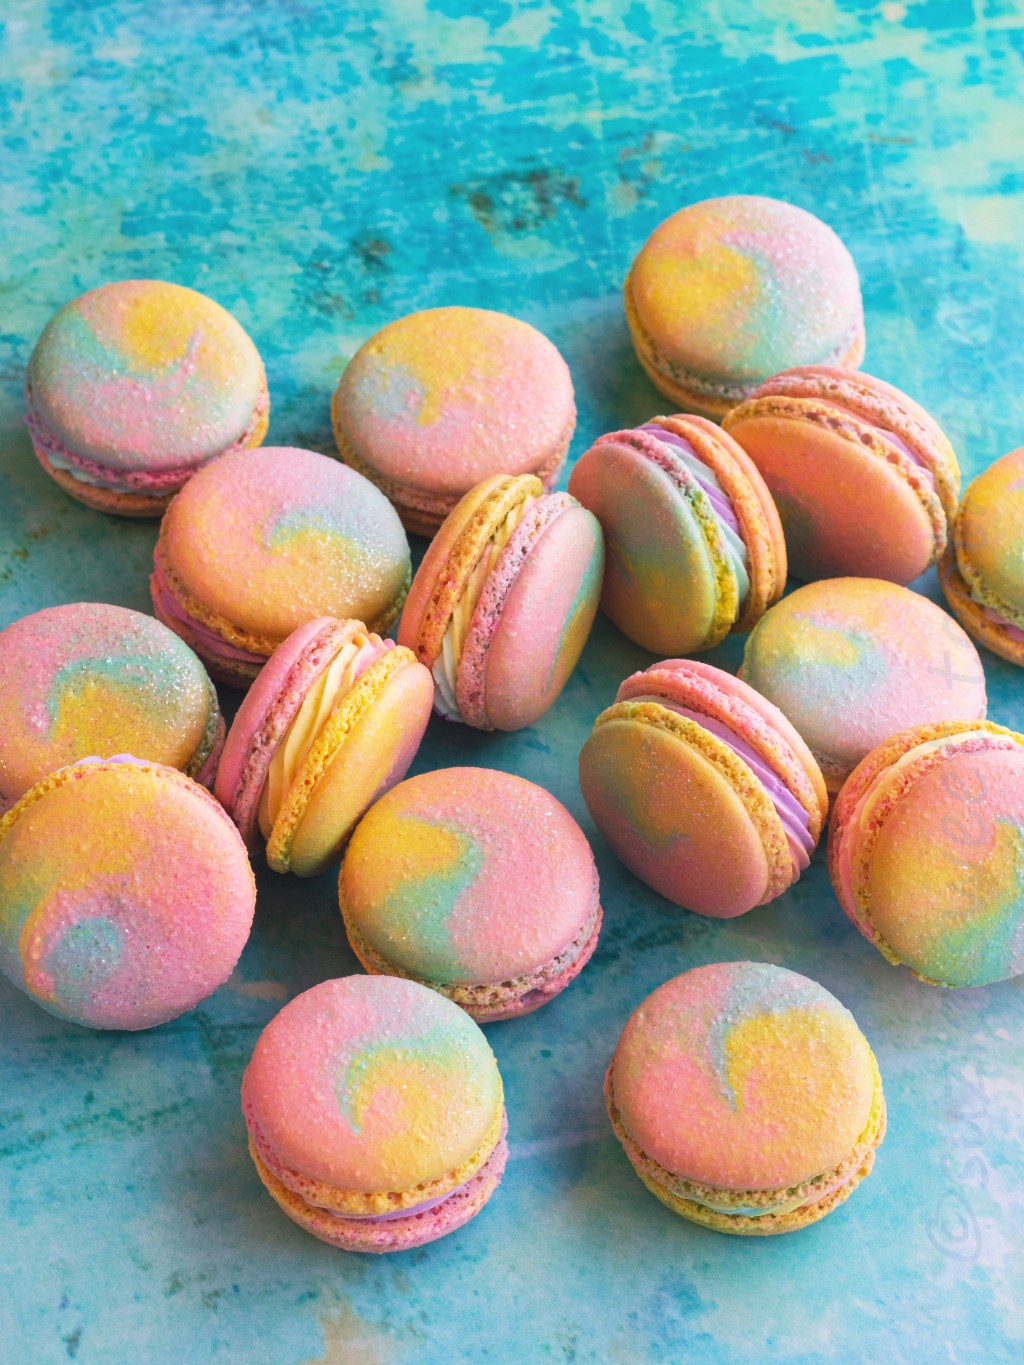
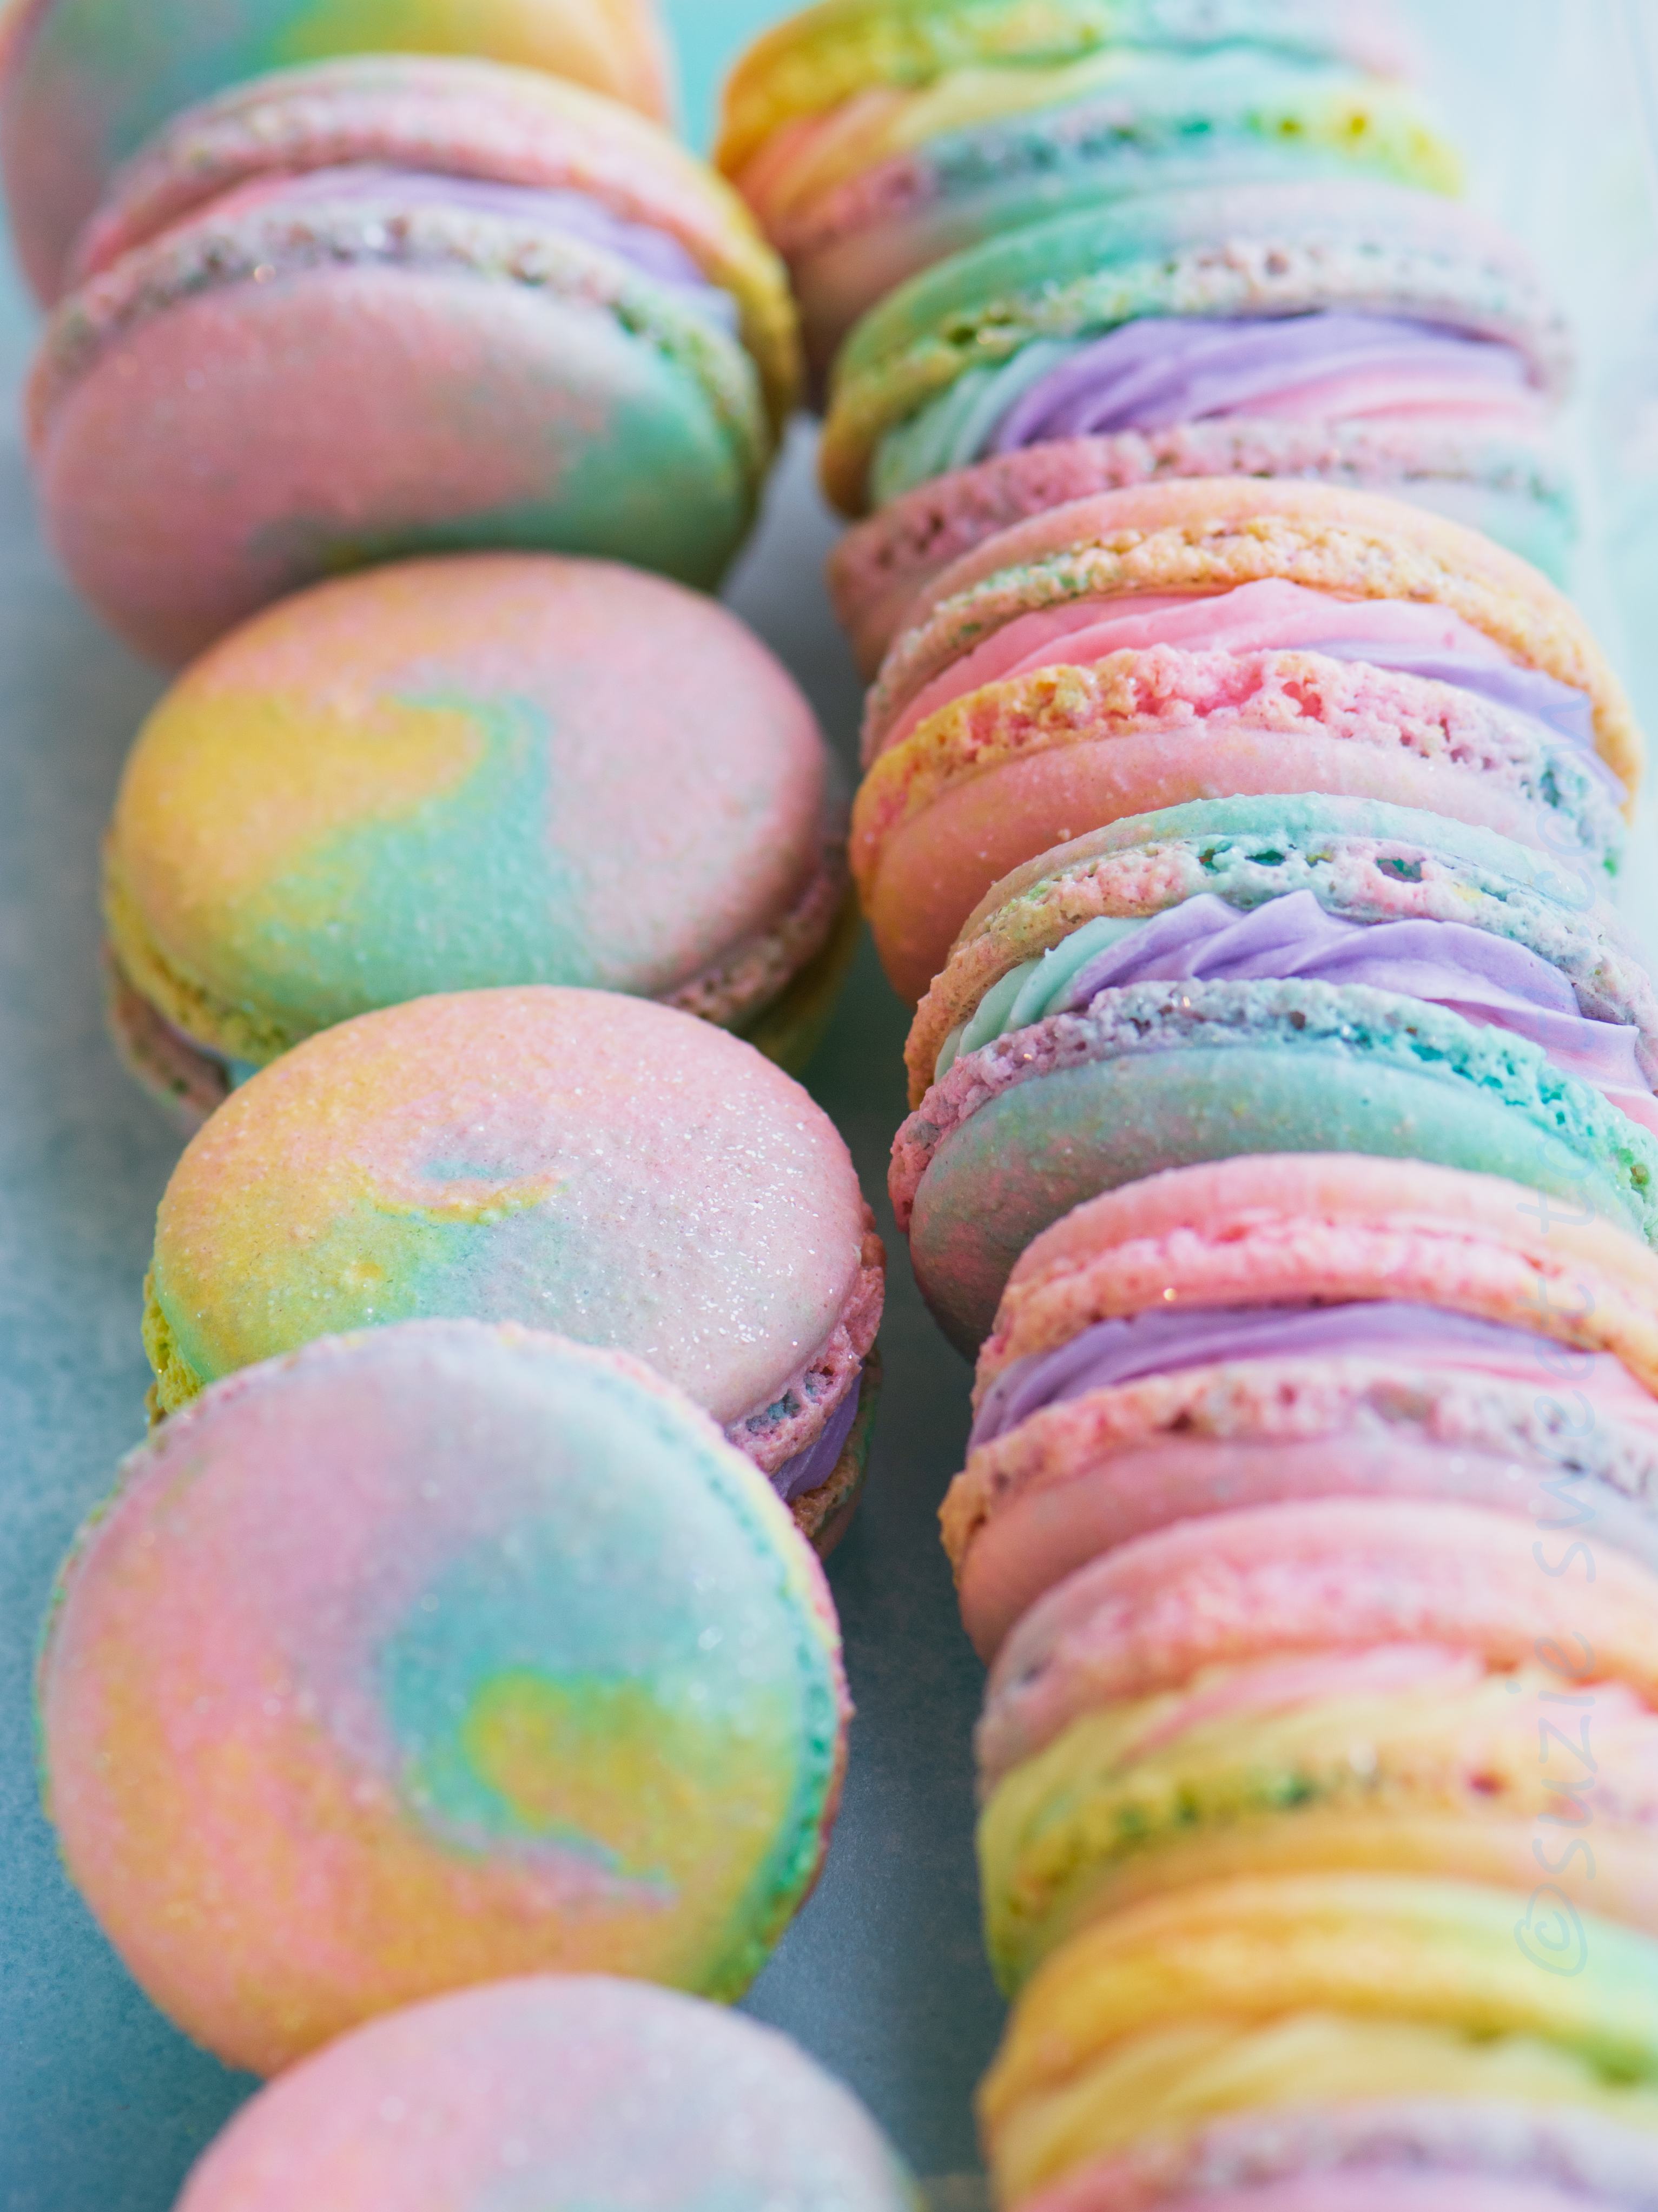
What’s your favorite part when making macarons? Mine is playing with color. Sometimes you end up very satisfied and other times the color doesn’t quite come out the way you intended. The good news is they still taste amazing. For Valentine’s Day I wanted to do something in pastel colors. I ended up using 3 colors to color my batter and then laid the colors alongside each other on a big piece of plastic wrap and rolled it into a log and dropped it into my piping bag. Before I started piping; I squeezed the bag in a few different spots to mix the colors just a wee bit. As you pipe, the colors blend a little and you end up getting a few different extra colors. In my experience, I’ve found that it does not pay to color more than 3 colors as the color will tend to get too muddy looking, but rather if you squeeze your bag a little it in a few different sections the colors will mix more subtle while still maintaining your original colors as well. Hope that makes sense!
Valentine Macarons: with Raspberry Champagne Buttercream
Macaron Shells (yield: ~ 27 paired macarons) depending on how large your pipe
140 g. Almond Flour
124 g. Confectioners Sugar
108 g. Egg whites
110 g. Granulated sugar
1/4 tsp. Cream of tartar
In a food processor place the almond flour and confectioners sugar and run for 30 seconds. Repeat 2 more times. Preheat the oven to 300° F convection, 325° F or your preferred temperature. More about that later. Prepare two baking sheets with Silpat mats or parchment paper.
In the bowl of a stand mixer place the egg whites, sugar, and cream of tartar and whisk by hand to combine. Place over a bain marie and stir gently for about 5 minutes until the mixture reaches about 130 F or when you touch the mixture with your index and thumb fingers you don’t feel any sugar crystals. Remove from the heat and place on the stand mixer fitted with the whisk at power level 4 (Kitchen Aide) and run for a few mins.
Increase mixer then to power level 6 and run for ~ 3 minutes. Add in any gel color at this point before turning up.
Increase mixer to power level high (10) and run until the meringue is stiff peaks and it has started leaving tracks in the meringue and a good portion has collected inside the whisk like a ball. If the color does not appear to be mixer to your liking at this point I add in any color and mix gently by; being careful not to overmix.
Add one half of almond flour/sugar mix and start folding with a rubber spatula until mixture starts to look cohesive. Add in the remaining half and continue to gently fold, stopping occasionally to scrape the sides and bottom of the bowl as needed. After the almond/sugar mixture is all added, I do about 4 reps of where I smash the mixture against the walls of the bowl with either my spatula or bowl scraper, stopping after each time to test the “flow” of the batter.. The batter is perfect when you lift up the spatula and tip the pointed end of the spatula down and ribbons of batter fall smoothly back into the bowl. I like to gauge its ready when I can count 6-7 ribbons falling without breaking and I can “draw” a figure 8 with the batter when lifting the spatula and letting it fall into the bowl. Fill your pastry bag by using a heavy tall cup or mason jar to hold your pastry bag with the top folded over the glass. When preparing your bag after you drop in your round tip (I use Ateco 804), twist the bag right above the larger end of the tip and push it down into tip. Fold the top 4 inches of the bag over the jar or glass.
Let the batter fall right into the bottom of the bag and continue filling to ensure you don’t get air bubbles.
Pipe the batter onto prepared baking sheet with 30 macarons per sheet. Six across the long side, and five rows perpendicular. Take the sheet pan and let it drop onto the counter about 5-7 times, then look for any visible air bubbles and pop with a toothpick or bamboo skewer.
I bake the macarons one tray at a time in a preheated (convection oven ) for NON convection oven* you’ll want to play around and determine what the perfect temp for you is; generally it would be 20 degrees hotter than convection) for about 15 minutes or until the cookie does not wiggle when attempting to check by carefully grabbing both sides of a cookie and gently testing. Let the tray rest on a wire rack and then bake the second tray. Cool the cookies completely and pipe the buttercream between two cookies and sandwich together.
Normally I dry my macs in a unconventional way; using the technique known by “Sugarbean” on Youtube. She has a technique whereby she dries her macs in lower degree oven for 2-3 minutes with the door ajar and then she increases the temp and bakes at the higher temperature. After a few thousand trials #kiddingnotkidding I finally (for me) arrived at the perfect temp for my oven at a convection temp of 248° F for drying and then 293° F. I baked them at 293 degrees F convection oven for about 15 mins., then did the oven “shower” for 2 mins with the oven open and oven off. I only bake one tray at a time.
Drying macs w/ oven method: (known as the Sugar Bean method). She has videos on you tube if you search for her.
I preheat my oven to 248° degrees F before I have piped my macs. I place one tray in the oven and immediately turn off the oven, then open the oven and place something like an oven mitt or something to keep it ajar a couple inches. Then I immediately turn back on the oven at 248° F again, and time for 2-3 minutes. After 3 minutes I close the oven door and turn up the oven to 293° F. Once the oven temp comes up to 293° F, I then start timing my bake time for 15 minutes. After the bake time I open the door and check a macaron; if it’s super wiggly still I bake for another minute. If it barely wiggles or not at all, I turn off the oven and open the oven door ajar and time for another 2-3 minutes; “Sugar bean” calls this the “oven shower”. After the 3 minutes, I remove the tray and then let them cool over a wire rack. Now; since the second tray has already been drying at room temperature; I usually only oven dry for 1.5 minutes and repeat the bake as I did for the first tray.
*A word about oven temperatures: EVERY one’s oven is different and after painstaking doing several batches of macarons I determined that in MY oven 293 F convection setting is best for me. Check your oven temperature against a thermometer placed in the middle of your oven. Some people bake there’s at 285, 290, 310 etc. unfortunately it’s something that you have to play around with and determine what is best for you and your oven.
Champagne and Raspberry Buttercream
(Makes 2 Cups buttercream )
3 egg whites
3/4 Cup sugar
small pinch of salt
2 sticks (1 Cup) unsalted butter, softened, but still slightly cool to touch
1 tsp. clear vanilla or butter vanilla emulsion
Raspberry seedless jam: I like Smucker’s brand
“Champagne flavoring” ( I use LorannOils Sparkling Wine flavor). (to taste) start with a drop at a time ; I think I ended up using about 6 drops.
Prepare a bain marie and place the sugar, salt, and egg whites in the bowl of your stand mixer (I have a Kitchen Aide); so if your bowl doesn’t fit over a saucepan place a metal or glass bowl over your pan that allows it to fit without touching the water in the pot. Place the mixer bowl over the bain marie and heat the mixture until it reaches 160° F. Take off the heat place on the mixer with whisk attachment until you reach a stiff meringue. Add in the butter 1 tablespoon at a time until fully incorporated, then mix in the vanilla. Change to a paddle attachment and mix until smooth. If you want to make a rainbow style colored buttercream, divide equal parts into 4 colors in small bowls and add in a few drops of gel food coloring or powdered color to achieve your desired color. I did yellow, pink, turquoise and lavender colors. Place a large sheet of plastic wrap onto the counter and pipe each color side by side along aside each other carefully wrap your color log; so that is is vertical into your piping bag fitted with a small star tip or tip of your choice. Pipe a swirl of circular dam of buttercream leaving an area free in the middle for you to pipe in some raspberry jam. Sandwich the macs together and let them mature in the fridge for 2-3 days for best optimal taste.
Next to scones, popovers are probably my next favorite breakfast treat. They are light and don’t leave you feeling so full that you have to dive back into bed for a nap. They are quick to whip up too. I like to rest my batter in the fridge for an hour to let the flour become absorbed into the wet ingredients well. Ideally you can whip up the batter in a few mins then head to the shower or grab a cup of coffee and relax before you head back to the kitchen to pop in the oven. Just like scones, once you’ve made a basic batter the flavor additions are endless. Play around, have fun.