This is my all-time favorite Fall or Winter pie. I know, I know that sounds like a heady claim, but it really is. This recipe alone is a reason to hoard cranberries. I implore you to make it. Everyone who tastes it agrees with me. The sweet tart notes along with the spices and the crunchy topping ticks all the boxes. The streusel is everything- do NOT skip that as it makes the pie. I totally forgot to snap a picture of the entire pie I was so amped to dive into it for Thanksgiving. This streusel is also my go to favorite crunchy topping- I also use it for my chai spice blueberry pie, but I leave out the walnuts for that one. Happy baking!
Preheat the oven to 350 F. In a food processor add in 1/2 amount of the cranberries and blitz a few times until coarsely chopped. Remove and place in a medium bowl. Add in the rest of the filling ingredients and stir to combine. Set aside. Place a single crust into a pie tin and crimp as desired. Brush the edge of the crust with heavy cream or egg wash. Fill the crust with the filling and prepare the streusel recipe as per below. Gently pile the streusel on top of the filling- it will look too much- but use it all as it will bake down and you definitely want to use it all. Bake on a sheet pan in the middle of the oven for 50-55 minutes or until the filling starts to bubble out through the top or sides slightly; cover the crust with a pie shield halfway through to prevent the crust edge from getting too dark. I also cover the entire pie about 40 minutes in with a sheet of tinfoil to prevent the streusel from getting too dark as well.
Streusel Recipe
3/4 flour
3/4 Cup granulated sugar
6 Tbsp unsalted butter, cubed
1/2 tsp salt
1/2 tsp ginger
3/4 Cup coarsely chopped walnuts
In a medium bowl place all the ingredients and combine with a pastry blender. Once the butter is the size of large peas, take your fingertips and scrunch the mixture to create larger clumps of streusel so you have some larger clumps shaped like pebbles.
Are you a pistachio fan? I love to eat them cold from the freezer.
Stay with me- I know it sounds a bit weird, but if you keep them in the freezer and when ready to snack on, remove a handful or two or three- they actually taste a bit sweeter. My brother-in-law who is Italian taught me that trick years ago. Besides the fact that if you are not using any type of nut right away, it is good practice to keep them in the freezer, so they do not go rancid. Mind you, a bag of pistachios in our house doesn’t last very long anyways. I made a pistachio – rose cake Birthday cake recently for a dear friend and I had some leftover pistachio buttercream so decided to whip up some pistachio macs. Some people will use ground pistachio as part of the almond flour in their recipes- and yes you can certainly do that, but it will take time to get them ground the right fineness that you need or if you buy the pistachio meal, it is not cheap. This was more a spur of the moment bake.
I like this version because with the pistachio paste made fresh gives the macs such great flavor once you fold it into Swiss meringue buttercream.
Alot of times when I’m making Swiss meringue buttercream, I will freeze leftover portions of it and pull it out to come to room temperature. I always try to have vanilla SMBC frozen so I can add any flavorings to it to make it into a certain desired flavor. In this case I stirred in 3 Tablespoons of my pistachio paste for each 2 cups of my vanilla Swiss meringue buttercream (SMBC is easier to type).
Macaron Shell Recipe:
124 g confectioners sugar
140 g almond flour
108 g fresh egg whites (I don’t age mine)
110 g granulated sugar
1/4 tsp. cream of tartar
mint green gel food coloring
In a food processor place the almond flour and confectioners sugar and run for 30 seconds. Stop and scrape down the sides so the mixture settles into the processor bowl. Repeat this 2 more times, then sift mixture through a strainer (it doesn’t have to be fine) over a large bowl (I use a 5 quart size stainless steel bowl). Preheat the oven to 300° F convection, 325° F for non convection setting. (If you want to try a different drying technique and/temperature see below about drying). Prepare two baking sheets with Silpat mats. I use these mats by Velesco (you can get 2 for 13 dollars on Amazon).
In the bowl of a stand mixer place the egg whites, sugar, and cream of tartar and whisk by hand to combine. Place over a ban marie and stir gently for about 5 minutes until the mixture reaches about 130 F or when you touch the mixture with your index and thumb fingers you don’t feel any sugar crystals. Remove from the heat and place on the stand mixer fitted with the whisk attachment and start the meringue by running mixer on power level 4 (Kitchen Aide) and run for about 3 minutes. Stop once to scrape the sides of the bowl to push down the mixture that appears on the sides.
Increase mixer then to power level 6 and run for 3 minutes.~ 3 minutes.
Stop mixer and with a bamboo skewer or toothpick add in a bit of mint green gel food color. You can add more color later during the end folding stage.
Increase mixer to power level high (10) and run until the meringue is stiff peaks and it has started leaving tracks in the meringue and a good portion has collected inside the whisk . A sign that meringue is ready is there will be a good amount collected within the whisk and if you turn the bowl upside down the meringue will not slip or move. If you stop the mixer and tap the whisk gently on the side of the mixer bowl it will look like a bird beak; the meringue is stiff but it has a slight hooked curve when holding the whisk horizontally. If the color does not appear to be mixer to your liking at this point I add in any color and mix gently by; being careful not to overmix.
Add one half of almond flour/sugar mix and start folding with a rubber spatula until mixture starts to look cohesive. Add in the remaining half and continue to gently fold, stopping occasionally to scrape the sides and bottom of the bowl as needed. After the almond/sugar mixture is all added, I do about 4 reps of where I smash the mixture against the walls of the bowl with either my spatula or bowl scraper, stopping after each time to test the “flow” of the batter.. The batter is perfect when you lift up the spatula and tip the pointed end of the spatula down and ribbons of batter fall smoothly back into the bowl. I like to gauge its ready when I can count 6-7 ribbons falling without breaking and I can “draw” a figure 8 with the batter when lifting the spatula and letting it fall into the bowl. Fill your pastry bag by using a heavy tall cup or mason jar to hold your pastry bag with the top folded over the glass. When preparing your bag after you drop in your round tip (I use Ateco 804), twist the bag right above the larger end of the tip and push it down into tip. Fold the top 4 inches of the bag over the jar or glass.
Let the batter fall right into the bottom of the bag and continue filling to ensure you don’t get air bubbles. When ready to pipe and all of the batter is in the bag, twist the top of the bag and when ready to pipe, push down with your dominant hand to force the bottom of the tip to open.
Pipe the batter onto prepared baking sheet with 30 macarons per sheet. Six across the long side, and five rows perpendicular. Take the sheet pan and let it drop onto the counter about 5-7 times, then look for any visible air bubbles and pop with a toothpick or bamboo skewer.
I bake the macarons one tray at a time in a preheated (convection oven ) for NON convection oven* you’ll want to play around and determine what the perfect temp for you is; generally it would be 20 degrees hotter than convection) for about 15 minutes or until the cookie does not wiggle when attempting to check by carefully grabbing both sides of a cookie and gently testing. Let the tray rest on a wire rack and then bake the second tray. Cool the cookies completely and pipe the buttercream between two cookies and sandwich together.
I recently started drying my macs in a different way using the technique known by “Sugarbean” on Youtube. She has a technique whereby she dries her macs in lower degree oven for 2-3 minutes with the door ajar and then she increases the temp and bakes at the higher temperature. After a few thousand trials #kiddingnotkidding I finally (for me) arrived at the perfect temp for my oven at a convection temp of 248° F for drying and then 293° F for baking and here is the process I use.
Drying macs w/ oven method: (known as the Sugar Bean method). She has videos on you tube if you search for her.
I preheat my oven to 248° degrees F before I have piped my macs. I place one tray in the oven and immediately turn off the oven, then open the oven and place something like an oven mitt or something to keep it ajar a couple inches. Then I immediately turn back on the oven at 248° F again, and time for 2-3 minutes. After 3 minutes I close the oven door and turn up the oven to 293° F. Once the oven temp comes up to 293° F, I then start timing my bake time for 15 minutes. After the bake time I open the door and check a macaron; if it’s super wiggly still I bake for another minute. If it barely wiggles or not at all, I turn off the oven and open the oven door ajar and time for another 2-3 minutes; “Sugar bean” calls this the “oven shower”. After the 3 minutes, I remove the tray and then let them cool over a wire rack. Now; since the second tray has already been drying at room temperature; I usually only oven dry for 2 minutes and repeat the bake as I did for the first tray.
*A word about oven temperatures: EVERY one’s oven is different and after painstaking doing several batches of macarons I determined that in MY oven 293 F convection setting is best for me. Check your oven temperature against a thermometer placed in the middle of your oven. Some people bake there’s at 285, 290, 310 etc. unfortunately it’s something that you have to play around with and determine what is best for you and your oven.
Have you ever made the Easy Buttercream from Sugar Geek? Here is the link for her recipe:
It uses pasteurized egg whites and confectioners sugar in the recipe and like the name says- is super easy. You could use that same recipe and factor in the ratio the same for stirring the 3 Tablespoons for every 2 cups of vanilla buttercream. Options- it’s always good to have options.
Pistachio Paste Recipe
1/2 Cup shelled unsalted & roasted pistachio nuts
6 Tbsp. sugar
1 1/2 Tbsp. water
1 Tbsp. pistachio, avocado oil, or vegetable oil (not same as the oil below which is a flavoring oil)
1. Prepare a sheet pan with either a Silpat or by lightly greasing with vegetable oil.
2. Pour the water in a saucepan and then add the sugar. With a clean finger mix the sugar and water until it looks like wet sand. Have a cup of water with a clean pastry brush placed in the cup. Bring the sugar to a boil stirring to dissolve the sugar. Once sugar dissolves-stop stirring. If sugar crystals form along the sides of the pan; use the wet pastry brush to let water drip down to dissolve the crystals. Continue to cook until the mixture comes to a light caramel color. Remove the pan from the heat and stir in the nuts. Return to the heat and cook until comes to a medium amber color. Working quickly- pour the nut mixture onto prepared pan and with a heat proof spatula do your best to flatten out nuts. Allow the nuts to cool until they become hard.
3. Once mixture is hard and completely cooled- use your hands to break apart any large clumps. Place the mixture in a food processor and pulse several times to initially break up the mixture. Proceed to process the mixture until it starts to form a thick paste. When the blade no longer seems to move add the oil and continue to process until as smooth as possible. Leftover should be stored in an airtight container in the refrigerator for up to one month or the freezer.
Pistachio Buttercream– first you have to prepare a Vanilla SWMC or “Easy Buttercream”.
Stir in 3 tablespoons of prepared fresh pistachio paste for every 2 cups of either “Easy buttercream” or my recipe for vanilla Swiss Meringue Buttercream (SWMC). I also like to add in a drop or two to taste of Lorann’s pistachio concentrated flavor oil if I have it on hand. See picture reference below.
Vanilla SMBC Recipe
3 large egg whites
3/4 Cup sugar
Pinch of salt
2 sticks unsalted butter, room temp
3/4 tsp. vanilla
In the bowl of a stand mixer combine the eggs whites and sugar, and pinch of salt and place over a pot with simmering water. Whisk the egg whites and sugar and heat until the sugar has dissolved, and the mixture is about 160 degrees F on an instant read thermometer* (*alternatively- you can feel the mixture with your first two fingers and ifyou don’t feel any sugar granules then it is ok). Turn off the heat. Attach the mixer bowl onto the mixer with the whisk attachment and whisk the mixture on medium until the bottom of the bowl is almost cool to the touch and the mixture has turned into a nice stiff meringue. This will take several minutes. With the mixer on medium high, add the softened butter one tablespoon at a time and continue to mix until all the butter is incorporated, and the mixture is smooth. It will go through a curdled looking stage as it mixes; but don’t worry keep adding the butter and it will come together. Add in the vanilla and mix to combine.
[Tip to scale up or down a recipe of Vanilla SMBC] (now, this is MY ratio recipe, if you like to use less butter, or you’ve seen recipes that are different- then so be it-please don’t write me saying its wrong or whatever; don’t come at me. You do you boo).
For every one large egg white– I use 1/4 Cup of granulated sugar. If I’m using 4 egg whites, then from there I know how much sugar to use and how much butter. For instance: if using a recipe with 4 egg whites, I’ll use 1 Cup of sugar, pinch of salt, and 3 sticks of butter, and 1 tsp. of vanilla. Note- I just make the pinch of salt a bit bigger- it’s not really crucial to measure it, just use a bigger pinch etc. if using 5 egg whites or 6 whites. I only buy unsalted butter and bake with unsalted butter.
5 egg whites would be 1 1/4 Cup granulated sugar, pinch of salt, and 4 sticks of butter. The process is always the same as far as technique. This way you can increase the amount of SMBC and adjust the addition of vanilla based on whether you’re going to be adding in other flavorings. I typically will use 1 tsp. of vanilla for every 4-egg white portion of SMBC, I’ll typically go by taste when it comes to the vanilla- once I make it, I’ll take a small tase with a spoon and decide if I want to add more. For a 5-egg white SMBC I might go with 1 1/4 tsp. of vanilla. It’s simply a matter of taste.
6 egg whites would be 1 1/2 Cups granulated sugar, pinch of salt, and 5 sticks of butter. Vanilla per taste.
3 egg whites would be 3/4 Cups granulated sugar, pinch of salt, and 2 sticks of butter. Vanilla per taste.
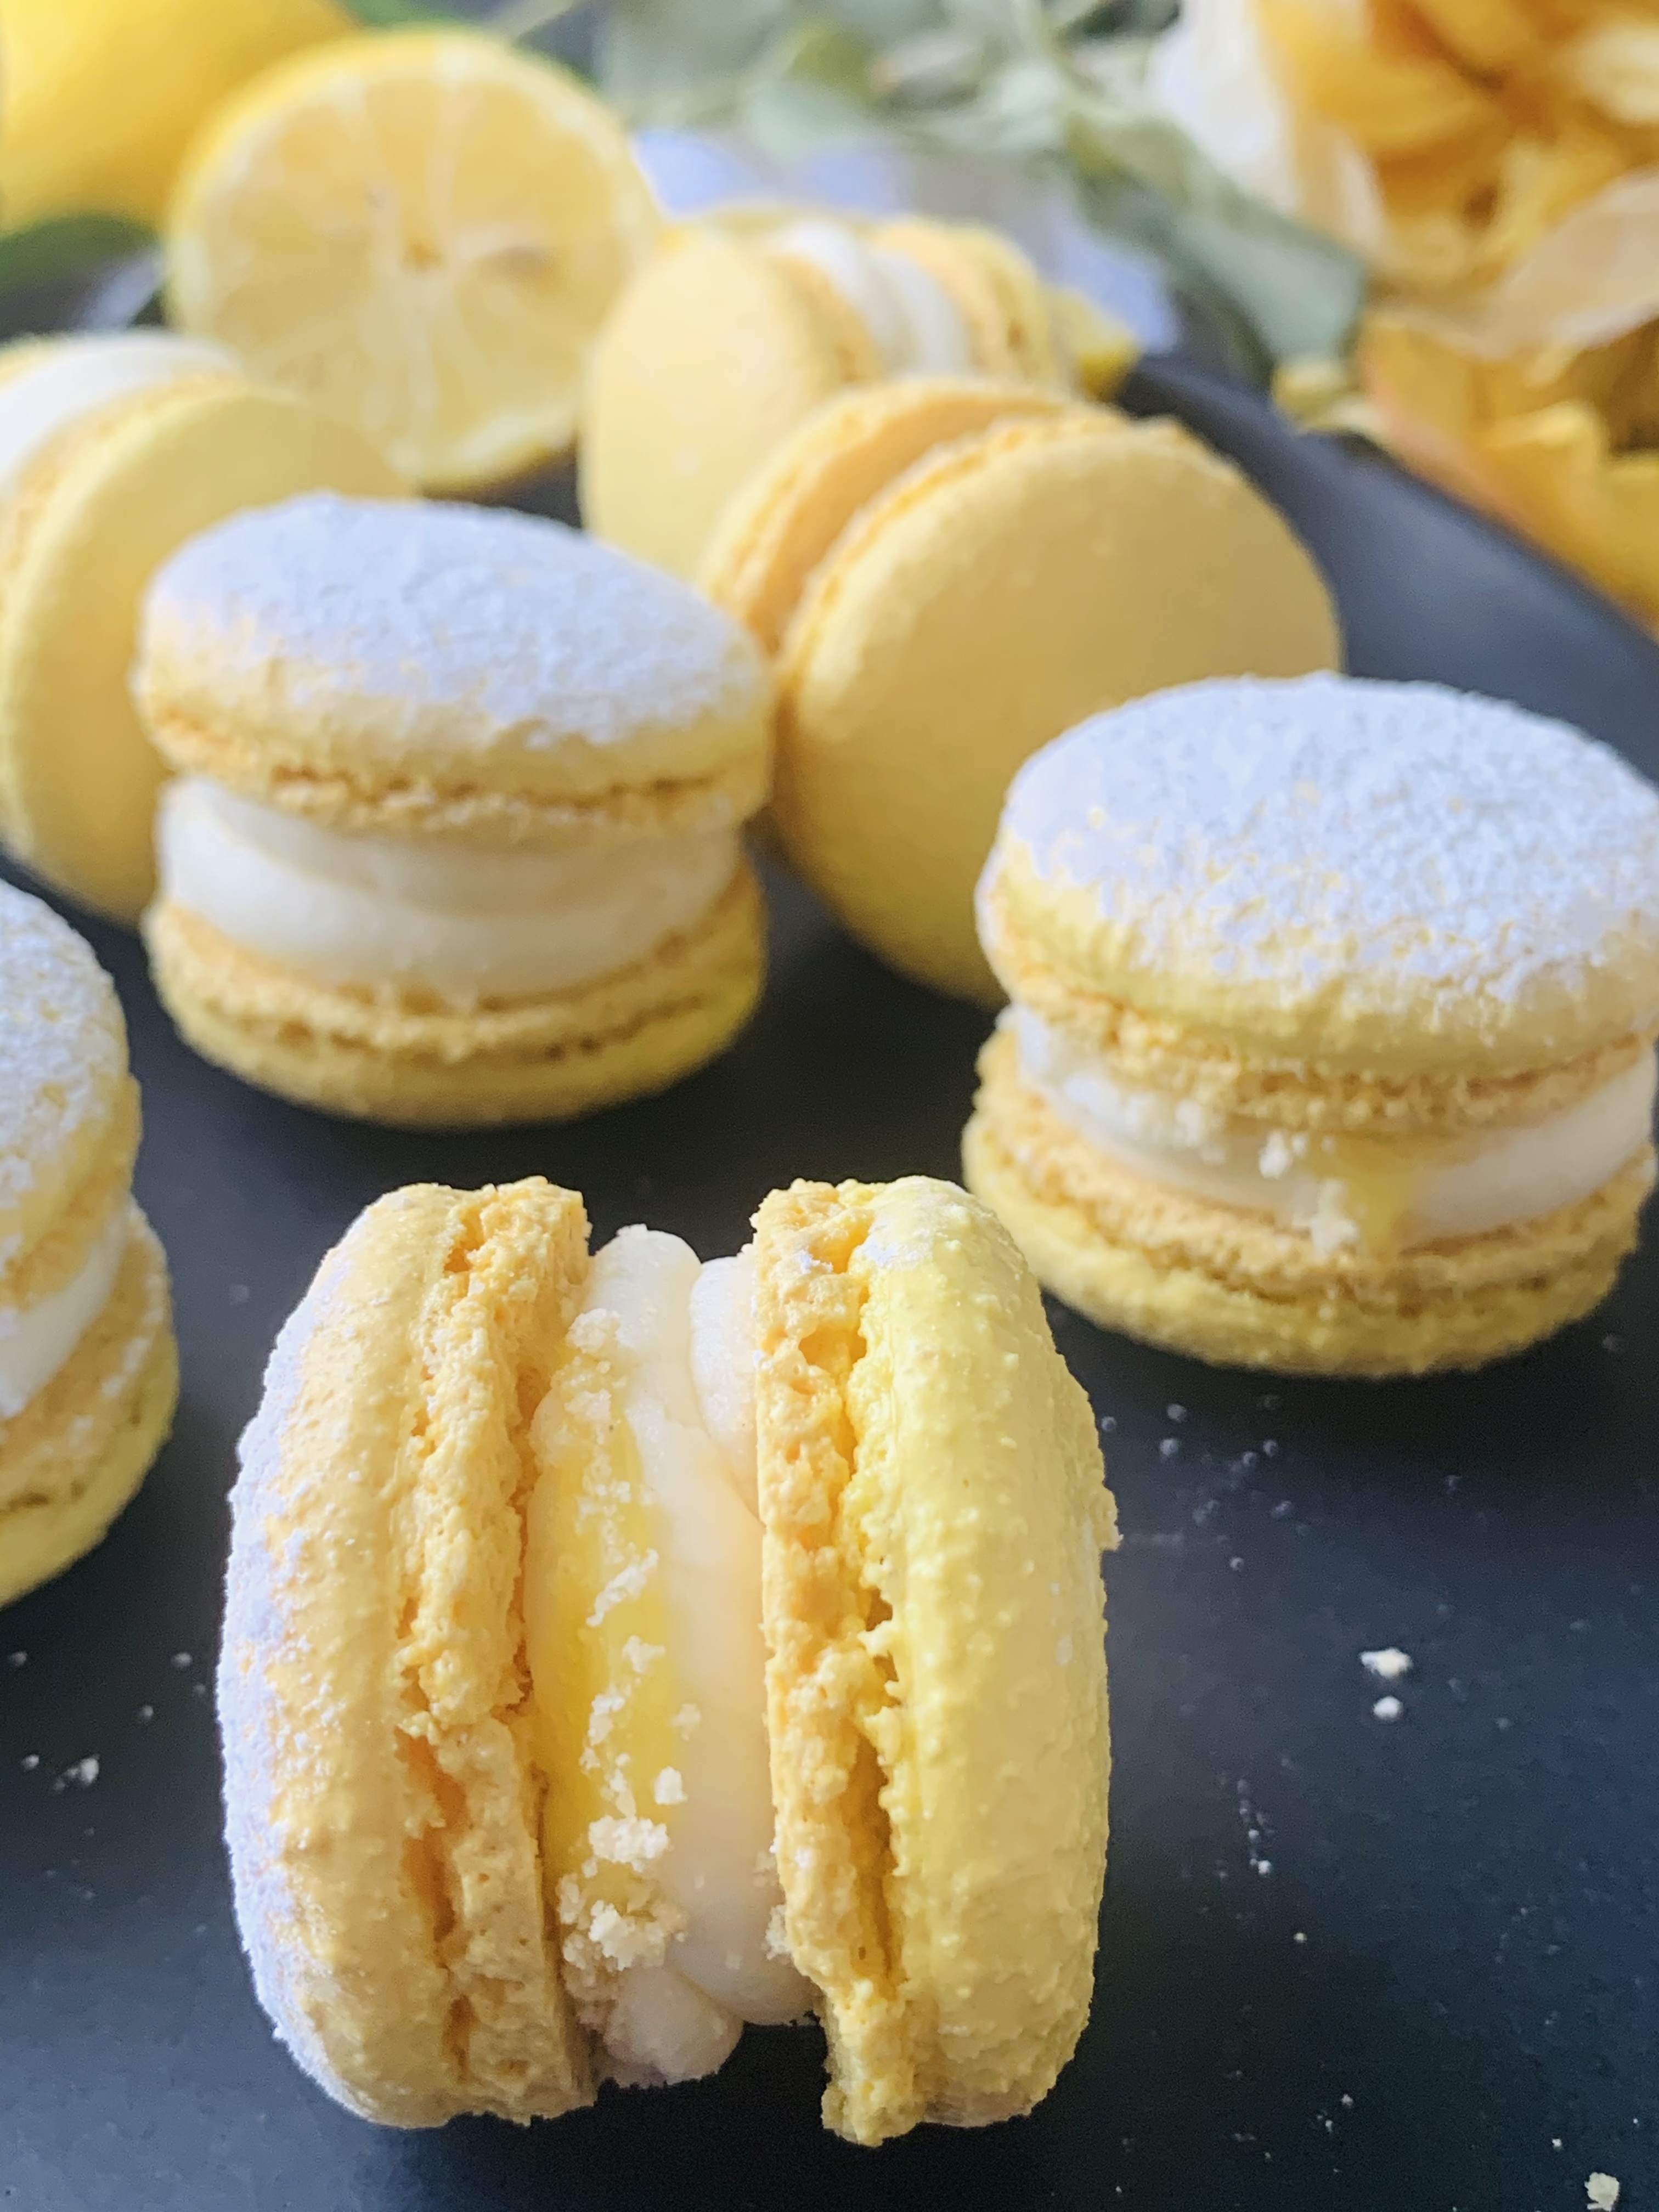
It’s lemon season here in Arizona and my ginormous lemon tree is busting with lemons. It’s one of my favorite times of year as I not only cook with lemons, but bake all sorts of lemon desserts. I married both of my two favorite desserts; the macaron and a lemon bar. These might be my new favorite macaron!
Lemon Bar Macarons
yield: ~ 30 or more assembled macarons (depending on piped size of shells)
Macaron Shells:
140 gm Almond flour (I like Wellbee’s super fine blanched brand)*
124 gm confectioners sugar
107 gm egg whites, room temperature
110 gm granulated sugar
1/4 tsp. cream of tartar
Lemon yellow gel food paste add to desired color
In a food processor place the almond flour and confectioners sugar and run for 30 seconds. Stop and scrape down the sides so the mixture settles into the processor bowl. Repeat this 2 more times, then sift mixture through a strainer (it doesn’t have to be fine) over a large bowl (I use a 5 quart size stainless steel bowl). Preheat the oven to 300° F convection, 325° F for non convection setting.
In the bowl of a stand mixer place the egg whites and cream of tartar and whisk by hand (using the mixer whisk) until foamy for about 30 seconds. Prepare two baking sheets with either parchment paper or Silpat liners.
Set the mixer bowl fitted with the whisk attachment assembled to the mixer, and start the meringue by running mixer on power level 4 (Kitchen Aide) and start gradually adding in the granulated sugar- run/whisk for 2minutes once all the sugar is in. Stop once to scrape the sides of the bowl to push down any sugar that appears on the sides.
Increase mixer then to power level 6 and run for 3 minutes.
Increase mixer to power level 8 and run for 3 minutes.
Stop mixer and with a bamboo skewer or toothpick add in your gel color.
Increase mixer to power level high (10) and run for 1 minute or until meringue is stiff peaks. A sign that meringue is ready is there will be a good amount collected within the whisk and if you turn the bowl upside down the meringue will not slip or move. If the color does not appear to be mixer to your liking at this point I add in any color and mix gently by hand; being careful not to overmix.
Add one half of the meringue to the almond flour/sugar mix and start folding with a rubber spatula until mixture starts to look cohesive. Add in the remaining half of meringue and continue to gently fold, stopping occasionally to scrape the sides and bottom of the bowl as needed. The batter is perfect when you lift up the spatula and tip the pointed end of the spatula down and ribbons of batter fall smoothly back into the bowl. I like to gauge its ready when I can count 7 ribbons falling without breaking and I can “draw” a figure 8 with the batter when lifting the spatula and letting it fall into the bowl.
Prepare your pastry bag fitted with an Ateco 804 tip or a Wilton number 12 tip.
Pipe the batter onto prepared baking sheet with 30 macarons per sheet. Six across the long side, and five rows perpendicular. Take the sheet pan and rap against the counter for 13 times. Repeat x 2 more times of 13, then look for any visible air bubbles and pop with a toothpick or bamboo skewer. Allow the macarons to rest for 10-30 minutes, then bake in a preheated (convection oven if you have at300° F , 325° F for NON convection oven*) for about 16-18 minutes or until the cookie does not wiggle when attempting to check by carefully grabbing both sides of a cookie and gently testing.
Let the tray rest on a wire rack and then bake the second tray.
Cool the cookies completely before removing from the tray. Pair up the same size cookies to fill as per assembly instructions below.
Lemon Curd(yield ~ 1 Cup)
1/2 Cup fresh lemon juice, strained (114 g)
zest of one large lemon
1/2 Cup granulated sugar (85 g)
3 egg yolks
1/8 tsp. salt
1 Tbsp. cornstarch
1/4 Cup unsalted butter (57 g) room temp, but not too soft.
In a bowl, place the egg yolks, cornstarch and salt and whisk vigorously to combine until smooth. Set aside.
In a saucepan place the lemon juice, lemon zest and sugar. Over medium heat whisk continuously and cook until you reach a simmer. Remove about 1/2 cup of the mixture and slowly whisk into the egg yolk mixture to temper the mixture. Add the mixture from the bowl back to the rest of the lemon mixture in the saucepan to combine. Whisk constantly and cook over medium heat until thickened and you see at least one large bubble burst open in the middle of the pan. I cook mine for a few minutes after I see the first large bubble. Remove from heat and strain into a bowl and stir in the butter. Cover directly with plastic wrap and cool in the fridge until thickened. Ideally its best to do the day before or several hours prior to allow proper thickening.
Vanilla Buttercream :
3 egg whites
3/4 Cup granulated sugar
2 sticks unsalted butter
1 tsp. vanilla bean paste
In the bowl of a stand mixer combine egg whites and sugar. Set over a saucepan of simmering water and whisk until mixture is hot and sugar is dissolved. Remove bowl and place on mixer and beat until stiff meringue forms and bottom of mixer bowl is cool to touch; about 5 minutes. Add softened butter one tablespoon at a time until all is incorporated. Add the vanilla bean paste, then beat until smooth.
To assemble: pipe a double ring of the vanilla buttercream on one half of a macaron shell, then pipe in a dollop of the lemon curd. Sprinkle on (optional) some crumbled up shortbread crumbs (I used Walkers brand), then top with a macaron shell. Dust the final assembled macaron with confectioners sugar. Let the assembled macarons ‘cure’ in the fridge until softened; about 3 days.
I love this time of year when my lemon tree is just bursting with fresh lemons. I have always loved any kind of lemon dessert. As a kid growing up my Mom would always let us kids choose our kind of birthday cake and I always chose white cake with lemon filling. I still this day will choose a lemon dessert off a menu given a choice over chocolate. what can I say, I am just a lemon lover.
If you’re a lemon lover like me, you will adore this pie.
Crust
2 1/4 Cups finely processed cookie crumbs; see note
(You can choose graham cracker crumbs, or if you can find a crisp lemon cookie; I used this option for an additional lemon flavor) I found a Kroger store brand lemon crisp cookie that was really tasty. The key is, you want to make sure the cookie crumbs are from a crisp cookie. You could also use lemon flavor Oreo cookies (discard the filling when processing).
one lemon zested finely.
6 Tbsp. unsalted butter, melted.
2-3 Tbsp. granulated sugar (depending on how sweet your cookies are)
Process the cookie crumbs in a food processor until finely ground. In a bowl stir the crumbs, lemon zest, melted butter and sugar until combined. Press firmly into a 9-inch-deep dish pie plate, up the sides and bottom until even. Do not press onto the rim of the pie plate. Bake in a preheated oven for 6-8 minutes or until the crust appears matte. Allow the crust to cool while you make the filling. Note; you can make the crust the day before and bake if you prefer.
+ 1 Cup for optional garnish for top of pie if desired
optional: for garnish; Sanding sugar, candied lemon peel, or lemon zest
In a saucepan whisk 1/3 cup of sugar along with the powdered gelatin.
In a bowl with a fork whisk the 4 egg yolks, lemon zest, lemon juice, and salt to combine.
Stir the egg yolk mixture into the saucepan, and on medium heat, cook the mixture while stirring constantly until mixture thickens and you get the sign of the first large bubble come to the surface in the middle of the pan. Immediately remove from the heat and pour into a bowl and place the fridge to chill until cooled; about 20 minutes. Every 5 minutes or so, go into the bowl and stir the contents to help it chill.
Pour the heavy whipping cream into a very cold bowl and whip using the whisk attachment until stiff peaks. Gently fold into the chilled lemon/yolk mixture.
In a squeaky-clean bowl place the 4 egg whites and using a clean whisk attachment , whip by adding in gradually the 1/3 remaining granulated sugar until stiff peaks. Fold this into the lemon/cream mixture until combined; being careful to fold gently.
Tip the lemon mousse mixture into the prepared pie shell, and smooth out the top. Set in the fridge and allow to become set while chilling for about 3-4 hours.
Decorate with stabilized whipped cream as desired, and top with sanding sugar, lemon zest etc. as desired.
Stabilized sweetened whipped cream
In a chilled bowl place 1 1/4 Cup of heavy whipping cream, 2 Tablespoons of confectioners sugar, and 1 Tablespoon of dried non-fat milk powder. Whisk to combine, then using either a hand mixer or a stand mixer whip until stiff peaks. Place in a piping bag with a tip of your choice; here I used a open star tip. Pipe a border of the whipped cream as desired. Sprinkle with sanding sugar, or lemon zest, or garnish with fresh thinly sliced lemons if you wish. I personally love the texture of the sanding sugar on the whipped cream.
You’ll never know the importance of Lunar New Year unless you are Asian or married to one. Mine is obviously the second reason. It’s amazing though how accurate Chinese astrology animals match up with personality traits. I’m a rabbit and I can say that it does line up with the character of my spirit. My son; who is a Dragon is truly a Dragon. We could wax on about this for a while, but the New Year is all about being with family, friends and eating. Lots of eating. Lots of relaxing, and did I mention lots of eating? It involves a lot of traditions as well depending on your family and what your Asian family holds in making certain foods. I lived in Taiwan back in 2012 so I have experienced the culture first hand, and fortune cookies while are an American thing; sweets still encompass Lunar New Year such as almond cookies, pineapple tarts, and sticky rice cake. See my recipes for my almond cookies and pineapple tarts.
When I saw this recipe posted by https://cooktildelicious.com/brown-butter-fortune-cookies/us on I think it was Instagram? can’t remember, but I thought is was so adorable with the markings from the waffle maker I had to try it. I decided to mix some matcha powder into some of the batter, since I love matcha anything. I also did a mix of the regular batter swirled in with a tiny bit of the matcha more for color than flavor to mix it up a bit.
Brown Butter Fortune Cookies (and a Green Tea Version)
In a small saucepan heat the butter over medium heat until it turns medium light brown and toasty, while continuously stirring gently with a heat proof spatula. Remove from the heat and add the water. Set aside to cool.
In a medium bowl place the egg whites and the sugar and salt and whisk until frothy. Stir in the vanilla. Whisk in the cooled browned butter. Whisk in the flour gently until combined.
Green Tea Matcha version
Remove 1/2 cup of the prepared batter and stir in 1 tsp. matcha powder until combined.
To make with a waffle cone maker- heat up the make for a few minutes, once ready place 1 level tablespoon of batter in the middle of the iron, close the lid and bake for about 60 seconds or until golden brown. Remove with an offset spatula and place the fortune in the top 1/3 of the cookie. Match up the bottom to the top by folding the bottom to meet the top and then grasp by the edges and on the folded side bend over an edge of a baking pan and place in a container to hold it’s shape until cool; such as an empty egg carton.
Notes: I made my fortune messages with 3 inch long strips of paper and about 1/2 inch wide. You can hand write your fortunes or on a computer if you use about a 12 size font that seemed to work well.
To bake in an oven. Preheat the oven to 350 degrees F. Line a baking sheet with a Silpat baking mat. Place a tablespoon of batter on the mat about 4-5 in in diameter. Bake until golden about 9-11 minutes. Slide an offset spatula under the cookie, then immediately shape. I’ve linked her video here from her blog so you can see how to shape the cookies.
I’ve been absent fora bit, due to my computer died several weeks ago, and with several projects going on in the house, a bit of a bathroom renovation (I got a new walk in whirlpool tub- as I am physically disabled) and it was an insurance battle to get that done. (Thank you Jesus). My son recently coming home from the Army, along with the usual Holiday madness, we’ve been quite busy in the house. I’m just now getting a new computer, and I’m revamping some things on my blog, so due to the Holidays and all, I’m reposting a few of my several favorite recipes. You’ll notice some oldies but goodies reappearing to the top of the blog page. I’m still trying to navigate the rearranging of things. I changed the theme on my blog, so things are still in a bit of transition. I hope everyone had a great Holiday. Although lazy on the blog, I’ve been cooking and baking up a storm. I’ve meant to post my sourdough starter for over a few years now, and decided it was time to post it soon. It will be coming soon, as I think this is a good time for it to make an appearance, so look for that to happen hopefully this week.
Blessings, Peace, and Love for 2023. And of course, Happy Baking…