
I confess-I still had leftover Halloween candy, I was going to wait and save it for next year but decided to crumble them and put them to use in a buttercream to try a new macaron flavor. Have you ever wondered why the Butterfinger candy bar has that weird orange color? or is it just me.
I have been recently tweaking my macaron recipe as well to try and combat hollow macaron shells and I was so overjoyed that this batch came out perfect. Nice feet with no hollows. I know you all are probably tired of another macaron recipe, but bear with me as I recently purchased some macaron Silpat mats and I had to try them out. For the record, I did not age my egg whites either-I have to admit, I’ve tried it several times with and without and for me personally I don’t see a difference in aging. I even baked my first batch with only resting them 10 minutes and they still came out perfect.

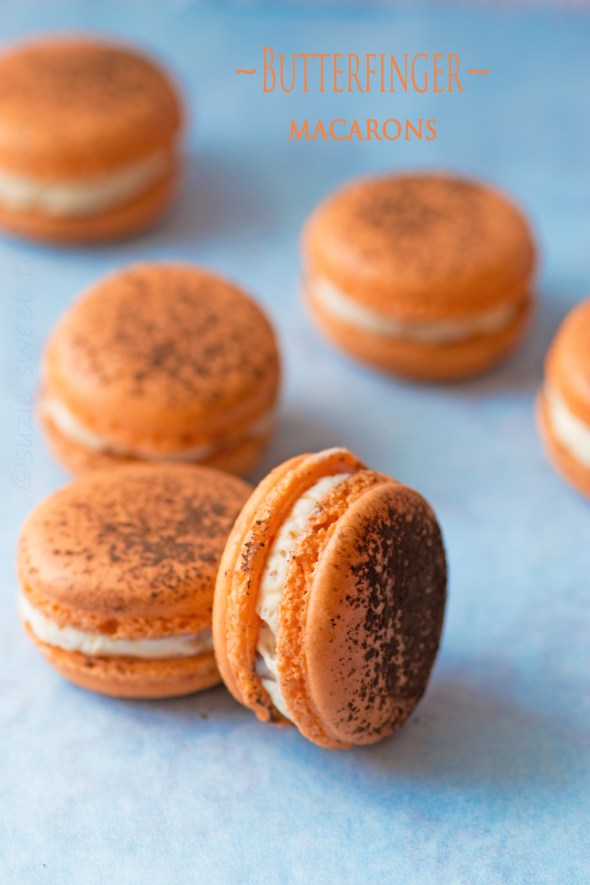
Butterfinger Macarons
yield: ~ 30 or more assembled macarons (depending on piped size of shells)
140 gm Almond flour (I like Wellbee’s super fine blanched brand)*
124 gm confectioners sugar
107 gm egg whites, room temperature
110 gm granulated sugar
1/4 tsp. cream of tartar
orange gel/paste food color
brown gel/paste food color
unsweetened cocoa powder for dusting
(*try to find the best almond flour that is fine or superfine and blanched, or pale in color). I use “Wellbee’s superfine blanched almond flour” which I buy in 5 pound bags from Amazon. It’s cheaper as you go up in quantity.


- In a food processor place the almond flour and confectioners sugar and run for 30 seconds. Stop and scrape down the sides so the mixture settles into the processor bowl. Repeat this 2 more times, then sift mixture through a strainer (it doesn’t have to be fine) over a large bowl (I use a 5 quart size stainless steel bowl). Preheat the oven to 300° F convection, 325° F for non convection setting.
- In the bowl of a stand mixer place the egg whites and cream of tartar and whisk by hand (using the mixer whisk) until foamy for about 30 seconds. Prepare two baking sheets with either parchment paper or Silpat liners. I recently purchased new macaron mats by Velesco from Amazon and I love them! You get 2 mats for 15 dollars.
- Set the mixer bowl fitted with the whisk attachment assembled to the mixer, and start the meringue by running mixer on power level 4 (Kitchen Aide) and start gradually adding in the granulated sugar- run/whisk for 2 minutes once all the sugar is in. Stop once to scrape the sides of the bowl to push down any sugar that appears on the sides.
- Increase mixer then to power level 6 and run for 3 minutes.
- Increase mixer to power level 8 and run for 3 minutes.
- Stop mixer and with a bamboo skewer or toothpick add in your gel colors. About 3-4 parts orange to one part brown.
- Increase mixer to power level high (10) and run for 1 minute or until meringue is stiff peaks. A sign that meringue is ready is there will be a good amount collected within the whisk and if you turn the bowl upside down the meringue will not slip or move. If the color does not appear to be mixer to your liking at this point I add in any color and mix gently by hand; being careful not to overmix.
Add one half of the meringue to the almond flour/sugar mix and start folding with a rubber spatula until mixture starts to look cohesive. Add in the remaining half of meringue and continue to gently fold, stopping occasionally to scrape the sides and bottom of the bowl as needed. The batter is perfect when you lift up the spatula and tip the pointed end of the spatula down and ribbons of batter fall smoothly back into the bowl. I like to gauge its ready when I can count 7 ribbons falling without breaking and I can “draw” a figure 8 with the batter when lifting the spatula and letting it fall into the bowl.
Fill your pastry bag by using a heavy tall cup or mason jar to hold your pastry bag with the top folded over the glass. When preparing your bag after you drop in your round tip (I use Ateco 804), twist the bag right above the larger end of the tip and push it down into tip. Fold the top 4 inches of the bag over the jar or glass. See pictures.


Let the batter fall right into the bottom of the bag and continue filling to ensure you don’t get air bubbles. When ready to pipe and all of the batter is in the bag, twist the top of the bag and when ready to pipe, push down with your dominant hand to force the bottom of the tip to open.
Pipe the batter onto prepared baking sheet with 30 macarons per sheet. Six across the long side, and five rows perpendicular. Sift a light dusting of cocoa powder over each piped macaron round. Take the sheet pan and wrap against the counter for 13 times. Repeat x 2 more times of 13, then look for any visible air bubbles and pop with a toothpick or bamboo skewer. Allow the macarons to rest for 10-30 minutes, then bake in a preheated (convection oven if you have at 300° F , 325° F for NON convection oven*) for about 16-18 minutes or until the cookie does not wiggle when attempting to check by carefully grabbing both sides of a cookie and gently testing.
Let the tray rest on a wire rack and then bake the second tray.
Cool the cookies completely and pipe the Butterfinger buttercream between two cookies and sandwich together.
*A word about oven temperatures: EVERY one’s oven is different and after painstaking doing several batches of macarons I determined that in MY oven 300 F convection setting is best for me. Check your oven temperature against a thermometer placed in the middle of your oven. Some people bake there’s at 285, 290, 310 etc. unfortunately it’s something that you have to play around with and determine what is best for you and your oven.
Butterfinger Buttercream
3 egg whites
3/4 Cup granulated sugar
2 sticks unsalted butter
1/2 tsp. vanilla
3 “fun size” Butterfinger bars, crushed
In the bowl of a stand mixer combine egg whites and sugar. Set over a saucepan of simmering water and whisk until mixture is hot and sugar is dissolved. Remove bowl and place on mixer and beat until stiff meringue forms and bottom of mixer bowl is cool to touch; about 5 minutes. Add softened butter one tablespoon at a time until all is incorporated. Add the vanilla, then beat until smooth. Fold in the crushed pieces of the Butterfinger. Note: you can make the buttercream a day or two ahead and keep chilled in the fridge-through the steps minus the crushed candy. When ready, let the filling come to room temperature and re whisk in the mixer until smooth and then fold in the crushed candy.
